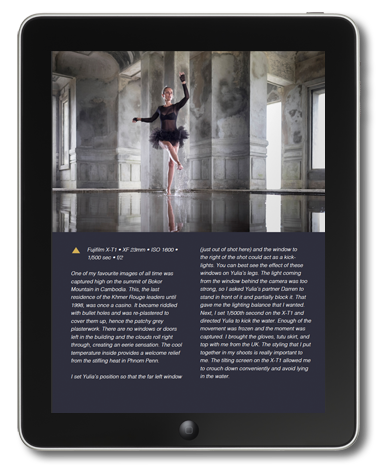
If you're a regular reader of this blog, you know that I think that Luminar by Skylum Software is one of the most interesting new developments in terms of photographic software. There are several reasons for this:
Luminar is affordable;
It exists in a Windows and a Mac version
It can be run by itself as a Lightroom alternative (Luminar 3) but also as a plug-in (Luminar Flex);
It is relatively simple to use:
It makes intensive use of AI (Artificial Intelligence) to automatically and quickly speed up complex image retouching jobs.
Skylum is currently working on Luminar 4, that is expected somewhere this fall. Every once in a while, they give a sneak peak of the new features that will be in that version 4 and this week, they teased a fantastic new tool for portrait photographers. I was lucky enough to be asked to make a video about this tool for Skylum that will be on Skylum’s YouTube channel later this year but as a reader of this blog, you can already watch it here. But first, let me tell you some more about the new philosophy for Luminar 4.
Luminar 4 ss the future for both Luminar 3 and Luminar Flex
An important new development is that Luminar 4 will be the upgrade for both Luminar 3 as well as for Luminar Flex. Luminar 3 and Flex will kind of melt into Luminar 4. During the installation procedure of Luminar 4, you will be able to choose whether you want to use the application as a stand-alone piece of software, as a plug-in, or as both. Personally, I think it is a good thing because now, Skylum can focus on this one product instead of having to update to different yet very similar pieces of software. This also means that if you want to use Luminar as a standalone and as a plug-in in the future, you’ll only need one license.
AI Sky Replacement: the first new dazzling feature of Luminar 4
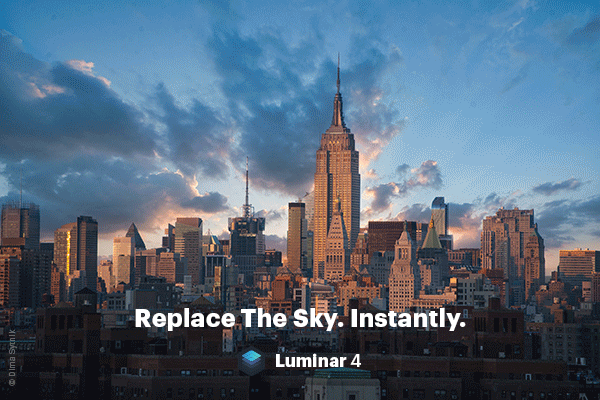
Luminar 4 will contain a lot of smaller and bigger new features. One feature that will definitely interest landscape photographers, is the AI Sky Replacement filter. This lets you swap out a boring sky in a landscape or a cityscape for a more interesting one without having to make tedious selections. It all happens automatically. Luminar 4 even makes sure that the perspective matches and that where necessary, the foreground is color graded to match the new sky, for example when you put us warm sunset sky into an image that was shot earlier in the day. As you can see from these animated gifs, the tool works surprisingly well and of course there are sliders for more advanced tweaks should you need them.

AI Structure: the second new feature of Luminar 4
Everybody loves Clarity, Structure and Texture. Lightroom just recently added a new Texture slider and Luminar also has a number of sliders to emphasize details in your images. Yet, up until recently, you always have to use a mask to make sure that all that extra structure and detail didn't add 10 or 20 years to your model. With AI Structure, this happens automatically this tool recognizes things like faces and skies and can give different areas in an image each their own (or none at all) dose of extra structure.

AI Skin Enhancer en AI Portrait Enhancer: the third main new feature of Luminar 4
The previous two tools were mainly interesting for landscape photographers, but this tool will be right up your alley if you are a portrait photographer. AI Skin Enhancer can't automatically recognize faces and can soften the skin in those faces while retaining texture. I was pretty sceptical myself but I think the result is nothing short of amazing. I know photographers that would happily pay the price of Luminar 4 only for this feature. Even more so, the only direct alternative that I know is a plug-in called Imagenomic Portraiture and although that plug-in is really good, it costs more than double then all the tools in Luminar 4 combined and it's not as flexible or automated.
In the video below, I show you these two new portrait tools in more detail.
What if you want to buy Luminar 4 or you want to upgrade to Luminar 4?
If this blog posts as aroused your interest for Luminar 4, there are a couple of options, depending on the scenario…
You want to start using Luminar already now as a standalone application
You can now buy a special, discounted ‘Early Bird’ bundle of Luminar 3 + Luminar 4: you can already start using Luminar 3 now and as soon as Luminar 4 is released, you can start using that. Luminar 4 will automatically upgrade your Luminar 3 catalogue. On this bundle, discount code MORETHANWORDS will knock another $10 off of the prize and you can also receive a number of bonus Luminar presets. The regular price for this bundle is $99. With the code you only pay $89.Click here to go directly to the sales page for this bundle on the Skylum website. The bundle you’re looking for is the most right-hand one of the two.
You want to start using Luminar already now as a plug-in
You can now buy a special, discounted ‘Early Bird’ bundle of Luminar Flex + Luminar 4: you can already start using Luminar Flex now and as soon as Luminar 4 is released, you can start using that. On this bundle, discount code MORETHANWORDS will knock another $10 off of the prize and you can also receive a number of bonus Luminar presets. The regular price for this bundle is $99. With the code you only pay $89.Click here to go directly to the sales page for this bundle on the Skylum website. The bundle you’re looking for is the most right-hand one of the three.
You're okay with waiting until Luminar 4 is officially released, but you want to get it at the best possible price
In that case, you can pre-order Luminar 4 right now via this link for $69. Choose the leftmost option of the two. The price will increase soon (although I don't know when exactly) but by pre-ordering, you are sure to lock in the current price and you get a number of bonus presets for Luminar on top of the deal. In any case, you have a 30 day money back guarantee that only starts when the software is actually out.You're already a Luminar 3 customer and you want to upgrade to Luminar 4.
In that case, you can pre-order your upgrade for $59 via this link and you’ll receive a bonus presets pack valued at $49. Until Luminar 4 actually comes out, you can simply continue to use your existing version of Luminar 3.You're already a Luminar 3 customer and you want to upgrade to Luminar 4.
In that case, you can pre-order your upgrade for $59 via this link and you’ll receive a bonus presets pack valued at $49. Until Luminar 4 actually comes out, you can simply continue to use your existing version of Luminar Flex.
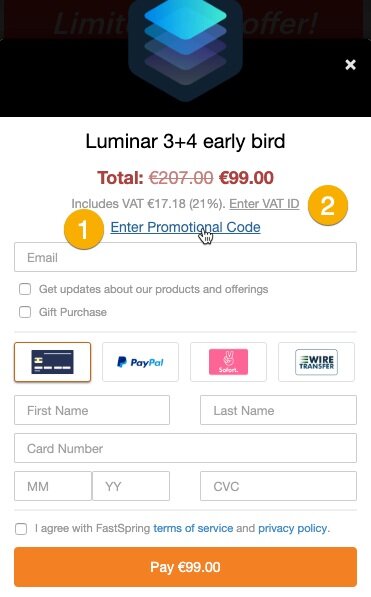
How do you enter your discount code in 1) and 2)
To claim your discount code MORETHANWORDS, in the checkout window, you click on Enter a Promotional Code (1). If you have a VAT number, you can even enter that and VAT will be excluded from the price. For that, click on (2) Enter VAT ID.
DISCLAIMER: The above links are affiliate links: when you use these, MoreThanWords receives a commission. This commission is entirely paid for by the software manufacturer. So you do not pay extra. On the contrary, in some cases, you can use a special discount code that lets you pay even less than if you would buy directly from the software manufacturer. Commissions like these allow me to continue adding free contents tutorials and reviews on this blog.