Reviews

Honoured, humbled, frightened and excited: 2 months with the X-Pro 2

When a while back, Fujifilm offered me the opportunity to test a pre-production sample of the upcoming X-Pro 2, I felt honoured, humbled, frightened and excited all at the same time.

Honoured, because I was one of a limited number of photographers worldwide to receive an early sample. Humbled, because the list of the others included big name photographers that I regard very highly, such as Damien Lovegrove, David Hobby and Zack Arias, to name but a few. Compared to these guys, I'm just a grown-up kid with too many cameras, too many lenses and waaaay to many flashes. I felt like taking a shower with the highschool football team. When I had just been out in the freezing cold...

You know the old joke ‘How many photographers does it take to change a light bulb?

Frightened because I had a tight deadline to give Fujifilm four images, preferably from different shoots. Four images that would be looked at, pixel-peeped, scrutinized by the whole world. Four images of which Fujifilm would choose one to display during the Fujifilm X Series Five Year Anniversary Exhibition in Tokyo. You know how photographers can be ruthless for each other’s work. I couldn’t help but think of the old joke: "How many photographers does it take to change a light bulb?" The answer is: "Eleven: one to actually fix the bulb and ten to comment afterwards about how that one guy could have done it better."

Charleroi, one of Belgium's old industrial cities. I scouted this cool location without ever leaving my house, thanks to Google Maps and Google Street View. The actual hike up the hill made me appreciate a lightweight camera system like the X-Series…

Charleroi, one of Belgium's old industrial cities. I scouted this cool location without ever leaving my house, thanks to Google Maps and Google Street View. The actual hike up the hill made me appreciate a lightweight camera system like the X-Series even more. Hills definitely look lower from Google Earth than they do when you're standing in front of them! My original plan was to do a Long Exposure here, but the wind was so strong I could not keep the camera steady enough.

Excited

But I also felt excited: I had been slaving away at my new Lightroom book for months (the Dutch version is available now and the English version is in layout) and I hadn’t really been photographing a lot. This opportunity and the deadline it included gave me a much needed kick in the butt. So I rustled up some models, fired up Google Maps and Google Street View to scout some cool locations, charged the battery of my Jinbei flash, dusted off my Formatt Hitech ND’s and my B+W Vari ND's (Dutch link, English link) and planned a couple of shoots.

Shooting JPEG (and actually liking it)

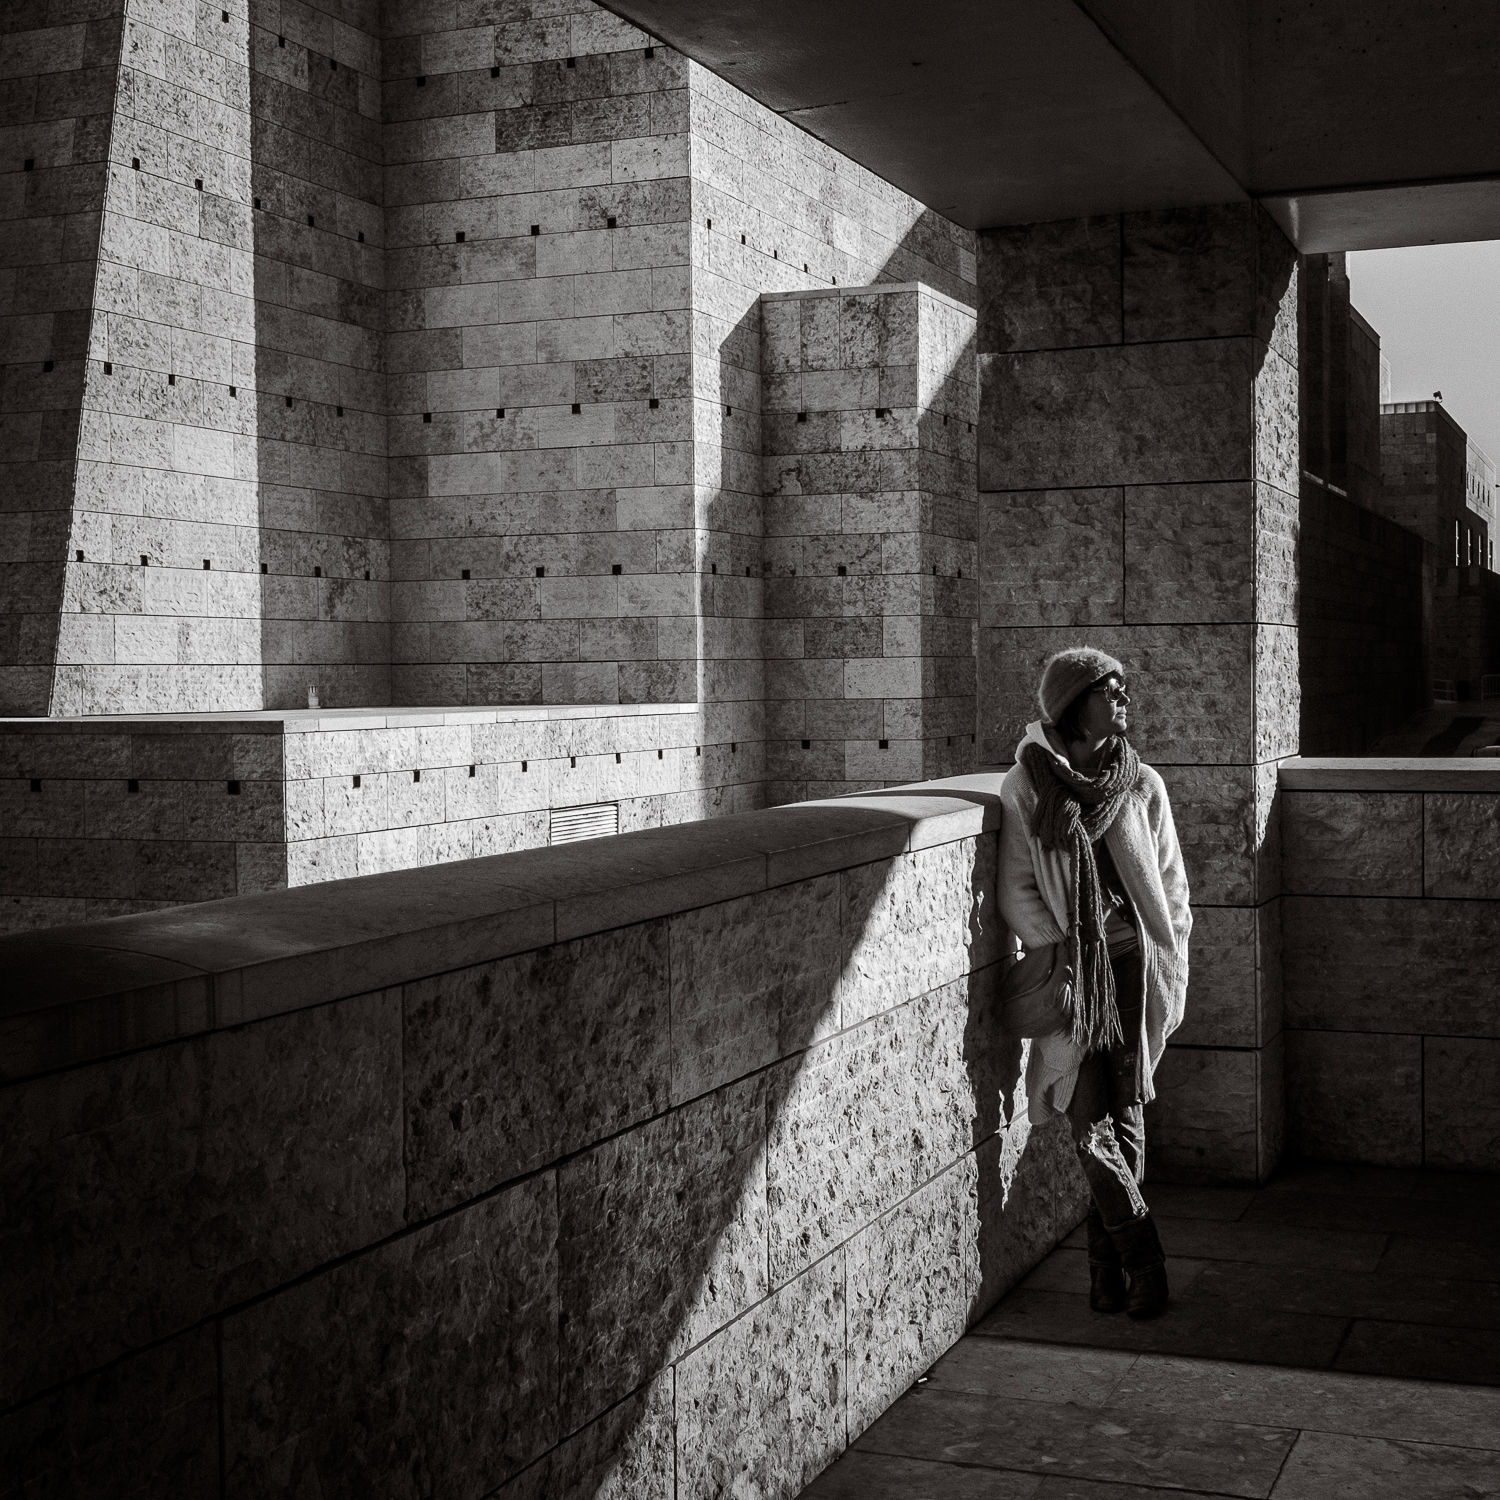
It was freezing cold but model Stéphanie was a real champ. Shot with one of my favourite lenses: the 10-24 mm. I used the Jinbei HD600 II and the Phottix Luna Folding Softbox. In very contrasty, backlit situations like these, it's good to have an Op…

It was freezing cold but model Stéphanie was a real champ. Shot with one of my favourite lenses: the 10-24 mm. I used the Jinbei HD600 II and the Phottix Luna Folding Softbox. In very contrasty, backlit situations like these, it's good to have an Optical Viewfinder, too. Especially the X100T-like one, where you can still have a small EVF inserted in the bottom right corner to help you with your composition. The X-Pro 2 also has a 1/3rd stop faster sync speed than the X-T1, which comes in very handy when you're trying to overpower the sun in bright daylight.

The camera being a pre-production sample, the camera’s firmware was also still beta, so there were a couple of limitations. First of all, the ‘Preview Exposure and White Balance in Manual Mode’ feature was not working on my sample. It’s a feature I rely on heavily when using flash, because it lets me easily set the desired ambient exposure. However, my model will generally be too dark in this mode, so once I’ve determined how dark or bright I want the background to be, I will switch this mode off.

I use the ‘Preview Exposure and White Balance in Manual Mode’ so much that I’ve assigned a function button to it.

I’ve even dedicated one of the function buttons to it. To assign a function to a function button, press and hold it for a couple of seconds and then choose the desired function from the list that appears. When off, the EVF goes to a normal brightness level so you can choose your composition and your focus point more easily. Being able to switch between both views and having a live histogram is one of the key advantages of mirrorless cameras. Needless to say, the feature will work as expected on shipping X-Pro 2’s.

Another thing that slightly worried me was the fact that there was no RAW support yet. In fact, there still isn’t (as is always the case with new cameras). As a Lightroom user, author and trainer, I eat RAW files for breakfast. Although I love the quality of Fuji’s out-of-camera JPEG files (they’re probably the best in the whole camera industry), I prefer to shoot at least RAW + JPEG for the added postprocessing leeway that RAW files give me. Partly, that’s for creative reasons, as I like to edit my images quite elaborately but partly it’s also to cover up for the underexposure mistakes I sometimes make while shooting. When you know your way around Lightroom, you run the risk of becoming a sloppy photographer because you know the tricks to cover your ass after the shoot.  

Just like David DuChemin, I firmly believe in Vision-Driven Postprocessing. I always try to maximise the mood in my images to make them convey what I felt at capture time. As you can see from the behind-the-scenes shot, this image was actually taken…

Just like David DuChemin, I firmly believe in Vision-Driven Postprocessing. I always try to maximise the mood in my images to make them convey what I felt at capture time. As you can see from the behind-the-scenes shot, this image was actually taken during the day, but I thought the loneliness I felt from shooting from the top level of a parking lot, would be better expressed by a "dusky" postprocessing. I used one of my Colorific Colour Grading presets.

Old X-Pro 1 shoots new X-Pro 2 :-) This is what the scene really looked like. The dusky atmosphere was added in post. I was surprised to see that even a JPEG could survive this much postproduction, so that's very promising for the RAW files!

Old X-Pro 1 shoots new X-Pro 2 :-) This is what the scene really looked like. The dusky atmosphere was added in post. I was surprised to see that even a JPEG could survive this much postproduction, so that's very promising for the RAW files!

For that reason, I chose to shoot with the Standard Profile, rather than with Classic Chrome which I normally prefer: that film simulation blocks the shadows and without the fallback option of a raw file, I preferred to keep my options open. The X-Pro 2 also has a new Black & White film simulation and a new grain feature, but I did not test that for the same reason.

In this blog post, I will list my top 10 favourite features of this incredible new camera. To conclude this post, I was amazed with the quality of the JPEG files and the flexibility they still offered in terms of further processing. It almost made me wish Fuji would offer an option to save images as 16 bit TIFFs: you would get the benefit of near-raw like editing options along with the beautiful out-of-camera film simulations.

So, these were the four images I submitted to Fujifilm. I’m as curious as you to know which one they picked for the 5 Year X anniversary exhibition. I hope they picked at least one. And even if they haven't, I still had a hell of a time shooting! For me, the X-Pro 2 is already a fantastic camera: it made me get up from my couch and go shoot. Isn't that what all good cameras should do?

This location, an abandoned cooling tower, had been on my to-do list for quite some time. But writing books, magazine articles, creating Lightroom presets and changing the occasional diaper kept coming in the way. The X-Pro 2 deadline was the necess…

This location, an abandoned cooling tower, had been on my to-do list for quite some time. But writing books, magazine articles, creating Lightroom presets and changing the occasional diaper kept coming in the way. The X-Pro 2 deadline was the necessary kick in the butt to finally load up my F-Stop Loka UL backpack and go explore. And that's probably what I like most about Fujifilm cameras: they inspire me to just go out and shoot, experiment, learn from my mistakes and shoot some more.

My trusted F-Stop Loka UL backpack and me at the foot of the hill overlooking Charleroi.

My trusted F-Stop Loka UL backpack and me at the foot of the hill overlooking Charleroi.

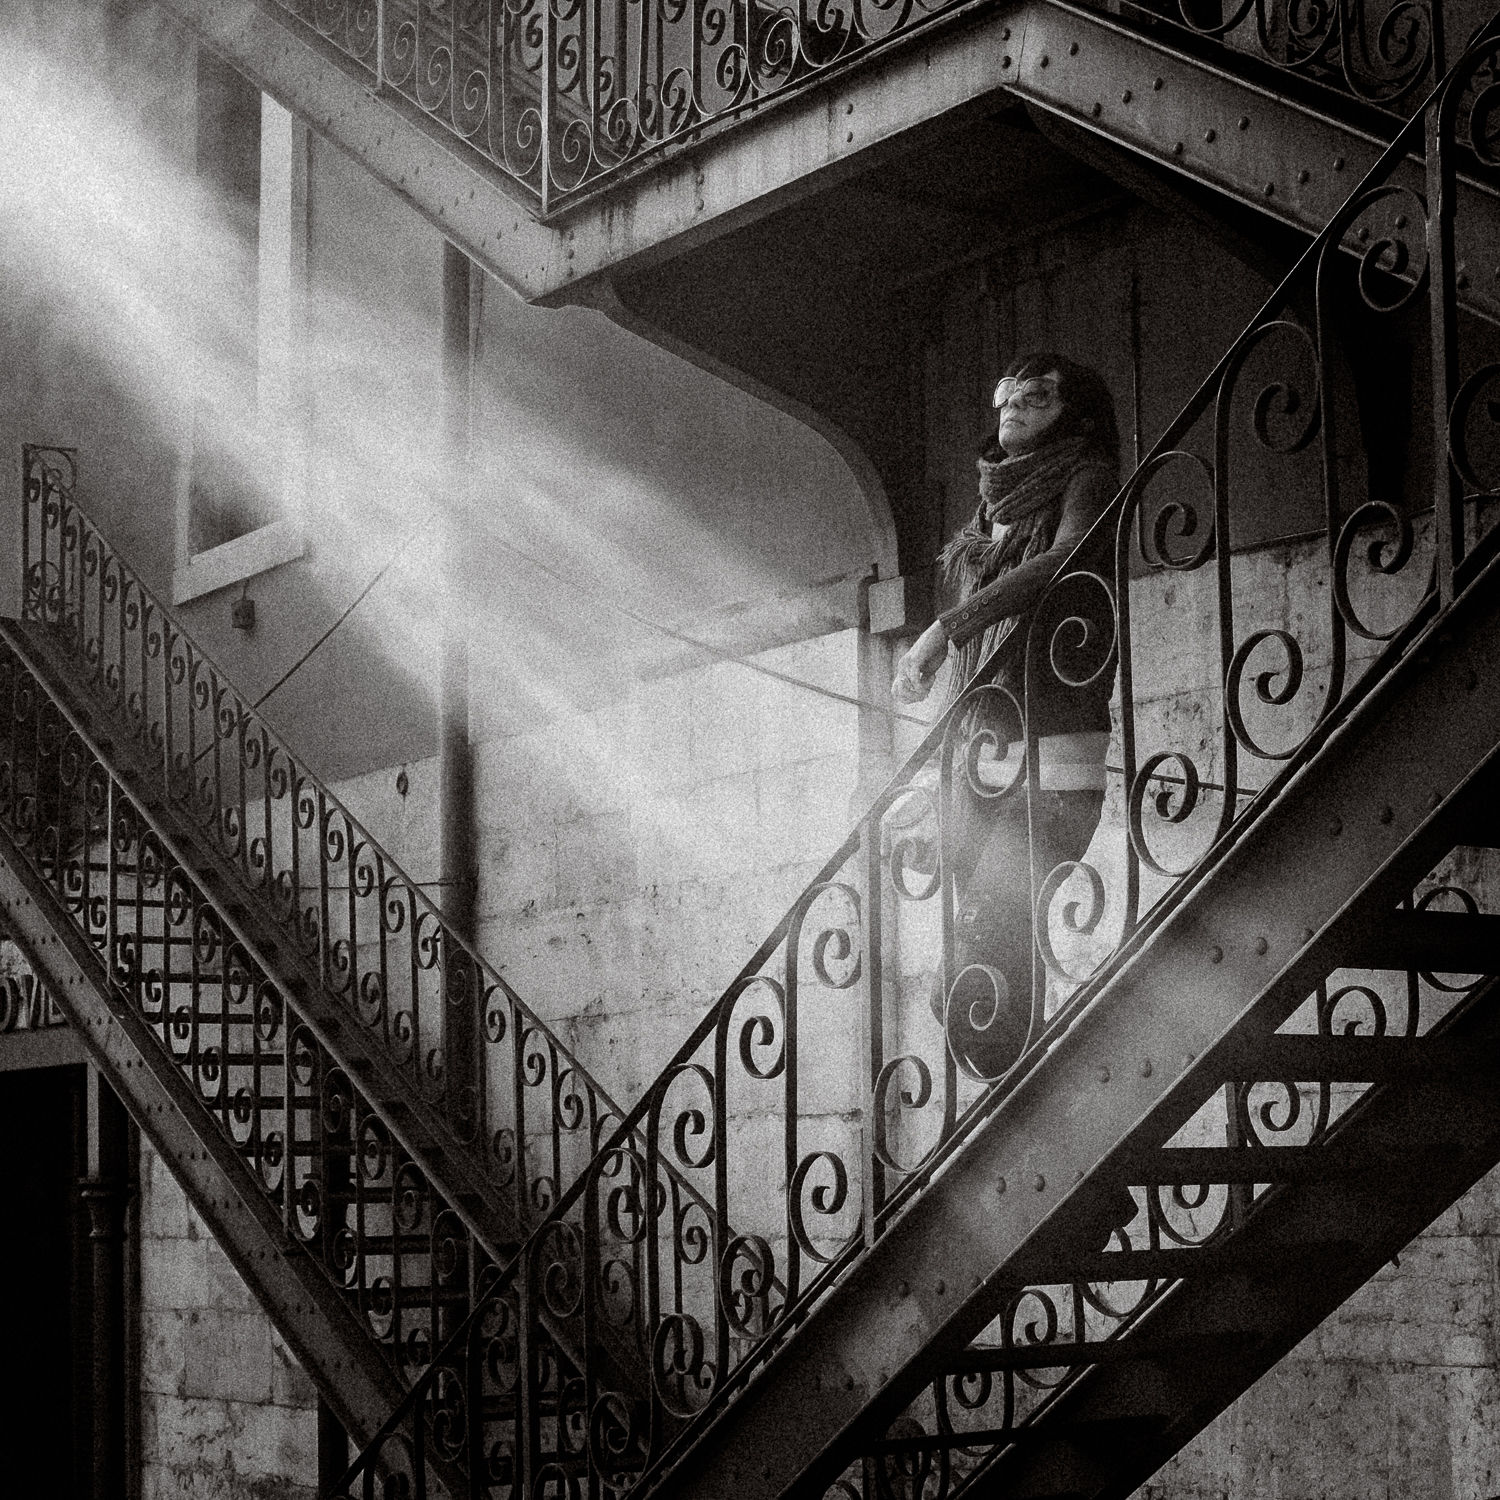
My favourite new camera with my favourite old lens: the 10-24. I think I make about half of my shots with that lens. In fact, three of the four images on this page were shot with it.

My favourite new camera with my favourite old lens: the 10-24. I think I make about half of my shots with that lens. In fact, three of the four images on this page were shot with it.

All images in this blog post are JPEG images coming from a pre-production X-Pro 2. They were processed in Adobe Lightroom with my Colorific Lightroom presets. A big thanks to Serge from www.fotografieblog.be for the behind-the-scenes shots (made with an X-Pro 1).


5 Reasons the RoboSHOOT X flash triggers for Fuji are a game changer

In a week or so, Fujifilm will be celebrating their fifth anniversary of the X-system. I know very few camera companies that have created such a fantastic camera eco-system in such a short time. My switch from a fullframe DSLR was a gradual one: I started with the X-Pro 1 in 2012. It was the appeal of having a lightweight, unobtrusive camera for my travels that won me over. Or, as my colleague and Fujifilm X-Photographer Matt Brandon says, 'I came for the size, i stayed for the quality'.

Yet, it took some adjusting: I love two things: flash and wide angle and neither were very developed at the start of the X-series: the widest lens was an 18 mm (27 mm in fullframe terms) and being used to 16 or even 14 mm on my fullframe DSLRs, 27 mm felt like I was looking through a telescope. However, in four years, Fujifilm have developed a lens line-up that is very complete, at least for my needs. If I were a Nikon or Canon crop DSLR shooter, I guess I'd be very jealous of the available lenses. There's everything from super wide angle over fast zooms and primes to telephoto. And rumour has it that the long-awaited 100-400 mm super telephoto will also be announced in the coming weeks. My favorite lenses currently are the 10-24 f/4 and the 56 f/1.2, although recently I've been very impressed with the sharpness of the 16-55, too! In fact so much that I only use the already excellent 10-24 in the 10-16 range and then I switch it out for the 16-55. 

I came for the Size, I stayed for the Quality
— Matt Brandon

Flash photography on the X-system

But I digress. I wanted to talk about flash: it's no secret that flash is the probably the least developed part of the Fujifilm X-series. That's not completely by lack of want from Fujifilm's part. Apparently, Fujifilm were going to develop a wireless TTL system in collaboration with German manufacturer Metz but that plan either got tanked or at least postponed due to the latter's bad financial situation. Luckily, things are improving. For example, the X-Pro 2 is rumoured to have a sync speed of 1/250th instead of 1/180th of a second on the X-T1. That makes any flash about 30 percent more powerful (at least when working at the sync speed). 
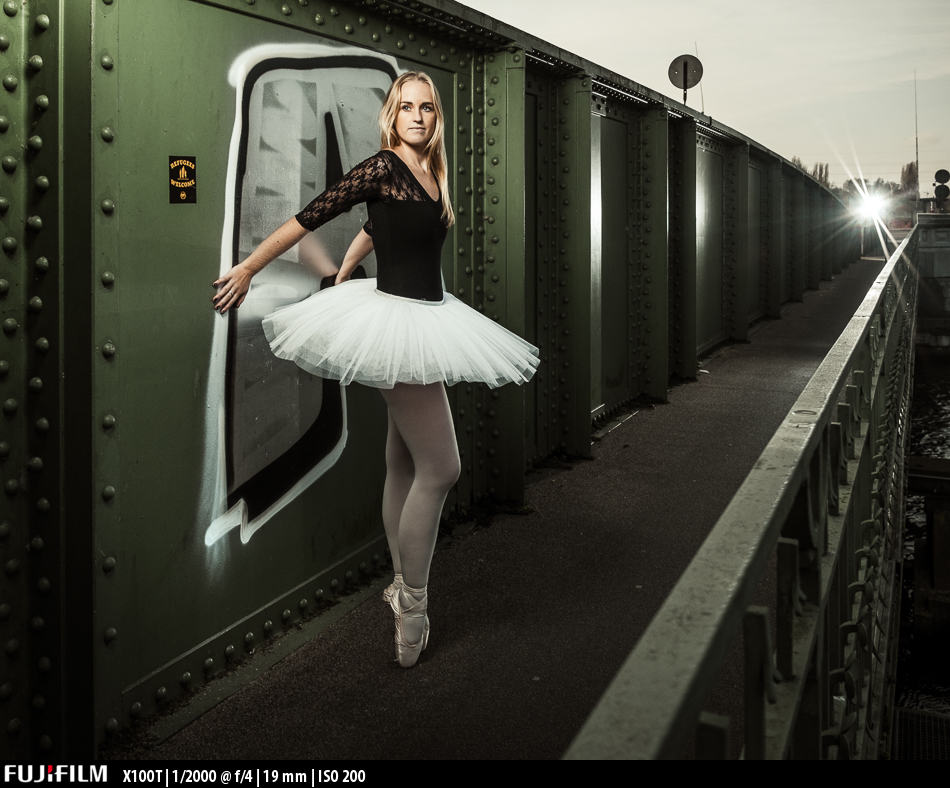
Fujifilm and TTL flash

So, it's not like you can't do flash with a Fuji. There are just less TTL whistles and HSS bells :-) All of the X-series cameras have a hotshoe and there are a couple of TTL flashes available, such as the EF-42 or my personal favourite: the Nissin i40, a review of which will follow shortly. The EF-42 might be the most powerful one, the i40 is the most fun to use and also the most balanced in terms of size and weight, at least when you want to use it on-camera. These flashes will work both in manual and in TTL, but the latter only on-camera.

If you want to use off-camera flash, up to now you are limited to using manual flashes and triggers. For manual use, I recommend the Godox V850 and the FT16s trigger, reviewed here or the Cactus RF60 and V6 trigger. If I need more power, for example when I want to overpower the sun in sunny India in the middle of the day, I turn to my big bazooka: the Jinbei HD600 II, a review of which you can read here.

A holiday snapshot: with kids never sitting still, TTL is a handy feature to have. In this case, I used the Lastolite Trifold collapsible umbrella. It folds down so small you have no excuse not to have one in your camera bag.

A holiday snapshot: with kids never sitting still, TTL is a handy feature to have. In this case, I used the Lastolite Trifold collapsible umbrella. It folds down so small you have no excuse not to have one in your camera bag.

All these off-camera flash options work well but they are manual-only. Although I have no problem working in manual (and sometimes even prefer it), there are times when having TTL remote control of my flash would be great. Especially for those instances where you have to work fast and/or when your subject is moving around in the frame, like my 2.5 year old son likes to do. Manual flash is a pain when the flash-to-subject distance changes a lot, because of that damn inverse square law. I can safely say that my toddler is responsible for my renewed interest in off-camera TTL flash photography!  When I'm on holidays and I want to take a family snap (I always have the Nissin i40 with me), TTL is great to have because my mind does not have to think as hard. After all, it's on holidays, too!

TTL with a cable

Up to now, there was only one workaround to do off-camera TTL flash with a Fuji camera and that was to use - oddly enough - a Canon flash sync cable. Yes, a cable! How very hipster retro :-) For example in this shoot of Dutch supermodel Rosalinde Kirkstra, I used a 10 meter Phottix OC-E3 flash cable. The downside of this is that it's not exactly practical, but it works. If the prospect of cloning out 10 meter of flash cable from some of your shots does not particularly entice you, please read on!

At 1/1000th of a second, the tiny Nissin i40 becomes as powerful as a couple of regular speedlights. In this case I used a 10 meter Phottix OC-E3 TTL cable, but wireless triggering is so much handier. The modifier I used for this shoot is the fantas…

At 1/1000th of a second, the tiny Nissin i40 becomes as powerful as a couple of regular speedlights. In this case I used a 10 meter Phottix OC-E3 TTL cable, but wireless triggering is so much handier. The modifier I used for this shoot is the fantastic SMDV 70 cm Speedbox

RoboSHOOT to the rescue

Then I heard about a new company, Serene Automation, that were developing TTL flash triggers for Fujifilm cameras. I contacted them and they were kind enough to send me a (pre-production) review sample of their top-of-the-line triggers: the RX-20 receiver and the MX-20 trigger. And they work like a charm. Below I've listed five reasons why, if you're even remotely interested in using flash on your Fujifilm X-cameras, you should seriously consider these triggers.

The MX-20 Trigger Unit

The MX-20 Trigger Unit

The RX-20 Receiver Unit

The RX-20 Receiver Unit


1 RoboSHOOT triggers allow TTL flash off camera, straight out of the box

This shot of Frannie and Brecht was made with the tiny but very capable Nissin i40 for Fujifilm and the SMDV 70 cm Speedbox. And of course the RoboSHOOT RX-20 and MX-20. I set one of the custom function buttons on the X100T to Flash Exposure Co…

This shot of Frannie and Brecht was made with the tiny but very capable Nissin i40 for Fujifilm and the SMDV 70 cm Speedbox. And of course the RoboSHOOT RX-20 and MX-20. I set one of the custom function buttons on the X100T to Flash Exposure Compensation. I also used Fuji's wide angle converter.

For many people, this reason alone should be enough to order a set. You attach the receiver to a Fujifilm compatible flash like the EF-42 or the i40 and put the trigger on your camera, enable the flash on the camera and you're good to go. If it does not work, it's generally because you've either set your camera to Silent Mode, or you're in one of the settings that disables the flash hotshoe. This happens for example when you're in Continuous shooting mode. Fujifilm has already said they would come out with a firmware that allows flashes (and therefore also triggers) on the hotshoe to fire while shooting in Continuous mode. In fact, the recent 4.20 X-T1 firmware update was supposed to install that but it got withdrawn because of a bug. I also recommend that when 'installing' the trigger, you make sure the little safety pin on the trigger aligns nicely with the corresponding hole in the hotshoe, before you tighten the wheel on the trigger.

The SMDV Speedbox 70 is one of my favourite modifiers for use with small flashes. It has a nice quality of light and it sets up and folds down in seconds. I got mine from the friendly people at www.foto-morgen.de. It's a German website but they spre…

The SMDV Speedbox 70 is one of my favourite modifiers for use with small flashes. It has a nice quality of light and it sets up and folds down in seconds. I got mine from the friendly people at www.foto-morgen.de. It's a German website but they sprechen English too :-)

Contrary to the cable solution I described above, which limits you to only using one off-camera flash, the RoboSHOOT X-system lets you work with multiple flashes off-camera. There's four different groups you can assing flashes to, you just need an equal number of receivers. A smartphone App (iOS and Android), then lets you set TTL flash compensation (more on that later).
Most of the time, I only use one remote flash, though. In those instances, I find it easier and faster to change the flash exposure compensation on the camera. Here's a quick tip: you can either set the Flash Exposure Compensation (FEC) as one of the items in your Quick menu or, faster still, you can assign a function button to FEC: to do so, simply press and hold the function button of your choice for a couple of seconds and then choose FEC from the list of available options. It works like a charm.

2 The MX-20/RX-20 combo does TTL with Nikon compatible flashes

Let me say that again: this system allows you to use (specific) Nikon flashes with your Fujifilm cameras. Off camera. In TTL! I don't know how John (founder of Serene Automation) pulled this one off, but he did! This is great news for 2 reasons: first of all, quite a number of Fujifilm users either have switched from Nikon or they use Fuji gear in addition to their Nikon cameras. In both cases, chances are that they have already lying an SB-900 around.

This shot of lovely Stéphanie was lit at 1/2000th of a second at f/7.1 with a single Nikon SB-900 speedlight! I again used the SMDV 70 cm Speedbox, which I not only love for its lighting characteristics but also because it's a breeze to set up and t…

This shot of lovely Stéphanie was lit at 1/2000th of a second at f/7.1 with a single Nikon SB-900 speedlight! I again used the SMDV 70 cm Speedbox, which I not only love for its lighting characteristics but also because it's a breeze to set up and take down.

Below is the current compatibility table. As more people will use these triggers with different kinds of third-party flashes, the list will probably grow. For example, I have successfully tried the triggers with Phottix' excellent Mitros+ for Nikon. Others have reported them to work with the Metz 52 AF-1 and the Yongnuo 568 EX.

Compatibility table of Fujifilm and Nikon flashes. I've personally tested the Nissin i40 and the Nikon SB-900.

Compatibility table of Fujifilm and Nikon flashes. I've personally tested the Nissin i40 and the Nikon SB-900.

But there's a second reason why this is such a big deal. Even when you don't have Nikon flashes lying around, you might actually consider picking one up or buying a used one because, as great as the Nissin i40 is, it's nowhere near as powerful as an SB-900 or an SB-910. Especially when you're working outside or with a diffuser, you'll quickly reach the limits of the i40. Unless... you're using it on the X100T, which brings me seamlessly to the next advantage:

3 The triggers support the high sync speed of the X100T

One current disadvantage of the Fujifilm flash system is that there is no High Speed Sync (HSS): you're stuck, both on- and off-camera, to whatever sync speed your camera has. In the case of the X-T1, that's only 1/180th of a second. As HSS support is a combination of camera, flash and trigger, I currently cannot say whether the Roboshoot triggers will support High Speed Sync if/when it comes out. But having gotten to know the CEO a little, I would not be surprised. However, Fujifilm have a bit of an odd one out with the X100T: this camera uses a leaf shutter which allows for a 'regular' sync speed of up to 1/2000th of a second. In fact, this sync speed is so fast that you can freeze motion or overpower the sun with a simple speedlight. At those sync speeds, the trigger sometimes becomes the limiting factor as some triggers' electronics simply aren't fast enough to take advantage of that high sync speed. The Roboshoot triggers are: I have succesfully used them on my X100T with shutter speeds of up to 1/2000th of a second. At these shutter speeds, the tiny i40 can almost overpower daylight and a Nikon SB900 becomes as powerful as the four times heavier Jinbei. The RoboSHOOT triggers are designed to work with all Fujfilm X cameras. They have been tested with the X-T1, X-Pro 1 and X100T. Personally, I use them the most with my X100T as you can see from the EXIF info in the images. I'm also looking forward to trying them out with a more powerful TTL flash like the Godox Witstro II. I'll report back on that as soon as I can.

4 Manual and TTL multi-flash control from a dedicated App

Using a free Android and iOS App, you have full control over up to four groups. You can set Flash Exposure Compensation and mix and match manual and TTL groups.

Using a free Android and iOS App, you have full control over up to four groups. You can set Flash Exposure Compensation and mix and match manual and TTL groups.

As you can see from the pictures, the MX-20 does not have power controls on the unit itself. Instead, when you want to use a flash in Manual mode or want to work with more than one flash in TTL and change relative FEC, you can use the free RoboSHOOT X App. This App lets you do the following:

  • turn groups on or off without having to use the actual buttons on the receivers
  • mix and match TTL and Manual control
  • set relative FEC compensation (e.g. Group 1 +1 FEC, Group 2 -2 FEC)
  • set FEC lock
  • set manual power levels, from 1/1 all the way down to 1/512!

The App can do a lot more that I haven't tested, but it's really complete without being complex. Still, while having smartphone control over your flashes is great in a studio, for outdoor work, I would still prefer to be able to control power levels, FEC and groups from the transmitter itself. I would really like to see Serene Automation develop a clip-on group controller much like Pocketwizard did with the AC-3 zone controller, so the phone can stay in my pocket during the shoot. In fact, I already pitched the idea.

This image of Stéphanie was shot at 1/2000th of a second, a feature made possible by the X100T's leaf shutter and the RoboSHOOT triggers. Not all radio triggers support these high sync speeds. If you have an X100T and you like flash, the RoboSH…

This image of Stéphanie was shot at 1/2000th of a second, a feature made possible by the X100T's leaf shutter and the RoboSHOOT triggers. Not all radio triggers support these high sync speeds. If you have an X100T and you like flash, the RoboSHOOT triggers are a no-brainer! I used a Nikon SB-900 and a Nissin i40. Main light was shot through the SMDV 70 Speedbox.

5 Other advanced features

If these features alone weren't enough to startle your interest, there's a couple of advanced features that I did not even use or try because I simply did not need them: you can use TTL lock, create up to four profiles that you can call up by pushing a button on the transmitter, specify delays and so on. The profiles can store advanced things like flash zoom setting, allowing you some extra pop from your flash by zooming it remotely. Wedding photographers will also appreciate the fact that there's a TTL passthrough hotshoe on the MX-20 trigger unit so you can put an on-camera fill flash on top of the trigger. It's actually even more than a simple passthrough, as it is also part of the group system that can be controlled from the App. Like I said... advanced features :-)

Conclusion

Although Serene Automation also produce a more basic trigger-receiver combo (the MX-15 / RX-15) I would recommend getting the more powerful and versatile MX-20 / RX-20 combo. The product page on the website gives you more info on the differences and specifications of the units. If you're only interested in manual off-camera flash, the MX-20 and RX-20 flash triggers are probably overcomplete and there are simpler and cheaper options available like the ones mentioned above. However, if you want to be able to use TTL off camera and/or if you have an X100T and/or if you still have some Nikon SB-900's or SB910's lying around, then these triggers are almost a must-buy.

At $380 for a set, they aren't cheap, but bear in mind that flash photography on Fujifilm is somewhat of a niche market and most importantly, they're currently your only option anyway. So considering the fact that Serene Automation basically has a monopoly right now on this kind of trigger and considering the relatively small market, the R&D that must have gone into it and the advanced features, I think they're actually reasonably priced.

You can order them directly from Serene Automation. If you live in Belgium or Holland (or elesewhere in Europe) and want to avoid potential hassle with customs and VAT, you'll be pleased to know there's an importer for the Benelux, VDH Photo. They will be able to tell you which camera shops will retail these units.

What I liked

  • They're the first (and only) TTL off-camera flash triggers that currently exist for Fujifilm cameras
  • Let you use selected Nikon and Nikon-compatible flashes in TTL with your Fujifilm camera
  • Advanced feature set (MX-20/RX-20)
  • Free iOS and Android App
  • Super fast sync speed (ideal for X100T users)
  • Support for rear/second curtain sync (haven't tried it myself but I know a lot of people want this)
  • Continuous shooting (introduced in the faulty and now revoked 4.20 X-T1 update) will be supported once Fuji re-releases the updated firmware.

What could be improved

  • Manual power control of individual flashes or groups of flashes and FEC of groups of flashes only via App. A hardware option would be great
  • Price (but in fairness, these are Serene Automation's top of the line triggers. The RX-15/MX-15 bundle is about 30 percent cheaper). The RX-15 does not let you use Nikon speedlights in TTL and the MX-15 does not work with the App.


Like the look of these images? Flash is a (big) part of it, but there's also the toning and styling that is done in postproduction: all images were postprocessed using my Lightroom Colorific Presets pack. You can learn more about these presets here.

If you're new to off-camera flash, my Making Light and Making Light 2 eBooks might come in handy. 


Review: Adrian Sommeling's 'Realistic Compositions' DVD

Every year, I try to set myself a new professional goal. For 2015, I wanted to redo my blog and website. And so I did. I switched to Squarespace from Wordpress. Squarespace is easier than Wordpress, but still, I had to learn it from scratch. So, you’re looking at the result of this year's goal. I hope you like it. And if you don’t, just imagine my previous site was even worse!

For 2016, I want to get better at compositing. In preparation, I think I’ve bought just about every tutorial and book there is on the planet. And there are a lot of them, believe me!

A couple of weeks ago, I noticed Dutch compositing guru Adrian Sommeling had released his brand new (and first) English training DVD: Realistic Compositions. Adrian’s work is fantastic, both literally and figuratively. I know his work from some of the covers of the Dutch photo magazine Focus. Although they're very realistically composited, I'd rather call them 'Surreal Compositions'. A look at his portfolio will tell you why. Watching one of Adrian's composites is like watching a show by a really good magician: you know it's not real, but you can't put your finger on 'the trick'.

I was lucky to receive a review copy. So... here is my review!

Almost 5 hours in 11 chapters

In this download-only production, which is broken up into 11 chapters, you get to see and follow along with a full composite from shoot to finish. That’s already a big difference with some of the other tutorials out there, who simply start with the Photoshop process. As it turns out, the way you plan your shoot (and your lights in your shoot) is essential to make your compositing project work.

The final composite (don't be intimidated by the height of the layer stack: everything is built up in easy to follow steps). Image © Adrian Sommeling.

The final composite (don't be intimidated by the height of the layer stack: everything is built up in easy to follow steps). Image © Adrian Sommeling.

Another difference with some of the other training material available, is that Adrian chose a more complex shoot (including flying chickens!), with lots of challenges. That partly explains the length of this DVD. On the other hand, it also means you can really learn a lot and after following this DVD to the end, you should definitely be able to create a realistic composite of your own, especially if you're smart enough not to make your first one as complex as this one! 

Shooting your subjects and masking them

A chicken with an expensive taste in lighting equipment. Image © Adrian Sommeling.

A chicken with an expensive taste in lighting equipment. Image © Adrian Sommeling.

So the first chapters are all about the shoot. Then, Adrian will teach you how to mask your subjects to extract them from the studio background and put them into their new surrounding. I was surprised to see he only uses the Quick Selection tool. And I picked up a brilliant tip on how to use it that’s probably worth half of the DVD’s price. Now that I know that tip, I can understand why Adrian only uses this tool.

You might be surprised, but cutting out your subjects from the studio background is actually the simplest part of creating a realistic composite. Image © Adrian Sommeling.

You might be surprised, but cutting out your subjects from the studio background is actually the simplest part of creating a realistic composite. Image © Adrian Sommeling.

I learnt a trick about the Quick Selection tool that by itself is worth half of the price of the DVD

It's all about the shadows

You might think that cutting out the individual elements is the most difficult part of the procedure, but it is not. That award goes to the tedious process of creating realistic shadows. Have you ever wondered why most composites (and compositing tutorials) only work with portraits from the waist up? That’s because it’s really difficult to create realistic shadows. And this is exactly what the biggest part of this DVD is about: Adrian gives us a little theory about shadows (I love his simple yet informative slides) and then he explains how to make contact shadows and ambient shadows.

Adrian's explanation on the types of shadows, their importance and how to recreate them from scratch is simply the best I've seen in any compositing tutorial.

Adrian's explanation on the types of shadows, their importance and how to recreate them from scratch is simply the best I've seen in any compositing tutorial.

He really makes you see your composite in three dimensions: there’s the shadows that the sun casts on the elements in your composite, but there’s also the shadows that the elements in your composite cast upon each other. Here again, I was surprised to see how he manually paints his shadows and then refines them with a layer mask. The closer a shadow is to its origin, the harder its contour will be and Adrian teaches you exactly how to simulate that.

All the elements placed into the scene. Without shadows, it definitely looks fake. Image © Adrian Sommeling.

All the elements placed into the scene. Without shadows, it definitely looks fake. Image © Adrian Sommeling.

After adding the different shadows: not only the long shadows caused by the sun, but also the contact shadows and the shadows that the elements of the scene cast upon each other. Image © Adrian Sommeling.

After adding the different shadows: not only the long shadows caused by the sun, but also the contact shadows and the shadows that the elements of the scene cast upon each other. Image © Adrian Sommeling.

Getting the 3D look

One thing that is really typical for Adrian’s work is a very threedimensional feel: the elements seem to leap off your screen. He does that partly with his lighting, partly with his choice of lens (mostly wide-angle) and viewpoint (close to the ground) and finally, partly with his postprocessing. Adrian shows you how he uses relatively simple dodge and burn techniques to make his subjects stand out better.

Finishing touches

The final chapters are dedicated to ‘finishing touches’ such as replacing the sky, making tonal corrections, adding some Color Efex Pro (one of my own favourite plug-ins) and adding motion blur.

A nice personal touch is that Adrian uses his son in a lot of his composites. I can only imagine the kick the young boy must get out of seeing himself in these super composites.

Source files included

The DVD comes with all the source files, so you can try to mask them yourself and then put them together. My own boy is two and a half years old. He’s still too impatient to model for me and that probably (and luckily) gives me a year or two to work on my composites. In the mean time, I’ll rewatch Adrian’s DVD a couple of times!

Conclusion

As you might have guessed by now, I can really recommend this DVD. 85€ is a very fair price considering the amount of info that you get and given the fact that all the source files are included. In fact, if you ever consider taking one of Adrian’s workshops, this DVD is an excellent boot camp. In order to get the most out of this training DVD, I do recommend you should be familiar with layers, layer masks and adjustment layers. If you aren’t, I would recommend taking a basic Photoshop course first. I'm obviously slightly biased but I have had some really nice reviews about my own - seven hour - ‘Photoshop for Photographers’ over at Craft & Vision. Alternatively, if you speak Dutch, the Photoshop courses Marit Hilarius and I have created for the Dutch Photography, Lightroom and Photoshop online video tutorial website Photofacts Academy. For the latter, you can get a 2 week free trial (no credit card required) here.

YOU MIGHT ALSO BE INTERESTED IN...

Review: Western Digital My Passport Ultra 3TB

As a photographer, you can never have enough storage space. Especially if you’re of the traveling kind and your laptop’s internal hard drive is limited.

I already reported about one of my favorite external drives for traveling, the WD My Passport Pro (review here).

Now a while back, WD introduced a new portable drive, the My Passport Ultra. There is also a Mac version of this drive, the My Passport for Mac. Except for the name, both are identical, it’s just that one is pre-formatted for Windows and the other is pre-formatted for Mac. The review copy WD sent me was an Ultra. As I use a Mac, I changed the formatting to HFS+. Easy enough.

75000 raw files on a pack of cigarettes

The My Passport Pro is available in four colours. If you use more than one (e.g. one for data and one for backup), choosing different colours can help you tell the drives apart. 

The My Passport Pro is available in four colours. If you use more than one (e.g. one for data and one for backup), choosing different colours can help you tell the drives apart. 

Compared to the My Passport Pro with its built in dual drives and raid system, the My Passport Ultra technically is a lot simpler: inside is a typical 2.5 inch laptop drive (you have a choice between 0.5, 1, 2 and 3 TB). At 5400 rpm, the drive itself is no faster or slower than the majority of other small external drives. The interface is USB 3 (backwards compatible with USB 2). What really sets this drive apart is its size and weight, or rather lack thereof: the 3TB version I tested weighs less than 250 grams (0.5 pounds) and at 21 x 81 x 110 mm (0.83 x 3.21 x 4.33 inches) it is not much bigger than a pack of cigarettes. At an average of 40 Mb per raw file, this means it can contain 75000 raw photos. Seventy Five Thousand! On a drive that fits in a shirt pocket! There won't be any more room for those cigarettes then, but they're bad for your health anyway. The beauty is that it’s USB powered, so no need to lug around a power supply that sometimes weighs more than the actual drive.

Possible uses

As you know from this post, I use a separate SSD drive to store my Lightroom catalog on. But SSD memory is far too expensive and limited to store your actual images on. And that's where this My Passport Ultra comes in. There are a couple of ways to include the Ultra in a portable Lightroom workflow:

  1. If you are a high volume shooter, you can use it exclusively for image storage. As I mentioned, if you calculate at an average of 40 MB for a raw file, the drive will contain up to 75.000 of them. If you shoot JPEG only, you can easily multiply that by 5. Just make sure you make regular backups to another drive. You don't want to lose 75.000 images in one go! You could get another My Passport Ultra, obviously, but you could also opt for a cheaper, bigger external hard drive with a separate power supply which would cost about half. You would then leave the bulky backup drive at home (or in your hotel room) and take the My Passport Ultra with you when you go out the door. Never leave your backup drive and the drive with your originals together in your hotel room!
  2. If you normally store your images on your internal harddrive, you could use the Ultra as a small and lightweight backup-only drive, although in that case, you probably don't need the 3 TB model!
  3. Personally, I make a hybrid use of the drive: as I'm really paranoid about losing my images, especially while traveling, I import them to my My Passport Pro, which is set up in Raid 1. That means if one of both drives in the My Passport Pro fails, I still have my pictures. However, Raid 1 does not protect me from theft or fire or other damage, and that's where the My Passport Ultra comes in: I've split it into two partitions. One, 1 TB in size acts as a Time Machine backup for my MacBook Pro's internal 1 TB drive. The other, 2 TB in size acts as a backup for the My Passport Pro. I've attached some velcro to the back of the My Passport Ultra (and to the back of my laptop case) so I can easily attach the drive to my laptop when I'm working. 
The My Passport Pro which I reviewed separately contains two drives. You can set these up in Raid 0 (they act like one big, faster drive but when one drive fails, all data is lost), Raid 1 (everything you write on one drive is automatically mirrored…

The My Passport Pro which I reviewed separately contains two drives. You can set these up in Raid 0 (they act like one big, faster drive but when one drive fails, all data is lost), Raid 1 (everything you write on one drive is automatically mirrored to the second) or JBOD (Just a Bunch of Disks) where they act as two different physical drives. The Pro has a Thunderbolt interface, which makes it more useful for Mac users than Windows users.

The above use cases are just examples. I'm sure you can come up with your own ideas on how to use 3 TB of storage! 

Price

This drive exists in a 0.5, 1, 2 and 3 TB version. Personally, I don't know who would buy the 0.5 TB version unless you're a photographer with lots of self-restraint. The 3 TB version costs around € 200 / $ 200. You do pay a premium for the small form factor, but I find the price to be very reasonable, especially given its extreme portability.

My Passport Pro or My Passport Ultra?

The Pro and the Ultra are different drives for different needs. For me, the main advantage of the My Passport Pro lies in the fact that it saves to two drives automatically, offering an initial and automated backup. However, having said that, you still need a secondary backup of the data that's on a My Passport Pro. After all, the drive can get lost or stolen, too.

If you don't mind making your own backups (on my Macs, I use Shirtpocket's SuperDuper), for the price of one My Passport Pro 2+2 TB, you can buy two My Passport Ultra 3 TB drives, giving you more flexibility and more storage.

Conclusion

I like the My Passport Ultra a lot. It's so small and lightweight that you can bring it with you wherever you go. The only disadvantage I could come up with is that the drive's housing isn't shock-resistant or weather-sealed, which would undoubtedly have added to the weight, size and... price! Other than that, if you’re looking for a lot of storage in a light small, convenient package, then look no further. Especially for laptop users this USB-powered drive combines convenience with ample storage without adding much bulk. Just as always, make sure to back up your data. No drive, regardless of the manufacturer, is failsafe. 


A Review of 'Making the Image', the new eBook by David duChemin.

I live in Ghent, one of Belgium's more touristy cities. From medieval castles to contemporary design, there's a lot to see and photograph in this city and therefore, it attracts lots of tourists, often with big, bulky and expensive cameras. 

A wise man doesn’t give the right answers, he poses the right questions.
— Claude Levi-Strauss

Occasionally, when I'm having the odd drink on one of the beautiful terraces along the river that intersects the city, I'm baffled at how some people photograph these old buildings and beautiful monuments. Often, they'll get out of the bus and walk up straight to the front of the monument - the front side being dictated by the shortest line between the bus doors and the actual monument - and squeeze the trigger. They don't kneel to get a more dramatic perspective, nor do they stroll a little further to the bridge because a bird's eye view might tell the story better. They don't walk around to see if the light is better from the other side nor do they wait until there's more or less people in the frame. They don't set up a tripod to let a slow shutter speed make the other tourists disappear. No. They just point a $2.000 camera with a $1.500 lens at the 'subject' and push the button.

They should probably read 'Making the Image', David duChemin's new Craft & Vision eBook.

Now before you think it's easy to be hard on others, I can be just as hard on myself...

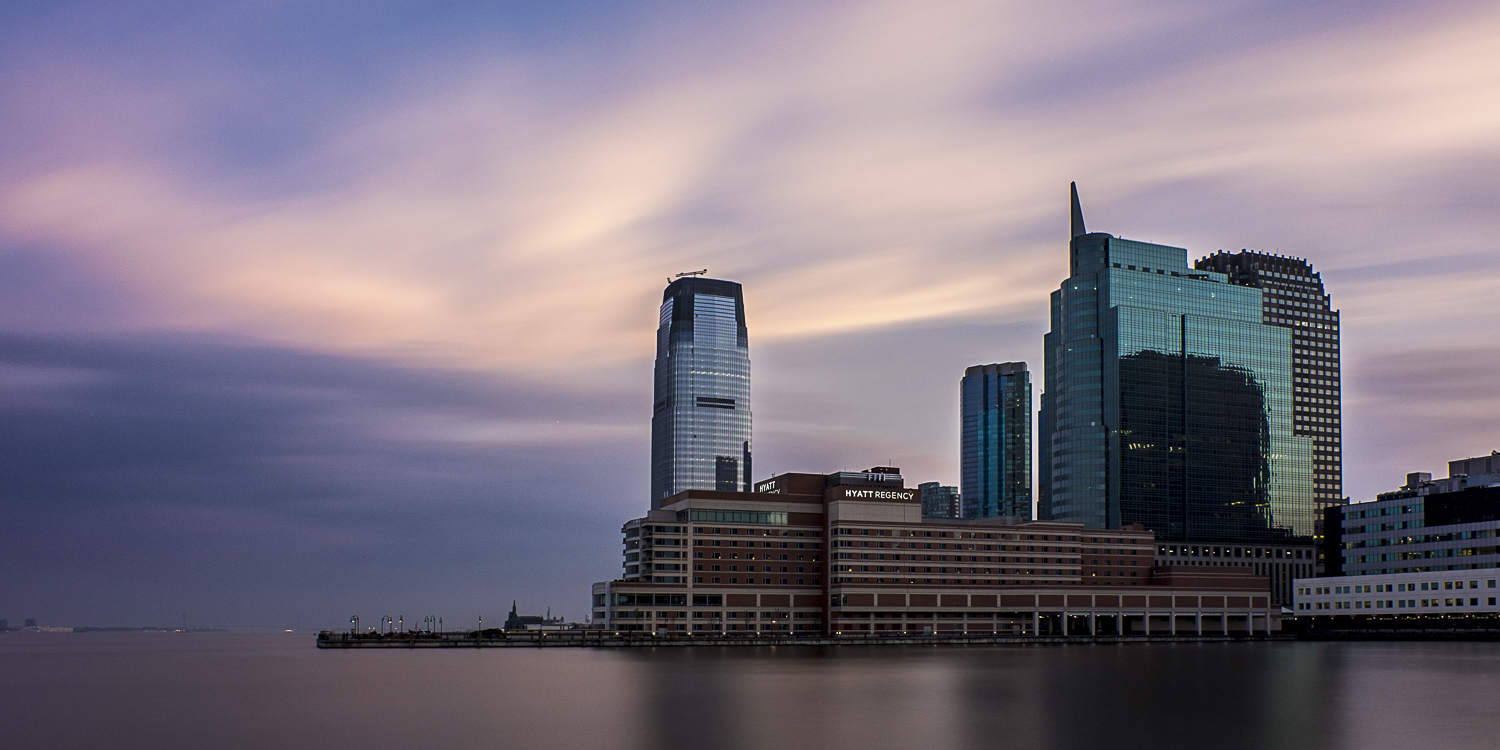
Take this situation for example... It's May 18th. I'm on a Long Exposure photography weekend in New York and I've just spent 45 minutes on a train and 30 minutes schlepping my gear around to photograph New York from the Jersey side. I just had to get the iconic shot. That's the picture below. It was all that I could think of.

Fujifilm X-T1 | XF16-55mm F2.8 R LM WR | 16 mm | 340,0 sec at f - 8,0 | ISO 400

Fujifilm X-T1 | XF16-55mm F2.8 R LM WR | 16 mm | 340,0 sec at f - 8,0 | ISO 400

It's an OK image - blurring the water helps to focus on the city - but if Rod (the super cool Formatt Hitech Marketing Manager) hadn't pointed me to this less stereoptypical, but lighting-wise much better view right behind me, I'd probably still be staring at the Manhattan skyline.

Fujifilm X-T1 | XF16-55mm F2.8 R LM WR | 16 mm | 240,0 sec at f - 8,0 | ISO 200

Fujifilm X-T1 | XF16-55mm F2.8 R LM WR | 16 mm | 240,0 sec at f - 8,0 | ISO 200

should definitely read 'Making the Image'.

Because, low and behold, what's there at page 60? Exactly the question I should have asked myself on May 18th but I didn't. And yet, I had all the time in the world because I was doing an almost six minute exposure!

I'm an experienced photographer (at least I like to think I am). I know my f-stops from my ISOs and my filter threads from my Wattseconds. But, like many other photographers, I often forget the essentials. I'll be sucked in by the technicality of things that I forget to ask the basic questions.

And those basic questions is what 'Making the Image' is all about: the ones you should ask yourself in the field when you're making a photograph that pretends to be more than a snapshot. The book poses 35 of them in two broad categories: 'Question the Scene' and 'Question the Process'. The questions themselves are deceptively simple: 'Shapes or details?' , 'Can I move to change the lines?' or, indeed, 'What's behind me?' Yet, they're probably as important as your camera manual is - actually more important because as we all know, most camera manuals suck big time anyway.

True to the Craft & Vision tradition, you get a lot of value for your money, as this eBook really is a bundle containing:

The little companion eBook that you can put on your phone is as simple as it is effective: just flip through a couple of random questions for each photo you're about to make and your images will improve. Pretty soon, you'll be asking these questions…

The little companion eBook that you can put on your phone is as simple as it is effective: just flip through a couple of random questions for each photo you're about to make and your images will improve. Pretty soon, you'll be asking these questions automatically, in your head!

  • The actual eBook, 158 pages exploring each of the 35 questions in greater detail, illustrated by photos that help make the point;
  • A smaller companion eBook to store on your phone, which just contains the questions, boldly formatted so you can see them clearly and you can flick through them on your phone quickly. My recommendation: read the book once, so you get the full meaning of the questions and then, before a shoot, randomly pick a couple of questions from the list and you'll walk home with a stronger image;
  • A 45 minute companion video that also explores these concepts in more detail.

'Making the Image' is one of those eBooks that should be bundled with every new camera. It doesn't tell you how to press the shutter - plenty of books do that already. Instead, it gives you the questions you should ask yourself before you press the shutter. It's not about stopping down your lens, but stopping down yourself and thinking before you shoot.

The book doesn't give the answers nor does it have to: it's the scene in front of you that will give you those. 

The 'Making the Image' bundle is available here and costs $25 + tax (only $20 during launch week), which is less than the price of a memory card, and it will make sure that that memory card will have better pictures on it. Fewer maybe, but definitely better.

But hey, you don't have to take my word for it, here's someone who's much more eloquent than I am: David duChemin himself! Listen to what he has to say about 'Making the Image':

Below are some other reviews you might enjoy:


Review: Western Digital WD My Passport Pro for Mac. The ultimate portable harddrive for photographers?

Ever since I saw my buddy Matt Brandon from www.thedigitaltrekker.com use one on our Rajasthan photo workshop, I've been using a Western Digital WD My Passport Pro myself. The difference being that I opted for the 2 TB version. After over a year of using the drive, it's time for a review. Is it the ultimate hard drive for photographers? Well, although there's no such thing as perfection, it does come close!

What is it?

The WD My Passport Pro is an external hard drive specifically for Mac users: it uses a fast Thunderbolt connection. The drive draws it power from your computer, so no need to lug a power adapter along. Some may disagree, but I find the fact that the cable is attached a nice feature: when not in use, it wraps around the side of the drive. So, for someone as disorganised as me, it's a good thing I cannot loose the cable anymore. Unless I loose the entire drive, obviously...

Inside though is where things really start to get interesting: the WD My Passport Pro does not contain one but two classical rotating 2.5 inch 5400 RPM drives. Two 1 TB drives in the case of the My Passport Pro 2 TB and two 2 TB drives In the case of the bulkier 4 TB version. Speaking about size, here's how the two models differ:

Images courtesy WD

Images courtesy WD

What makes it special: three ways to configure it:

 
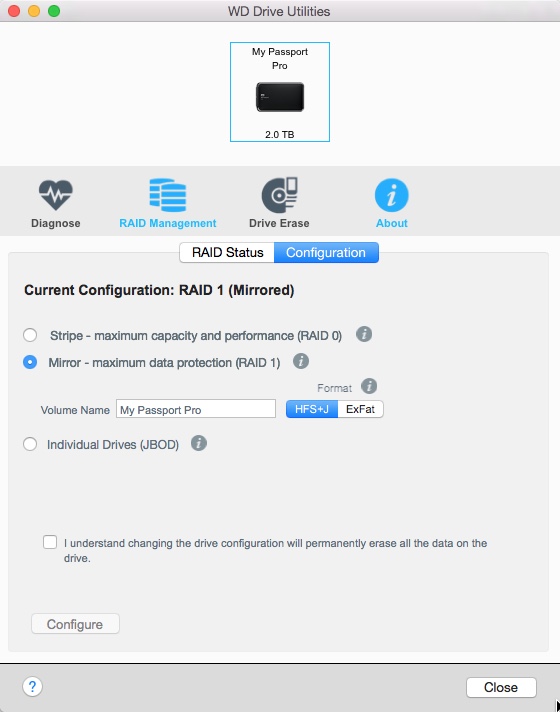
The WD Utilities software lets you set up the drive in three different ways. 'Mirror' is the one that I use and that offers the protection your images deserve.

The WD Utilities software lets you set up the drive in three different ways. 'Mirror' is the one that I use and that offers the protection your images deserve.


Using the supplied and easy to use WD software, this means you can set up the drive in any of three ways:

  1. JBOD (Just a Bunch of Disks): this means that the two drives inside the My Passport Pro will also show as two separate drives on your Mac. It's a bit like using two separate external drives, the difference being that they're conveniently stored in the same housing and there's only one cable. However, this is not the use I make of it nor is it the use I recommend making: there's cheaper and more efficient options for that, such as the newly announced My Passport Ultra, which exists in up to 3 TB of storage. 
    UPDATE: check out my friend Mike's workflow in the comments section: he does use the drive in JBOD mode and makes some valid arguments for that, too. And... he works in IT so he knows way more about this stuff than I do!
  2. Raid 0: this means that the two drives act like one big 2 or 4 TB drive (depending on the model). Especially for the latter, that's a lot of mobile storage! The risk however is that if one drive fails, all your data is gone because it's effectively spread across the two drives. So, unless you have an airtight backup system (which would mean you would have to backup to another WD My Passport Pro or a similar capacity drive) and, if you don't want to interrupt your workflow, also carry that backup with you, this is probably not the way you want to store your precious photographs.
  3. Which brings us to the third option (the one I use and is most recommended for photographers who, unlike Mike, aren't IT experts :-) : use the drive in Raid 1 mode. This means that the drive behaves as a 1 or 2 TB drive on your system and whatever you save on that drive is automatically mirrored on the second drive. If drive one fails, your data is still intact on the other and vice versa. As Mike rightly points out in the comments, this only protects you from drive failure, though. If you accidentally delete a file from one drive, it's automatically gone from the second, too... 

It's the latter option which makes the drive interesting for photographers who generally are paranoid (or should be) about losing their precious images. 

Scenario 1: using the drive as a temporary drive while traveling

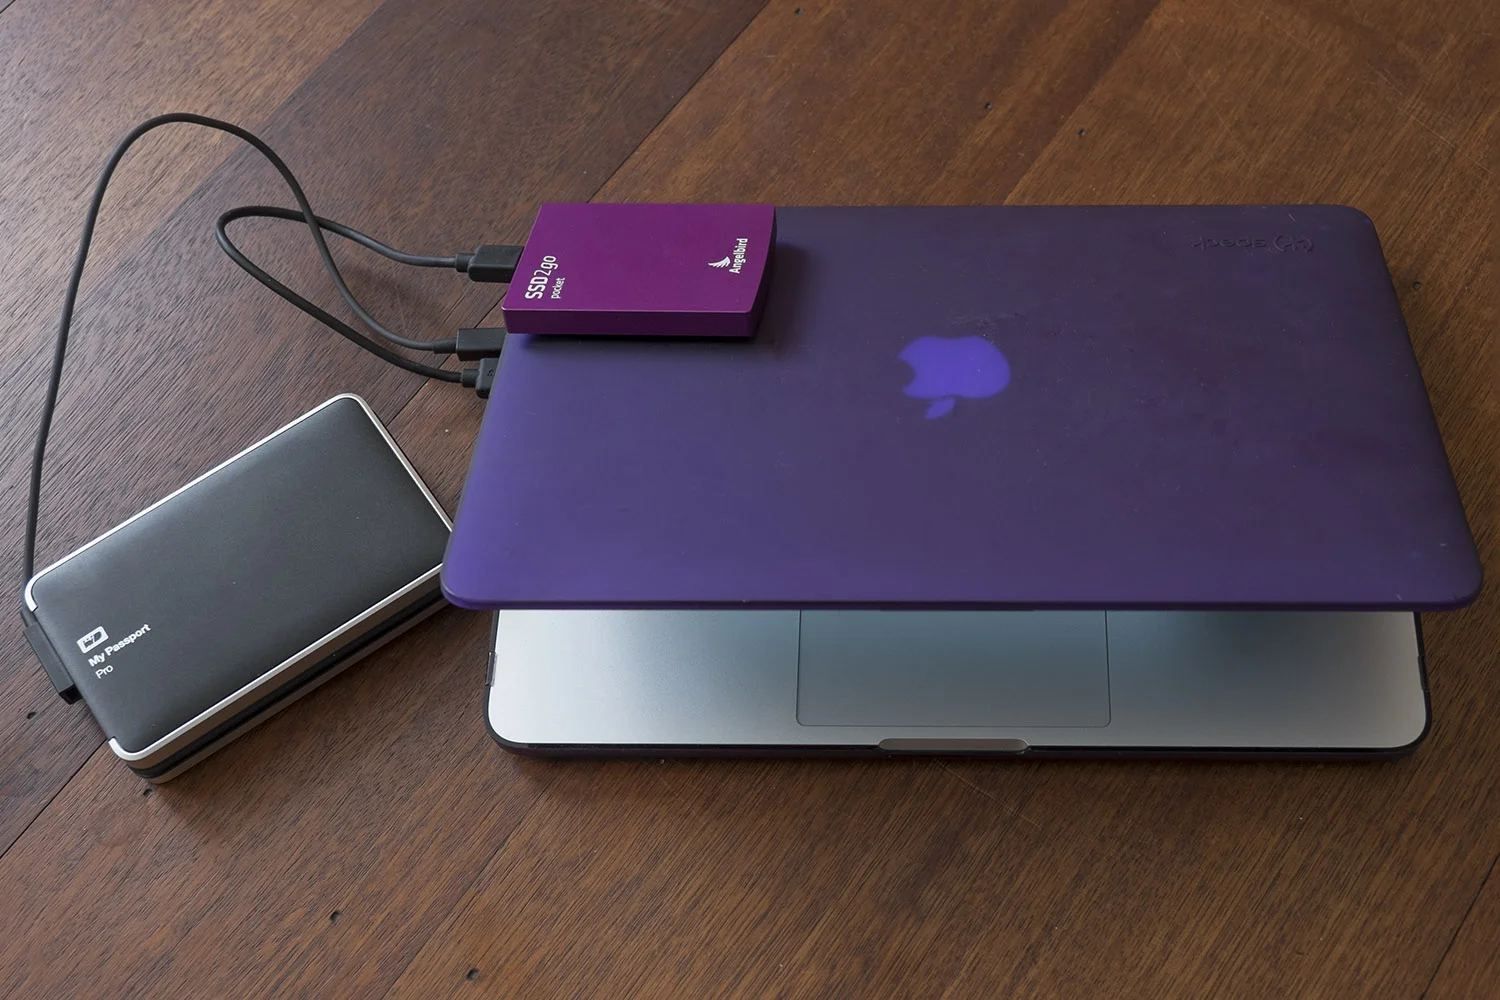
I see two big scenarios in which this drive really shines: the first is as a travel drive to store your photographs (and other essential data) on while you're traveling. This means the setup would look something like this:

WDLaptop2.jpg

This is the scenario I follow when I'm traveling: using Lightroom, I'll import my images from the SD card to the My Passport Pro. My Catalog and Previews are on an external 512 GB Angelbird SSD drive. When Lightroom prompts me to back up the catalog when I quit it, I altnernate that backup between the internal drive of my laptop and the WD My Passport Pro. This adds an extra layer of security for my Catalog, as I will always have a fairly recent version in at least two extra locations. I only backup the catalog itself, by the way, not the previews, as they are too bulky and can always be re-rendered if necessary. 

If your Lightroom Catalog is not as big as mine (I have over 130.000 images in it), you could also put the Catalog, Previews and Smart Previews on the internal drive of your laptop or... on the My Passport Pro as well. Lightroom will just run slower because of the slower read and write speeds of this type of drive compared to solid state memory. Ultimately, you're the only judge of whether 'slower' still means 'fast enough' or 'too slow'. 

Especially if you're using a MacBook Air for traveling, due to its limited internal hard drive space, I'd recommend against putting the catalog and previews on the internal drive.

Additional security precautions while traveling

Having my images and a backup of my Lightroom catalog on the My Passport Pro protects me against drive failure, but it does not protect me against theft or loss of the drive, obviously. That's why I never reformat my memory cards while I'm traveling: memory cards are cheap so I just bring plenty of them. By not reformatting them, I have an extra, super light backup which I can easily take with me. I also make it a habit never to leave the My Passport Pro and my laptop unattended together (like in the hotel room): I will always carry one of them with me. That's also an advantage of the 2 TB version over the 4 TB version: it's slightly lighter and quite a lot smaller.

If the internet is fast enough wherever I'm traveling, I'll try to upload my best pictures of the trip (say the 5 star ones) to Dropbox as yet an extra layer of security.

When I'm back home, I will connect my catalog drive and the WD My Passport Pro to my desktop computer and - using Lightroom ! -I will  transfer the files over to my main storage system (currently a Drobo 5D Thunderbolt, although I have been investigating the options of NAS storage), freeing up room on the My Passport Pro for the next trip.

Scenario 2: using the drive as your only dedicated photo drive

For this workflow, I would recommend the 4 TB version because... you never can have enough storage, right? In this case, you just use the My Passport Pro as a convenient, small Raid device with the added benefit that should you ever want to take it with you, it's small and light enough to do so. 

This gives you 2 TB of mirrored hard drive space. In the case of my Fujifilm Raw files, which weigh about 30 MB per image, this means I could safely store some 66.000 images on the 4 TB version. That's a lot of images! If you're planning on organizing and storing more images than that, you're probably better of using a bigger, heavier (and more expensive) Raid System or NAS system. 

UPDATE: SCENARIO 3 - See Mike's comment for a possible third scenario I hadn't thought of myself.

Pricing

As you might expect from the feature list: these drives aren't cheap. If you're more of the DIY variety, you could get two separate drives and use separate backup software to do something similar. Personally, I prefer to avoid hassling with too much gear and software so I prefer to pay a premium for the portability and the convenience of the WD My Passport Pro. The 2 TB version will set you back some 289 € (that's at Dutch online retailer Bol.com) while the 4 TB version - if you're lucky enough to find a dealer that has them in stock - retails for about 432 €. As often is the case, it pays to surf around a bit and also, if you're reading this from the US, consider yourself lucky as prices are cheaper there.

The verdict

If you're a photographer using a Mac, the My Passport Pro is a very convenient tool to add an extra layer of security in your photography workflow, whether you're on the go or in your studio. The 2 TB version is very compact for its features and although not exactly shirt-pocketable, even the 4 TB version is still easily transportable. I've been using the 2 TB version for over a year now and other than one of the rubber feet getting MIA, which I replaced by a bit of Sugru, it has performed flawlessly! 

Highly recommended!

The WD My Passport Wireless is another drive that can be of interest to photographers, as it features a built-in SD Card Reader

The WD My Passport Wireless is another drive that can be of interest to photographers, as it features a built-in SD Card Reader

By the way, if you're mainly needing an external drive to back-up travel images to, Western Digital has given itself some internal competition in the form of the My Passport Wireless, which I will review on this blog shortly. Suffice to say for now that the built-in SD card reader of this particular drive should be enough to draw a photographer's attention.


Using the Angelbird 512 GB SSD2go pocket as a Catalog Drive with Lightroom

The Angelbird 512 GB SSD2go Pocket

The SSD2go pocket is one of the smallest, lightest external Solid State Drives there is.

The SSD2go pocket is one of the smallest, lightest external Solid State Drives there is.

During a recent tradeshow, I came across the people of Angelbird Technologies. Angelbird is an SSD storage developer and manufacturer.

So amongst other SSD solutions, they develop and manufacture external external Solid State Drives (SSDs). 

I was immediately struck by the simple and elegant design of their SSD2go pocket. When I suggested the drive might be an interesting option for photographers to store their Lightroom catalog on, I was offered to try one out. This drive is about as small as it gets for an external drive: it measures a mere 89.0 x 69.9 x 10.4 mm (3.5 x 2. 75 x 0.41 inch) and weighs only 90 grams without the cable. Speaking of which, I was happy to see that Angelbird uses a different kind of USB3 cable: one that looks like the old, standard USB2 cables. The main advantage is that this type of cable fits much tighter in the drive's and your computer's USB port. As I use this drive a lot plugged into my laptop when I'm running Lightroom, this diminishes the risk of me accidentally pulling out the drive's cable. Especially with the intended use of the drive as a Lightroom catalog drive, this is a big one, as (accidentally) disconnecting a catalog drive when Lightroom is still running can wreck all kinds of havoc, including catalog corruption! Not with this drive: I can actually have the drive dangle from my laptop and it still won't disconnect!

The USB3 cable has a much tighter fit than regular USB3 cables which adds an extra protection against accidental data loss or Lightroom catalog corruption, caused by inadvertently pulling the cable out of the USB port.

The USB3 cable has a much tighter fit than regular USB3 cables which adds an extra protection against accidental data loss or Lightroom catalog corruption, caused by inadvertently pulling the cable out of the USB port.

I won't bore you with the technical details (you can find those on the Angelbird website), but suffice to say that the drive is really fast: how does a Sustained Read Speed of up to 450 MB/s and a Sustained Write Speed of up to 390 MB/s sound? The Angelbird people seem to put a lot of attention to details: there's a five year warranty (still, don't forget to back up as no company will give you your data back), the unit comes with two cables and you can choose two lines of custom engraving to appear on the back of the drive. This is more than a gimmick: I put my website and telephone number on there, in case I ever lose the drive (with that minute size, something to consider!). For the fashion-conscious: you can choose between 4 colours. Again, this can be handy to easily tell drives apart. 

So, where does this drive fit in in a Lightroom workflow?

Working with two computers and an ECD (External Catalog Drive) 

Quite a number of photographers have two computers: a laptop and a desktop. As you might know, you can’t put your Lightroom Catalog on a network drive. Prior to Lightroom 5, if you kept your catalog on the internal drive of your desktop and you wanted to edit (part of ) your images on the laptop, you had to export those images as a catalog to an external drive, attach that drive to your laptop, open the exported catalog on your laptop, edit the images, and then reimport that changed catalog back into your main catalog on your desktop via File > Import from Another Catalog. If this sounds convoluted, well, it’s because it is; it’s definitely something for more advanced users and not something that you would want to do a couple times a day. 

The alternative used to be that you could put your catalog and also your images on one or more external drives and then attach those to the computer you wanted to work with. But large external drives aren’t easily transportable, nor are they meant to be! And they tend to be slower, too.

Smart Previews to the rescue!

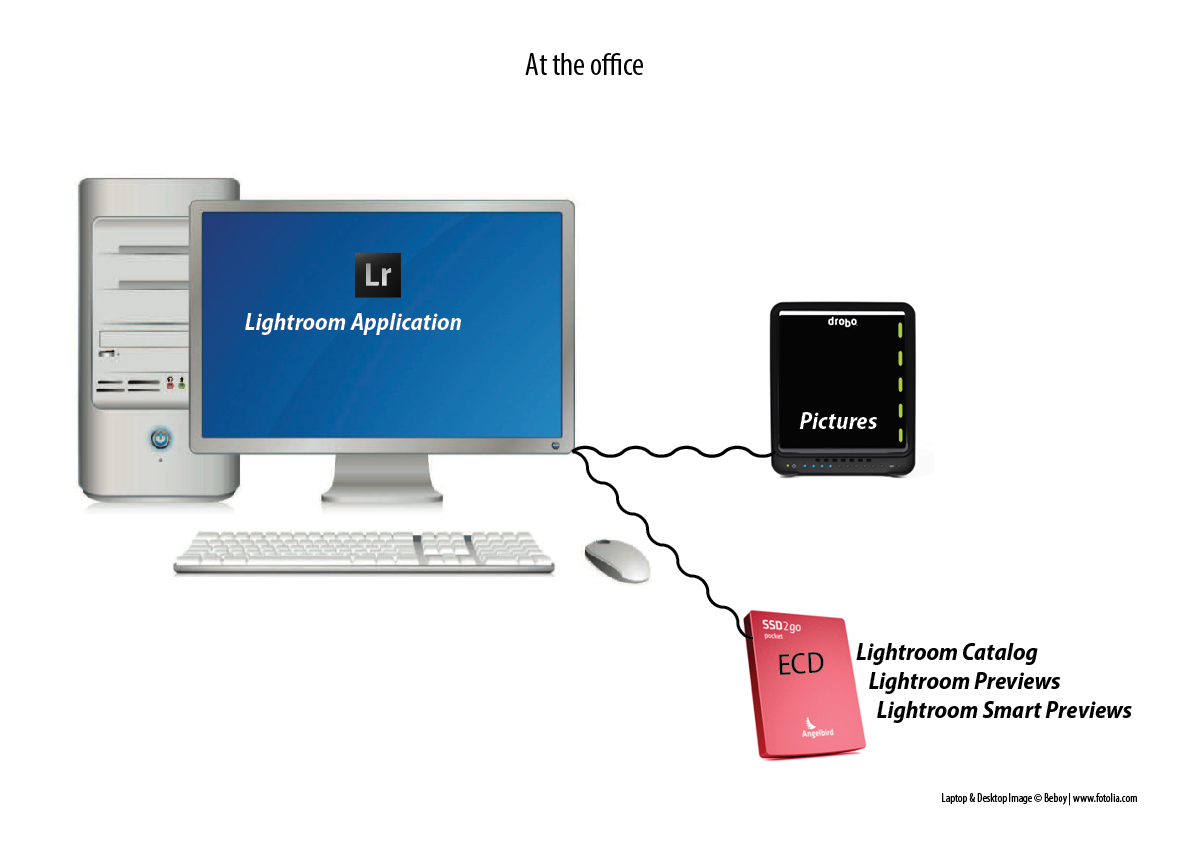
Smart Previews, introduced in Lightroom 5, offer a solution: the workflow consists of putting your catalog (and therefore the regular Previews and the Smart Previews) on a fast external drive (I call this the ECD for ‘External Catalog Drive) such as the Angelbird SSD2go pocket. The images themselves can then reside on the internal drive of your desktop computer, or on yet another external drive normally connected to that desktop computer. 

You then simply connect the ECD to the computer you want to work on at that moment. On your desktop computer, you will be working on the originals; on your laptop you will be working on the Smart Previews. 

In my personal workflow, my Lightroom catalog contains references to some 130,000 images. These are on a Drobo 5D where they take about 4 TB of hard drive space. The catalog, Previews and Smart Previews are on an external 512 GB SSD2go pocket. The S…

In my personal workflow, my Lightroom catalog contains references to some 130,000 images. These are on a Drobo 5D where they take about 4 TB of hard drive space. The catalog, Previews and Smart Previews are on an external 512 GB SSD2go pocket. The Smart Previews ‘weigh’ only about 100 GB. I can control the size of the ‘regular’ Previews (which are larger than the Smart Previews) via the options in the File Handling tab found under Lightroom > Catalog Settings (Mac) or Edit > Catalog Settings (Windows). 

When I want to work on my laptop, I will quit Lightroom on my desktop computer, disconnect the ECD, connect it to the laptop, start up Lightroom, open the catalog from the ECD and work on that. 

When I want to work on my laptop, I will quit Lightroom on my desktop computer, disconnect the ECD, connect it to the laptop, start up Lightroom, open the catalog from the ECD and work on that. 

When I’m finished working on the laptop, I will quit Lightroom, disconnect the ECD, reconnect to the desktop, start up Lightroom, open the catalog from the ECD, and all the edits I’ve made while working on my laptop will automatically be transferred…

When I’m finished working on the laptop, I will quit Lightroom, disconnect the ECD, reconnect to the desktop, start up Lightroom, open the catalog from the ECD, and all the edits I’ve made while working on my laptop will automatically be transferred to the high-resolution originals on my Drobo. 


POWER TIP: If you also put the Mac and Windows trial versions of Lightroom 5 (which you can download from the Adobe website) in a folder on your ECD, then you can literally open your catalog anywhere in the world, even if you don’t have your own computer on hand; just install the trial version on any (compatible) computer and you can get started!

Adding a 'Work in Progress' folder to the mix

If you have some spare space on your ECD, you can add a 'Work in Progress' folder: this is handy to store your latest images, or for example images you shoot while traveling. Once I no longer need the high resolution original raw files on the ECD, I…

If you have some spare space on your ECD, you can add a 'Work in Progress' folder: this is handy to store your latest images, or for example images you shoot while traveling. Once I no longer need the high resolution original raw files on the ECD, I simply move them - in Lightroom - to my Drobo, making room on the ECD for new 'work in progress' images.

Technically, my Lightroom Catalog and previews could fit on a 256 GB model, yet, I opted for the larger size for two reasons: it gives me some extra headroom for when my catalog grows (each extra file I import means I need to put about a 5 MB 1:1 preview and a 1.5 MB Smart Preview on the ECD) but it also allows me to put a 'Work in Progress' folder on the ECD: this is especially useful if you want to be able to edit files not only in Lightroom but also in Photoshop. Smart Previews can only be edited in Lightroom. So, I make it a habit to import recent files to a 'Work in Progress' folder on the Angelbird SSD2go pocket. This allows me to edit them in Photoshop or plug-ins, even when I'm on my laptop!

Catalog Backups

One thing to watch out for is your catalog backup: make sure that you’re even more rigorous than otherwise when it comes to making backups because external drives of course run a higher risk of getting lost or stolen, or—in the case of the classical, rotating drives—to fail. So, save your catalog backups on the internal drive of the desktop or laptop (or alternating between both) and verify in the back-up dialog window whether Lightroom is indeed backing up to the correct drive. Now that Lightroom 6 compresses your catalog backups, this extra security costs you even less in terms of storage space.

Isn't Dropbox an alternative?

An alternative to using an ECD would be to store your catalog (and the Previews and Smart Previews) on Dropbox. However, that not only requires a paid subscription (the free accounts are too small to store anything but a minute catalog) and moreover, it requires rigourous attention to waiting for your catalog to sync across your systems before opening it up on the other machine. Otherwise, you risk opening an outdated catalog and the longer it takes to realize that, the bigger mess you're in. Also, synching larger catalogs and previews can take quite a while. Therefore, the Dropbox route is one I don't personally use nor particularly recommend.

A little bit of Velcro goes a long way

I've added some Velcro to the back of my MacBook's protective cover and to the back of the SSD2go. This way I can use and move my laptop around without worrying about the drive falling.

I've added some Velcro to the back of my MacBook's protective cover and to the back of the SSD2go. This way I can use and move my laptop around without worrying about the drive falling.

Even though, as mentioned before, the Angelbird's USB cables fit firmly in the USB port, I still want to avoid unnecessary mishandling of that port. That's why I've added some velcro on the Angelbird's back as well as on my laptop's protective cover. They loose some of their design cool, but it's just easier to transport both through the house as I go from one room to another.

Conclusion

For anyone looking for a fast and hassle-free external drive to put their Lightroom catalog on so they can use it in a multi-computer setup, the Angelbird SSD2go pocket is a great choice. It exists in 3 sizes up to 512 GB. Because you only store the catalog itself, the previews and the smart previews, those capacities will get you a long way. Even if you don't need the full 512 GB right now, having some extra room could be handy because you can use it to store your 'Work in Progress' as well. Add to that the light weight, small size, lightning fast transfer speeds and great looks and it's easy to see why the Angelbird is now my favourite external catalog drive for Lightroom.

Angelbird's SSD2go pocket is available from the Angelbird website as well as a list of international retailers (the bespoke engraving is only available through their website). Prices start as low as 169 € for the 128 GB model.


This is an adapted excerpt from my Lightroom 5 Up to Speed + Lightroom 6 Unmasked eBook bundle. Between them, these two eBooks offer over 400 pages of solid Lightroom advice, tips and tricks and case studies. The bundle is available for a mere CAD $20 through www.craftandvision.com. (Scroll down from the product page to add the bundle to your cart instead of the individual eBooks).

Wirelessly tethering your camera into Lightroom with an Eyefi MobiPro SD Card

In a previous blog post, I did a review about the new Eyefi MobiPro SD Card. You might want to read that blog post first before watching this video. One of the conclusions was that for real-life tethered shooting (e.g. in a studio), wirelessly sending over raw files is just too slow (unless you're paid by the hour). So, in this follow-up article, I want to investigate an alternative workflow, which is a lot more efficient. Basically, I use this technique to wirelessly tether my 3 year old Fujifilm X-Pro 1 into Lightroom and it works like a charm! You can pretty much use this technique with most cameras that use SD cards.

The main workflow is as follows:

  1. Set your camera up to shoot raw + JPG
  2. Only transfer the JPG files wirelessly from the Eyefi card to your computer (that's the default Eyefi setup anyway)
  3. Use Lightroom's Auto-Import feature to import the wirelessly transferred JPG files into Lightroom
  4. Make any edits, add star ratings, keywords and pick or reject flags to the JPG files during your tethered shoot
  5. At the end of the shoot, copy the raw files over from the SD card to the same Lightroom folder the jpg files are in, 'the old fashioned way', i.e. manually using Lightroom's regular Import dialog
  6. (And this is the magical part) Have Lightroom automatically synchronise any edits (except for cropping) and metadata from the jpg files to the corresponding raw files, using John Beardsworth's Syncomatic plugin.

That's the short and sweet version. You can get the full lowdown in this video. 

Review: Eyefi Mobi Pro 32 GB wireless SD card

Eyefi kindly sent me a Mobi Pro 32 GB wireless SD card to review. The timing was right, because I had been looking for a way to create a tethered workflow in which I can send images I take with my Fujifilm cameras to Lightroom. Although Fujifilm have announced a tethering solution, it is not yet available and once it will be, it will still require you to use a cable.

What is it?

The Eyefi Mobi Pro 32 GB wireless SD card is, as its name implies, a 32 GB SD card that includes a wireless transmitter so you can send your photos wirelessly to your smartphone, tablet or computer. It's priced at about $99 / €89. Eyefi also has a cheaper wireless card, the Eyefi Mobi, that exists in 8 and 16 GB versions. The difference between both is that the Pro version can...

  • also transfer raw files
  • has an option to only transfer selected photos (the regular Mobi transfers all photos)
  • use its own wifi network but also be integrated in your existing home or office network

Note that these options are off by default, but you can enable them by putting your card in your desktop computer's card reader and going into the Eyefi Desktop App's preferences. More about that later.

Working with mobile devices

The Mobi Pro not only allows you to transfer raw files to your computer, you can also send images (JPEG only, if I'm correct) to a mobile device. You only have to install the Eyefi Mobi app, enter the card's serial number in the app and connect your mobile device to the wifi network that the card emits. It was really nice to see the images that I was shooting with my wifi-less X-Pro 1 appearing on my iPhone. 

 
My X-Pro 1 now has wifi capabilities, thanks to the Eyefi Mobi Pro!

My X-Pro 1 now has wifi capabilities, thanks to the Eyefi Mobi Pro!


So, if nothing else, this card enables you to transfer images that you shoot with a non-wifi equipped camera to a tablet or phone, from which you could then share them to Instagram, Facebook or edit them in an App such as Snapseed. Heck, if you're a Lightroom CC user, you could even have them automatically imported in Lightroom mobile and that way have them wind up in your desktop version of Lightroom, too. Lots of possibilities there! 

The Mobi Pro turns (almost) any non-wifi equipped camera into a camera that lets you share images to your mobile devices
On your mobile device, select the Eyefi Mobi Card's network and you're good to go!

On your mobile device, select the Eyefi Mobi Card's network and you're good to go!

By default, the card sends out its own ad hoc wifi signal, so you can even do this in the middle of nowhere: you just have to select the card's wifi network in your phone's wifi settings and you're good to go. As mentioned, by default it sends all the images over but you can configure it (computer required) to only transfer those that you mark on your camera as locked or protected. On the X-Pro 1, when in playback mode, press the OK key and choose the 5th option from the Playback menu: Protect. 

So far, so good. I was starting to think it would be nice to use this setup during workshops: I do a lot of teaching and it would be fun to have the images appear on an iPad that I could then pass around to the students. It sure beats looking at a camera LCD or viewfinder (especially the X-Pro 1's EVF)!

The (jpg) images transfer nicely and relatively quickly to the Eyefi Mobi App

The (jpg) images transfer nicely and relatively quickly to the Eyefi Mobi App

However, that's where things didn't quite go as hoped: each time the camera went to sleep, I had to reestablish the wifi connection. So I set the camera to not go to sleep, but then the card's internal settings wrecked havoc: apparently, to conserve power on the camera, the card will shut down the connection after 1 to 2 minutes of non-use. Which is too soon for a real world tethering workflow. I've looked around but there seems to be no easy fix to this. According to Eyefi Customer Care, this cannot be changed. Which is a bummer, because it makes the card unusable for the teaching use I had in mind. Mind you that this auto-disconnect issue does not seem to happen when you shoot to a laptop or desktop computer.

Eyefi Cloud

The Eyefi Mobi Pro also comes with a complimentary free year of Eyefi Cloud: this service lets you upload an (unlimited) amount of images to the Eyefi servers, from where you can also share them or you can use this service as a cloud backup (you can even upload old photos so the service isn't limited to photos you took with an Eyefi card). Eyefi Cloud lets you display your images in a timeline no matter which device you used to take them with. The pictures are shared across all your devices and available for viewing even when there's no internet connection. Of course, you can also share pictures with other people.

Although the concept sounds nice enough, I personally won't be using this service as I already have a full computer backup through backblaze.com and I use Lightroom mobile to display and sync my images online across different devices.

Tethering to a desktop or laptop computer

Being able to transfer images to a phone or tablet is nice, but the main reason I was interested in this card was to wirelessly transfer my raw files to a watched folder on my computer, and have Lightroom pick them up from there using the Lightroom's Auto Import feature. This way, I was hoping not only to shoot tethered into Lightroom, but to do so wirelessly!

The first time you use your card, you have to enter the activation code and then take a couple of test shots. Once your card is recognised, you're good to go. This setup procedure only has to be done once. Make sure to save the card with the activat…

The first time you use your card, you have to enter the activation code and then take a couple of test shots. Once your card is recognised, you're good to go. This setup procedure only has to be done once. Make sure to save the card with the activation code in case you change computers or want to use the card with a different computer, too.

I installed the Mobi Pro Desktop App (make sure you have the latest version of that specific app - the version that works with the regular Eyefi Mobi card will not support the extra features of the Mobi Pro card) and set the card up to transfer raw files, too. You have to insert the card in your computer to make that change. A nice touch for raw + jpeg shooters is that you can send both file types to different folders if you want.

The Pro card offers the ability to add up to 32 Home Networks, transfer raw files and enable selective transfer of files.

The Pro card offers the ability to add up to 32 Home Networks, transfer raw files and enable selective transfer of files.

Again, so far, so good. Just like with the iPhone, after the initial setup procedure is over, you select the card's wifi signal in your computer's list of available networks and you're good to go. However, then came the disappointment: it took about 30 seconds to download a 30 megabyte raw from the X-Pro 1. On top of that, sometimes, the desktop app would not immediately start to download after I made a shot. So I would shoot again and then both shots would be downloaded from the card together. Oddly enough, the second shot would sometimes arrive on my computer before the first, making it hard to judge my shoot's progress. I checked this with Eyefi's (excellent and quick) customer support and they said the maximum speed of the card, using the card's own network, is between 10 to 15 megabit per second, which means that theoretically, that raw file could download in about 15 seconds. But even that is quite long a wait in the heat of a shoot. Eyefi also recommends to keep the card close to the receiving device when transferring. If you're using a megapixel monster like the D800 then those times would easily double.

One of the other exclusive features of the Pro version of the card is that it can also work via your own WIFI network: in fact, you can store up to 32 different networks in the card and it will then default to any of those if it finds one and otherwise it will fall back to creating its own ad-hoc network. This has two advantages: it keeps you from having to switch back and forth between your own network and the card's network and you can use your computer for things such as internet browsing while using the card. I had hoped that the transfer speed might improve, too but I was unable to confirm that. In fact, when I tried the card over my own wifi network, transfer speed was slower than through the card's own ad hoc network. Working via my own network did give me one (important) advantage: even if I put the camera down for a while, I could just pick it up again and start shooting and the files would automatically transfer again. When using the Eyefi's ad hoc (own) wifi signal, just as with my iPhone, the network connection dropped after a minute or two. It's really a pity though that we cannot configure this timing. I would be interested to hear other user's experience with this.

Back to jpgs, then?

So I decided to try how fast a jpg would transfer. FINE jpgs from an X-Pro 1 are about 3 megabyte and those downloaded in 3 seconds. A burst of 10 shots downloaded in half a minute. Unless you're shooting very fast, I consider that workable. So at least, when I'm in a situation where I can use another network than the card's own (because of the reason explained at the end of the previous paragraph), I seem to be able to tether jpg files to the computer steadily enough.

Conclusion

Unless you're a very slow and deliberate shooter, raw tethered shooting in a professional environment is possible in theory, but not in practice, IMHO. Does that mean I won't be using the Mobi Pro? No, on the contrary: I find it to be a valuable tool, as long as you set your expectations right, which was the point of this blog post.

First of all, I like the fact that I can transfer selected shots from my X-Pro 1 to my iPad or iPhone for social sharing or quick editing. And as far as tethered shooting to a computer goes: whenever there's a shoot where I feel I can benefit from shooting wirelessly straight into Lightroom, I will shoot raw + jpg on the card but transfer only the jpg files wirelessly and import those into Lightroom. I will do my ratings, flags and possibly some minor editing on those jpg images. After the shoot, when the client or the model have gone home, I will copy the raw files over the old-fashioned way: by putting the card into my computer!

And before you pity me for having to manually copy over my edits from the jpg to the raw files or even worse, doing everything over again, don't: I've got a trick up my sleeve that I will share in next week's blog post. Stay tuned!

UPDATE: 'next week's blog post' is now live, here! In this blog post, I'll show you how to automatically import your images into Lightroom and how to transfer any edits you've already performed on the JPGs to your raw files.

Cons

  • wireless raw transfer too slow for tethered shooting use in studio or outside, using jpg is recommended
  • auto-disconnects too quickly when used with iPhone / iPad for tethered use with these devices

Pros

  • turns cameras without wifi into wifi-enabled cameras
  • works with Mac and Windows, iOS and Android
  • wireless transfer of raw files, ok for one-offs
  • option to transfer only selected files
  • if configured, works with your own network
  • fast customer support