Using the Angelbird 512 GB SSD2go pocket as a Catalog Drive with Lightroom

The Angelbird 512 GB SSD2go Pocket

The SSD2go pocket is one of the smallest, lightest external Solid State Drives there is.

The SSD2go pocket is one of the smallest, lightest external Solid State Drives there is.

During a recent tradeshow, I came across the people of Angelbird Technologies. Angelbird is an SSD storage developer and manufacturer.

So amongst other SSD solutions, they develop and manufacture external external Solid State Drives (SSDs). 

I was immediately struck by the simple and elegant design of their SSD2go pocket. When I suggested the drive might be an interesting option for photographers to store their Lightroom catalog on, I was offered to try one out. This drive is about as small as it gets for an external drive: it measures a mere 89.0 x 69.9 x 10.4 mm (3.5 x 2. 75 x 0.41 inch) and weighs only 90 grams without the cable. Speaking of which, I was happy to see that Angelbird uses a different kind of USB3 cable: one that looks like the old, standard USB2 cables. The main advantage is that this type of cable fits much tighter in the drive's and your computer's USB port. As I use this drive a lot plugged into my laptop when I'm running Lightroom, this diminishes the risk of me accidentally pulling out the drive's cable. Especially with the intended use of the drive as a Lightroom catalog drive, this is a big one, as (accidentally) disconnecting a catalog drive when Lightroom is still running can wreck all kinds of havoc, including catalog corruption! Not with this drive: I can actually have the drive dangle from my laptop and it still won't disconnect!
The USB3 cable has a much tighter fit than regular USB3 cables which adds an extra protection against accidental data loss or Lightroom catalog corruption, caused by inadvertently pulling the cable out of the USB port.

The USB3 cable has a much tighter fit than regular USB3 cables which adds an extra protection against accidental data loss or Lightroom catalog corruption, caused by inadvertently pulling the cable out of the USB port.

I won't bore you with the technical details (you can find those on the Angelbird website), but suffice to say that the drive is really fast: how does a Sustained Read Speed of up to 450 MB/s and a Sustained Write Speed of up to 390 MB/s sound? The Angelbird people seem to put a lot of attention to details: there's a five year warranty (still, don't forget to back up as no company will give you your data back), the unit comes with two cables and you can choose two lines of custom engraving to appear on the back of the drive. This is more than a gimmick: I put my website and telephone number on there, in case I ever lose the drive (with that minute size, something to consider!). For the fashion-conscious: you can choose between 4 colours. Again, this can be handy to easily tell drives apart. 

So, where does this drive fit in in a Lightroom workflow?

Working with two computers and an ECD (External Catalog Drive) 

Quite a number of photographers have two computers: a laptop and a desktop. As you might know, you can’t put your Lightroom Catalog on a network drive. Prior to Lightroom 5, if you kept your catalog on the internal drive of your desktop and you wanted to edit (part of ) your images on the laptop, you had to export those images as a catalog to an external drive, attach that drive to your laptop, open the exported catalog on your laptop, edit the images, and then reimport that changed catalog back into your main catalog on your desktop via File > Import from Another Catalog. If this sounds convoluted, well, it’s because it is; it’s definitely something for more advanced users and not something that you would want to do a couple times a day. 

The alternative used to be that you could put your catalog and also your images on one or more external drives and then attach those to the computer you wanted to work with. But large external drives aren’t easily transportable, nor are they meant to be! And they tend to be slower, too.

Smart Previews to the rescue!

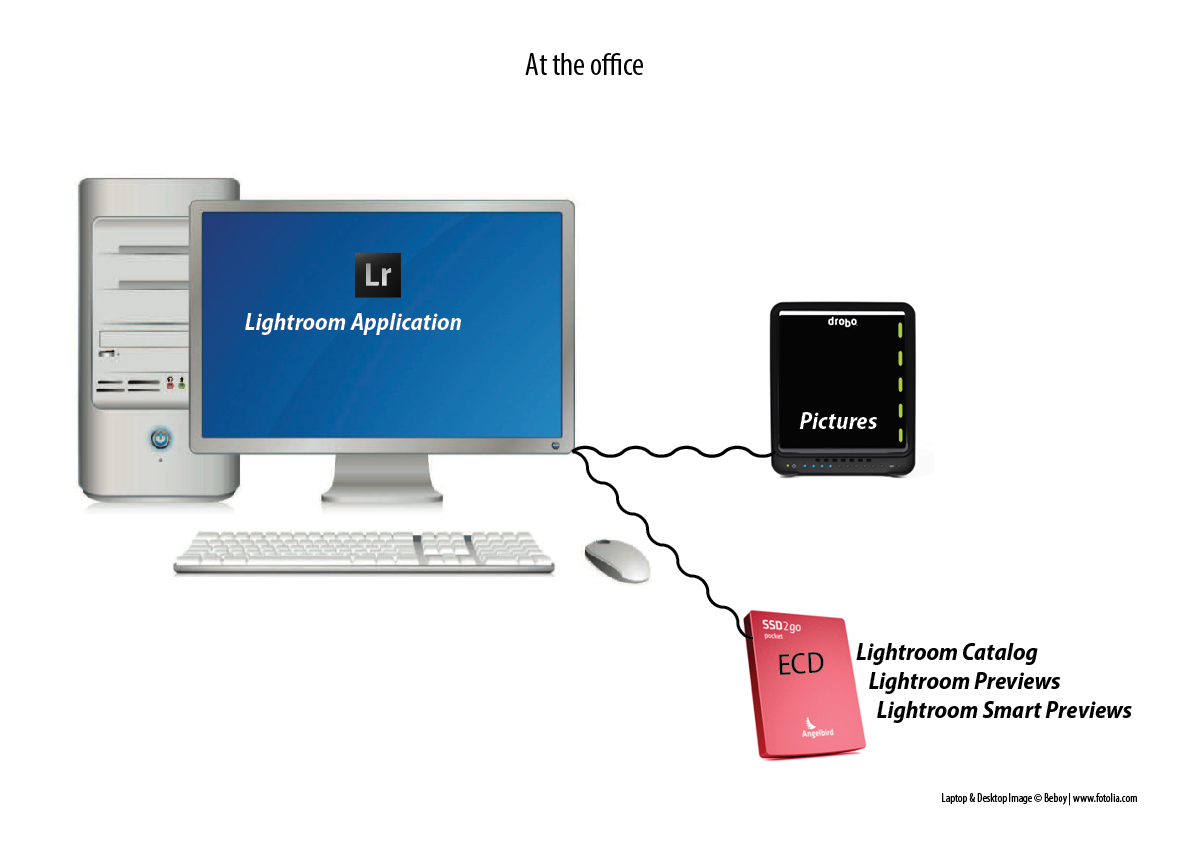
Smart Previews, introduced in Lightroom 5, offer a solution: the workflow consists of putting your catalog (and therefore the regular Previews and the Smart Previews) on a fast external drive (I call this the ECD for ‘External Catalog Drive) such as the Angelbird SSD2go pocket. The images themselves can then reside on the internal drive of your desktop computer, or on yet another external drive normally connected to that desktop computer. 

You then simply connect the ECD to the computer you want to work on at that moment. On your desktop computer, you will be working on the originals; on your laptop you will be working on the Smart Previews. 

In my personal workflow, my Lightroom catalog contains references to some 130,000 images. These are on a Drobo 5D where they take about 4 TB of hard drive space. The catalog, Previews and Smart Previews are on an external 512 GB SSD2go pocket. The S…

In my personal workflow, my Lightroom catalog contains references to some 130,000 images. These are on a Drobo 5D where they take about 4 TB of hard drive space. The catalog, Previews and Smart Previews are on an external 512 GB SSD2go pocket. The Smart Previews ‘weigh’ only about 100 GB. I can control the size of the ‘regular’ Previews (which are larger than the Smart Previews) via the options in the File Handling tab found under Lightroom > Catalog Settings (Mac) or Edit > Catalog Settings (Windows). 

When I want to work on my laptop, I will quit Lightroom on my desktop computer, disconnect the ECD, connect it to the laptop, start up Lightroom, open the catalog from the ECD and work on that. 

When I want to work on my laptop, I will quit Lightroom on my desktop computer, disconnect the ECD, connect it to the laptop, start up Lightroom, open the catalog from the ECD and work on that. 

When I’m finished working on the laptop, I will quit Lightroom, disconnect the ECD, reconnect to the desktop, start up Lightroom, open the catalog from the ECD, and all the edits I’ve made while working on my laptop will automatically be transferred…

When I’m finished working on the laptop, I will quit Lightroom, disconnect the ECD, reconnect to the desktop, start up Lightroom, open the catalog from the ECD, and all the edits I’ve made while working on my laptop will automatically be transferred to the high-resolution originals on my Drobo. 


POWER TIP: If you also put the Mac and Windows trial versions of Lightroom 5 (which you can download from the Adobe website) in a folder on your ECD, then you can literally open your catalog anywhere in the world, even if you don’t have your own computer on hand; just install the trial version on any (compatible) computer and you can get started!

Adding a 'Work in Progress' folder to the mix

If you have some spare space on your ECD, you can add a 'Work in Progress' folder: this is handy to store your latest images, or for example images you shoot while traveling. Once I no longer need the high resolution original raw files on the ECD, I…

If you have some spare space on your ECD, you can add a 'Work in Progress' folder: this is handy to store your latest images, or for example images you shoot while traveling. Once I no longer need the high resolution original raw files on the ECD, I simply move them - in Lightroom - to my Drobo, making room on the ECD for new 'work in progress' images.

Technically, my Lightroom Catalog and previews could fit on a 256 GB model, yet, I opted for the larger size for two reasons: it gives me some extra headroom for when my catalog grows (each extra file I import means I need to put about a 5 MB 1:1 preview and a 1.5 MB Smart Preview on the ECD) but it also allows me to put a 'Work in Progress' folder on the ECD: this is especially useful if you want to be able to edit files not only in Lightroom but also in Photoshop. Smart Previews can only be edited in Lightroom. So, I make it a habit to import recent files to a 'Work in Progress' folder on the Angelbird SSD2go pocket. This allows me to edit them in Photoshop or plug-ins, even when I'm on my laptop!

Catalog Backups

One thing to watch out for is your catalog backup: make sure that you’re even more rigorous than otherwise when it comes to making backups because external drives of course run a higher risk of getting lost or stolen, or—in the case of the classical, rotating drives—to fail. So, save your catalog backups on the internal drive of the desktop or laptop (or alternating between both) and verify in the back-up dialog window whether Lightroom is indeed backing up to the correct drive. Now that Lightroom 6 compresses your catalog backups, this extra security costs you even less in terms of storage space.

Isn't Dropbox an alternative?

An alternative to using an ECD would be to store your catalog (and the Previews and Smart Previews) on Dropbox. However, that not only requires a paid subscription (the free accounts are too small to store anything but a minute catalog) and moreover, it requires rigourous attention to waiting for your catalog to sync across your systems before opening it up on the other machine. Otherwise, you risk opening an outdated catalog and the longer it takes to realize that, the bigger mess you're in. Also, synching larger catalogs and previews can take quite a while. Therefore, the Dropbox route is one I don't personally use nor particularly recommend.

A little bit of Velcro goes a long way

I've added some Velcro to the back of my MacBook's protective cover and to the back of the SSD2go. This way I can use and move my laptop around without worrying about the drive falling.

I've added some Velcro to the back of my MacBook's protective cover and to the back of the SSD2go. This way I can use and move my laptop around without worrying about the drive falling.

Even though, as mentioned before, the Angelbird's USB cables fit firmly in the USB port, I still want to avoid unnecessary mishandling of that port. That's why I've added some velcro on the Angelbird's back as well as on my laptop's protective cover. They loose some of their design cool, but it's just easier to transport both through the house as I go from one room to another.

Conclusion

For anyone looking for a fast and hassle-free external drive to put their Lightroom catalog on so they can use it in a multi-computer setup, the Angelbird SSD2go pocket is a great choice. It exists in 3 sizes up to 512 GB. Because you only store the catalog itself, the previews and the smart previews, those capacities will get you a long way. Even if you don't need the full 512 GB right now, having some extra room could be handy because you can use it to store your 'Work in Progress' as well. Add to that the light weight, small size, lightning fast transfer speeds and great looks and it's easy to see why the Angelbird is now my favourite external catalog drive for Lightroom.

Angelbird's SSD2go pocket is available from the Angelbird website as well as a list of international retailers (the bespoke engraving is only available through their website). Prices start as low as 169 € for the 128 GB model.


This is an adapted excerpt from my Lightroom 5 Up to Speed + Lightroom 6 Unmasked eBook bundle. Between them, these two eBooks offer over 400 pages of solid Lightroom advice, tips and tricks and case studies. The bundle is available for a mere CAD $20 through www.craftandvision.com. (Scroll down from the product page to add the bundle to your cart instead of the individual eBooks).

Wirelessly tethering your camera into Lightroom with an Eyefi MobiPro SD Card

In a previous blog post, I did a review about the new Eyefi MobiPro SD Card. You might want to read that blog post first before watching this video. One of the conclusions was that for real-life tethered shooting (e.g. in a studio), wirelessly sending over raw files is just too slow (unless you're paid by the hour). So, in this follow-up article, I want to investigate an alternative workflow, which is a lot more efficient. Basically, I use this technique to wirelessly tether my 3 year old Fujifilm X-Pro 1 into Lightroom and it works like a charm! You can pretty much use this technique with most cameras that use SD cards.

The main workflow is as follows:

  1. Set your camera up to shoot raw + JPG
  2. Only transfer the JPG files wirelessly from the Eyefi card to your computer (that's the default Eyefi setup anyway)
  3. Use Lightroom's Auto-Import feature to import the wirelessly transferred JPG files into Lightroom
  4. Make any edits, add star ratings, keywords and pick or reject flags to the JPG files during your tethered shoot
  5. At the end of the shoot, copy the raw files over from the SD card to the same Lightroom folder the jpg files are in, 'the old fashioned way', i.e. manually using Lightroom's regular Import dialog
  6. (And this is the magical part) Have Lightroom automatically synchronise any edits (except for cropping) and metadata from the jpg files to the corresponding raw files, using John Beardsworth's Syncomatic plugin.

That's the short and sweet version. You can get the full lowdown in this video. 

Summary Block
This block has no content yet. Items you add to the page connected to this block will display here.

Custom Graduated Filters in Color Efex Pro 4

This tutorial is about one of my favorite filters in Color Efex Pro 4: the Graduated Filter (it’s only one of 52 filters, by the way). If you’ve ever used a real graduated filter (or a software-version in a graphics application), you know that you cannot have buildings or trees protruding from the foreground into the background… That is, unless you use Color Efex' Graduated filter. Thanks to the unique Control Point technology, which I explain in the video, you can basically create custom Graduated Filters. I apologise for the rather crude audio quality.

Now you might argue that the new Filter Brush in Lightroom 6 does something similar, but the Control Point feature is still a bit stronger in my opinion, as it works automatically, or should I say: 'automagically'.

Color Efex Pro is part of the Nik Collection by Google, a Lightroom and Photoshop set of plug-ins that contains 6 other plugins as well.

Review: Eyefi Mobi Pro 32 GB wireless SD card

Eyefi kindly sent me a Mobi Pro 32 GB wireless SD card to review. The timing was right, because I had been looking for a way to create a tethered workflow in which I can send images I take with my Fujifilm cameras to Lightroom. Although Fujifilm have announced a tethering solution, it is not yet available and once it will be, it will still require you to use a cable.

What is it?

The Eyefi Mobi Pro 32 GB wireless SD card is, as its name implies, a 32 GB SD card that includes a wireless transmitter so you can send your photos wirelessly to your smartphone, tablet or computer. It's priced at about $99 / €89. Eyefi also has a cheaper wireless card, the Eyefi Mobi, that exists in 8 and 16 GB versions. The difference between both is that the Pro version can...

  • also transfer raw files
  • has an option to only transfer selected photos (the regular Mobi transfers all photos)
  • use its own wifi network but also be integrated in your existing home or office network

Note that these options are off by default, but you can enable them by putting your card in your desktop computer's card reader and going into the Eyefi Desktop App's preferences. More about that later.

Working with mobile devices

The Mobi Pro not only allows you to transfer raw files to your computer, you can also send images (JPEG only, if I'm correct) to a mobile device. You only have to install the Eyefi Mobi app, enter the card's serial number in the app and connect your mobile device to the wifi network that the card emits. It was really nice to see the images that I was shooting with my wifi-less X-Pro 1 appearing on my iPhone. 

 
My X-Pro 1 now has wifi capabilities, thanks to the Eyefi Mobi Pro!

My X-Pro 1 now has wifi capabilities, thanks to the Eyefi Mobi Pro!


So, if nothing else, this card enables you to transfer images that you shoot with a non-wifi equipped camera to a tablet or phone, from which you could then share them to Instagram, Facebook or edit them in an App such as Snapseed. Heck, if you're a Lightroom CC user, you could even have them automatically imported in Lightroom mobile and that way have them wind up in your desktop version of Lightroom, too. Lots of possibilities there! 

The Mobi Pro turns (almost) any non-wifi equipped camera into a camera that lets you share images to your mobile devices
On your mobile device, select the Eyefi Mobi Card's network and you're good to go!

On your mobile device, select the Eyefi Mobi Card's network and you're good to go!

By default, the card sends out its own ad hoc wifi signal, so you can even do this in the middle of nowhere: you just have to select the card's wifi network in your phone's wifi settings and you're good to go. As mentioned, by default it sends all the images over but you can configure it (computer required) to only transfer those that you mark on your camera as locked or protected. On the X-Pro 1, when in playback mode, press the OK key and choose the 5th option from the Playback menu: Protect. 

So far, so good. I was starting to think it would be nice to use this setup during workshops: I do a lot of teaching and it would be fun to have the images appear on an iPad that I could then pass around to the students. It sure beats looking at a camera LCD or viewfinder (especially the X-Pro 1's EVF)!

The (jpg) images transfer nicely and relatively quickly to the Eyefi Mobi App

The (jpg) images transfer nicely and relatively quickly to the Eyefi Mobi App

However, that's where things didn't quite go as hoped: each time the camera went to sleep, I had to reestablish the wifi connection. So I set the camera to not go to sleep, but then the card's internal settings wrecked havoc: apparently, to conserve power on the camera, the card will shut down the connection after 1 to 2 minutes of non-use. Which is too soon for a real world tethering workflow. I've looked around but there seems to be no easy fix to this. According to Eyefi Customer Care, this cannot be changed. Which is a bummer, because it makes the card unusable for the teaching use I had in mind. Mind you that this auto-disconnect issue does not seem to happen when you shoot to a laptop or desktop computer.

Eyefi Cloud

The Eyefi Mobi Pro also comes with a complimentary free year of Eyefi Cloud: this service lets you upload an (unlimited) amount of images to the Eyefi servers, from where you can also share them or you can use this service as a cloud backup (you can even upload old photos so the service isn't limited to photos you took with an Eyefi card). Eyefi Cloud lets you display your images in a timeline no matter which device you used to take them with. The pictures are shared across all your devices and available for viewing even when there's no internet connection. Of course, you can also share pictures with other people.

Although the concept sounds nice enough, I personally won't be using this service as I already have a full computer backup through backblaze.com and I use Lightroom mobile to display and sync my images online across different devices.

Tethering to a desktop or laptop computer

Being able to transfer images to a phone or tablet is nice, but the main reason I was interested in this card was to wirelessly transfer my raw files to a watched folder on my computer, and have Lightroom pick them up from there using the Lightroom's Auto Import feature. This way, I was hoping not only to shoot tethered into Lightroom, but to do so wirelessly!

The first time you use your card, you have to enter the activation code and then take a couple of test shots. Once your card is recognised, you're good to go. This setup procedure only has to be done once. Make sure to save the card with the activat…

The first time you use your card, you have to enter the activation code and then take a couple of test shots. Once your card is recognised, you're good to go. This setup procedure only has to be done once. Make sure to save the card with the activation code in case you change computers or want to use the card with a different computer, too.

I installed the Mobi Pro Desktop App (make sure you have the latest version of that specific app - the version that works with the regular Eyefi Mobi card will not support the extra features of the Mobi Pro card) and set the card up to transfer raw files, too. You have to insert the card in your computer to make that change. A nice touch for raw + jpeg shooters is that you can send both file types to different folders if you want.

The Pro card offers the ability to add up to 32 Home Networks, transfer raw files and enable selective transfer of files.

The Pro card offers the ability to add up to 32 Home Networks, transfer raw files and enable selective transfer of files.

Again, so far, so good. Just like with the iPhone, after the initial setup procedure is over, you select the card's wifi signal in your computer's list of available networks and you're good to go. However, then came the disappointment: it took about 30 seconds to download a 30 megabyte raw from the X-Pro 1. On top of that, sometimes, the desktop app would not immediately start to download after I made a shot. So I would shoot again and then both shots would be downloaded from the card together. Oddly enough, the second shot would sometimes arrive on my computer before the first, making it hard to judge my shoot's progress. I checked this with Eyefi's (excellent and quick) customer support and they said the maximum speed of the card, using the card's own network, is between 10 to 15 megabit per second, which means that theoretically, that raw file could download in about 15 seconds. But even that is quite long a wait in the heat of a shoot. Eyefi also recommends to keep the card close to the receiving device when transferring. If you're using a megapixel monster like the D800 then those times would easily double.

One of the other exclusive features of the Pro version of the card is that it can also work via your own WIFI network: in fact, you can store up to 32 different networks in the card and it will then default to any of those if it finds one and otherwise it will fall back to creating its own ad-hoc network. This has two advantages: it keeps you from having to switch back and forth between your own network and the card's network and you can use your computer for things such as internet browsing while using the card. I had hoped that the transfer speed might improve, too but I was unable to confirm that. In fact, when I tried the card over my own wifi network, transfer speed was slower than through the card's own ad hoc network. Working via my own network did give me one (important) advantage: even if I put the camera down for a while, I could just pick it up again and start shooting and the files would automatically transfer again. When using the Eyefi's ad hoc (own) wifi signal, just as with my iPhone, the network connection dropped after a minute or two. It's really a pity though that we cannot configure this timing. I would be interested to hear other user's experience with this.

Back to jpgs, then?

So I decided to try how fast a jpg would transfer. FINE jpgs from an X-Pro 1 are about 3 megabyte and those downloaded in 3 seconds. A burst of 10 shots downloaded in half a minute. Unless you're shooting very fast, I consider that workable. So at least, when I'm in a situation where I can use another network than the card's own (because of the reason explained at the end of the previous paragraph), I seem to be able to tether jpg files to the computer steadily enough.

Conclusion

Unless you're a very slow and deliberate shooter, raw tethered shooting in a professional environment is possible in theory, but not in practice, IMHO. Does that mean I won't be using the Mobi Pro? No, on the contrary: I find it to be a valuable tool, as long as you set your expectations right, which was the point of this blog post.

First of all, I like the fact that I can transfer selected shots from my X-Pro 1 to my iPad or iPhone for social sharing or quick editing. And as far as tethered shooting to a computer goes: whenever there's a shoot where I feel I can benefit from shooting wirelessly straight into Lightroom, I will shoot raw + jpg on the card but transfer only the jpg files wirelessly and import those into Lightroom. I will do my ratings, flags and possibly some minor editing on those jpg images. After the shoot, when the client or the model have gone home, I will copy the raw files over the old-fashioned way: by putting the card into my computer!

And before you pity me for having to manually copy over my edits from the jpg to the raw files or even worse, doing everything over again, don't: I've got a trick up my sleeve that I will share in next week's blog post. Stay tuned!

UPDATE: 'next week's blog post' is now live, here! In this blog post, I'll show you how to automatically import your images into Lightroom and how to transfer any edits you've already performed on the JPGs to your raw files.

Cons

  • wireless raw transfer too slow for tethered shooting use in studio or outside, using jpg is recommended
  • auto-disconnects too quickly when used with iPhone / iPad for tethered use with these devices

Pros

  • turns cameras without wifi into wifi-enabled cameras
  • works with Mac and Windows, iOS and Android
  • wireless transfer of raw files, ok for one-offs
  • option to transfer only selected files
  • if configured, works with your own network
  • fast customer support