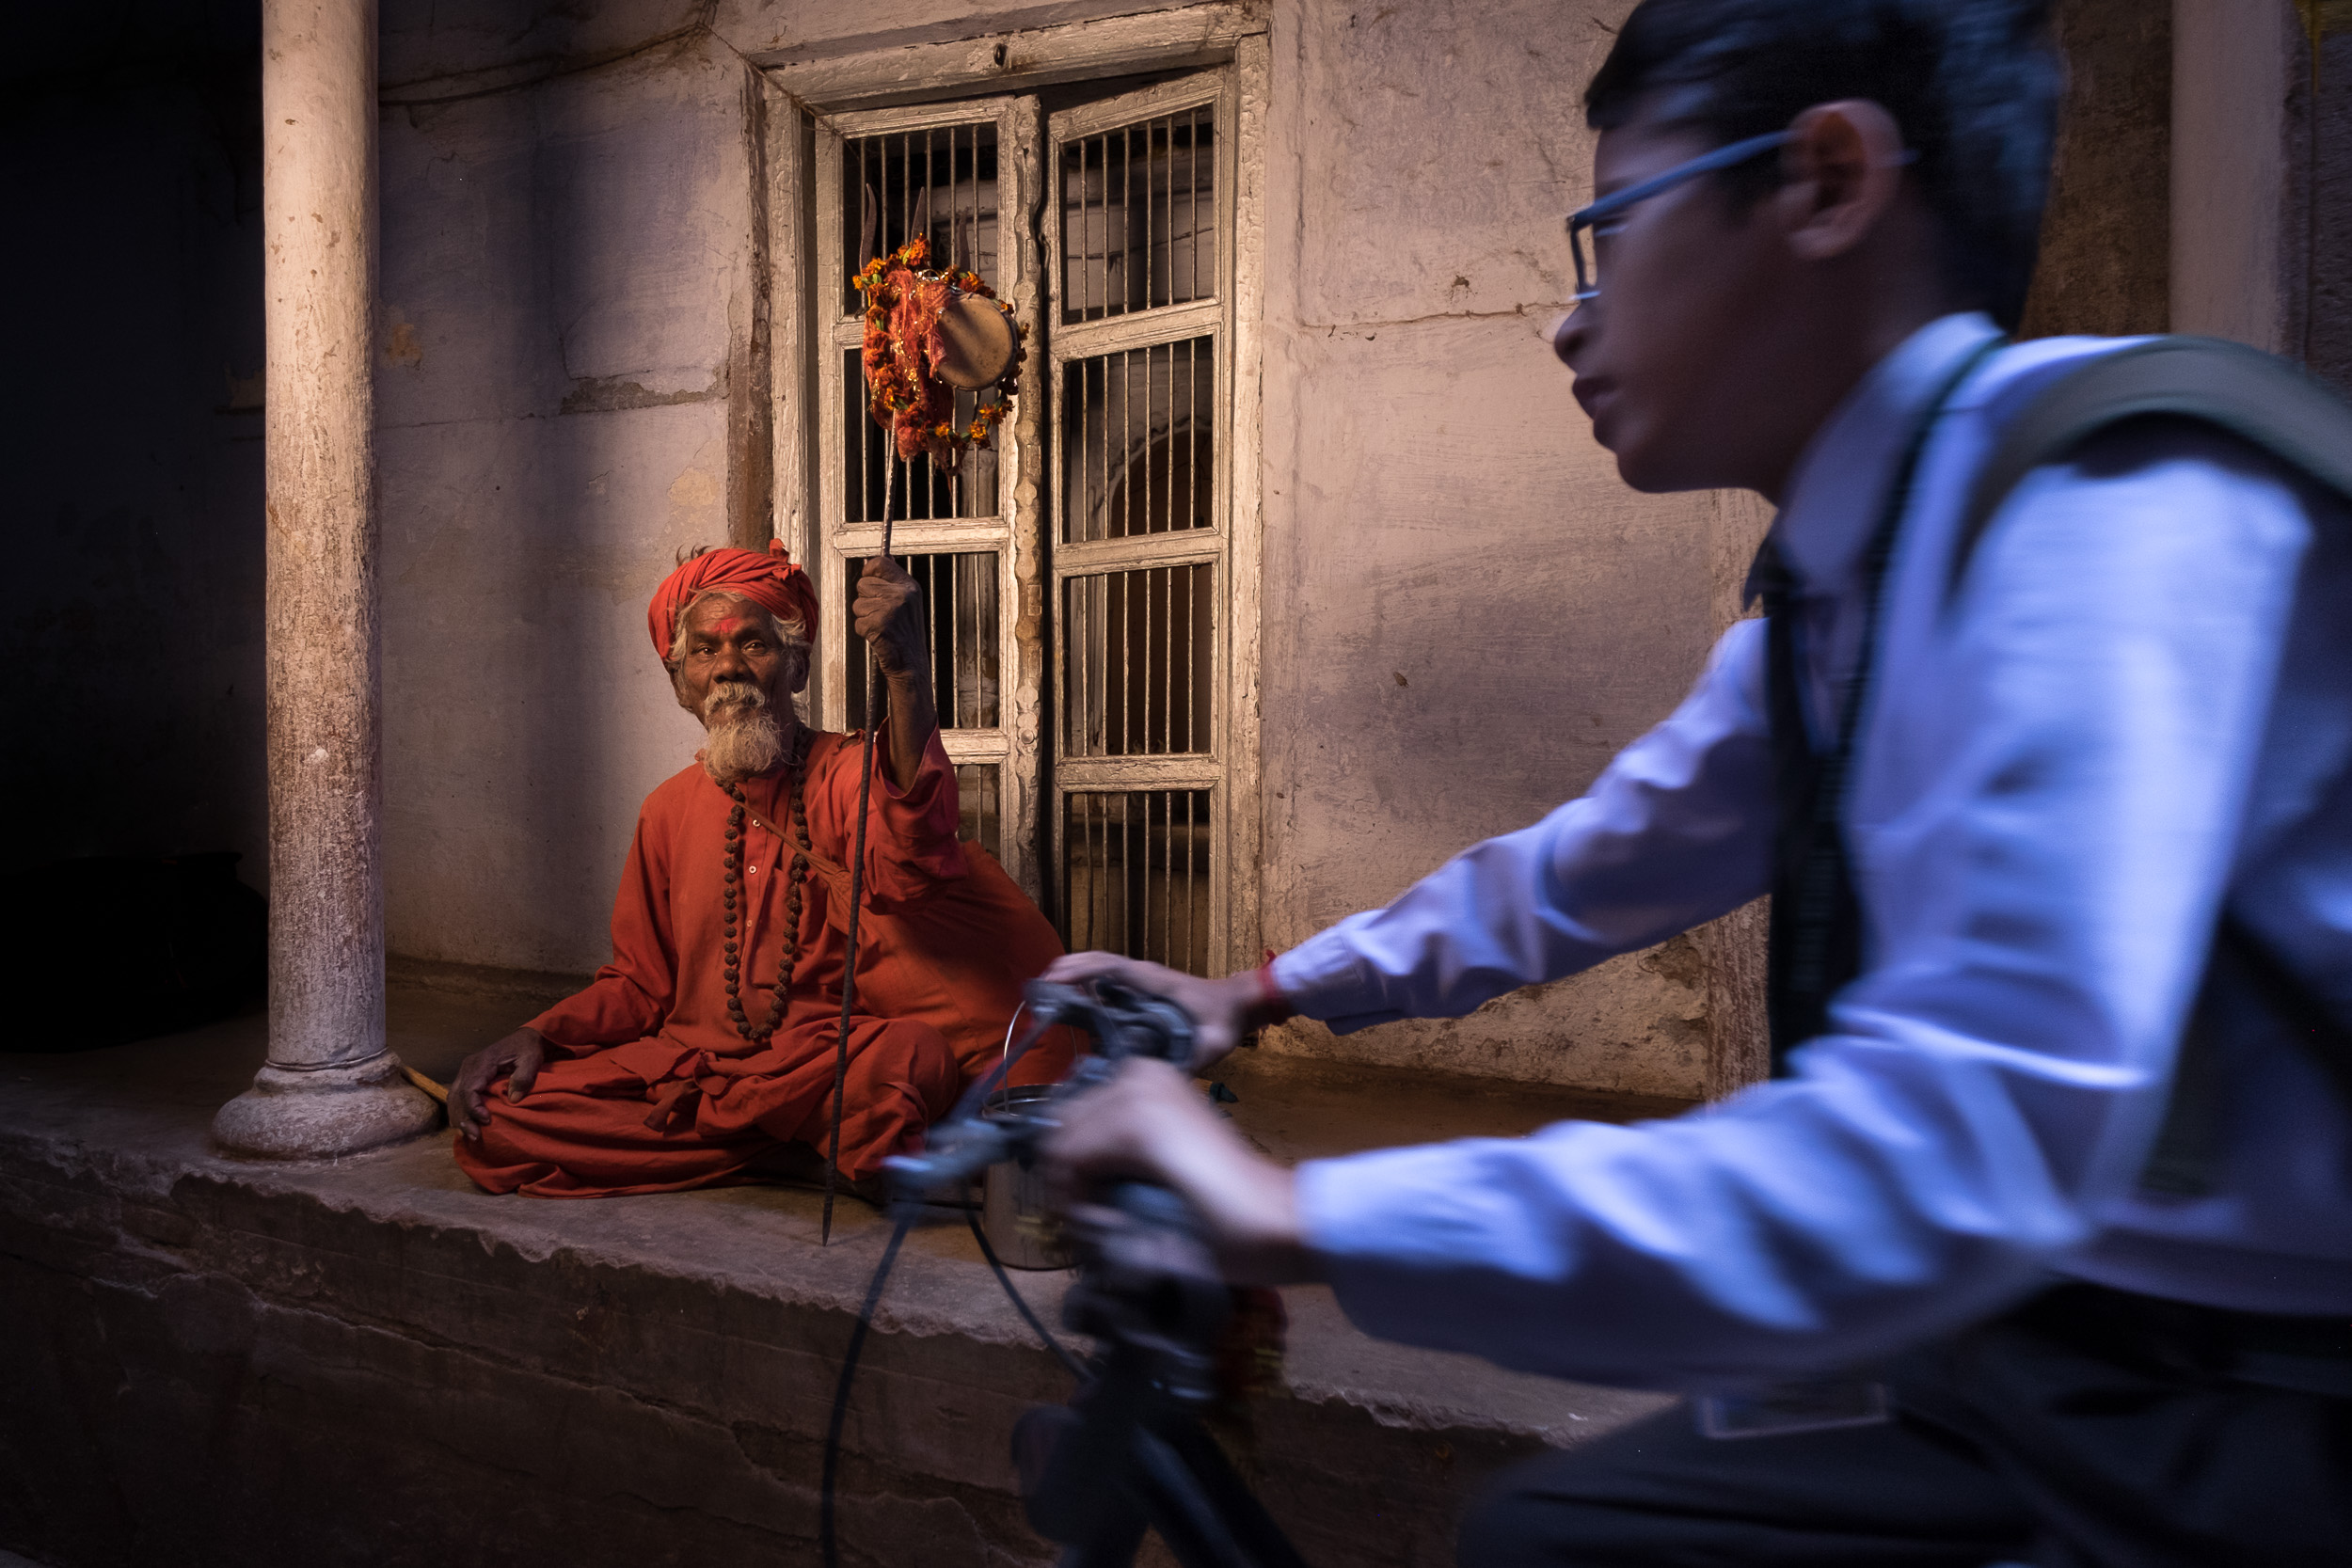
Is it the memories of the narrow alleyways, the photogenic people, the company of like-minded photographers or simply that fantastic hole-in-the-wall place with the heavenly chocolate coconut banana dosas? I don't know, but editing this picture sure made me want to go back to Varanasi for a new edition of the Varanasi Location Portraiture and Lighting Masterclass. The last one Matt Brandon and I did, dates back to 2017 and that's a long time to be without those delicious pancakes!
But first things first: I actually only wanted to do a before-and-after type of blog post on editing an image in Lightroom. While scrolling through my Library, I stumbled across this image that I made in 2016 with my Fujifilm X-T1. I still remember Matt and me seeing this photogenic sadhu and escorting him away from the busy main street into a calmer alleyway to have our participants photograph him using off-camera flash. While Matt was setting up the shot, I made this photo almost by accident. It was more meant as a behind-the-scenes type of shot, but as I liked the three characters (did you actually already notice the kid in the lower left part?) in the picture, I decided I would try to resuscitate it in Lightroom.
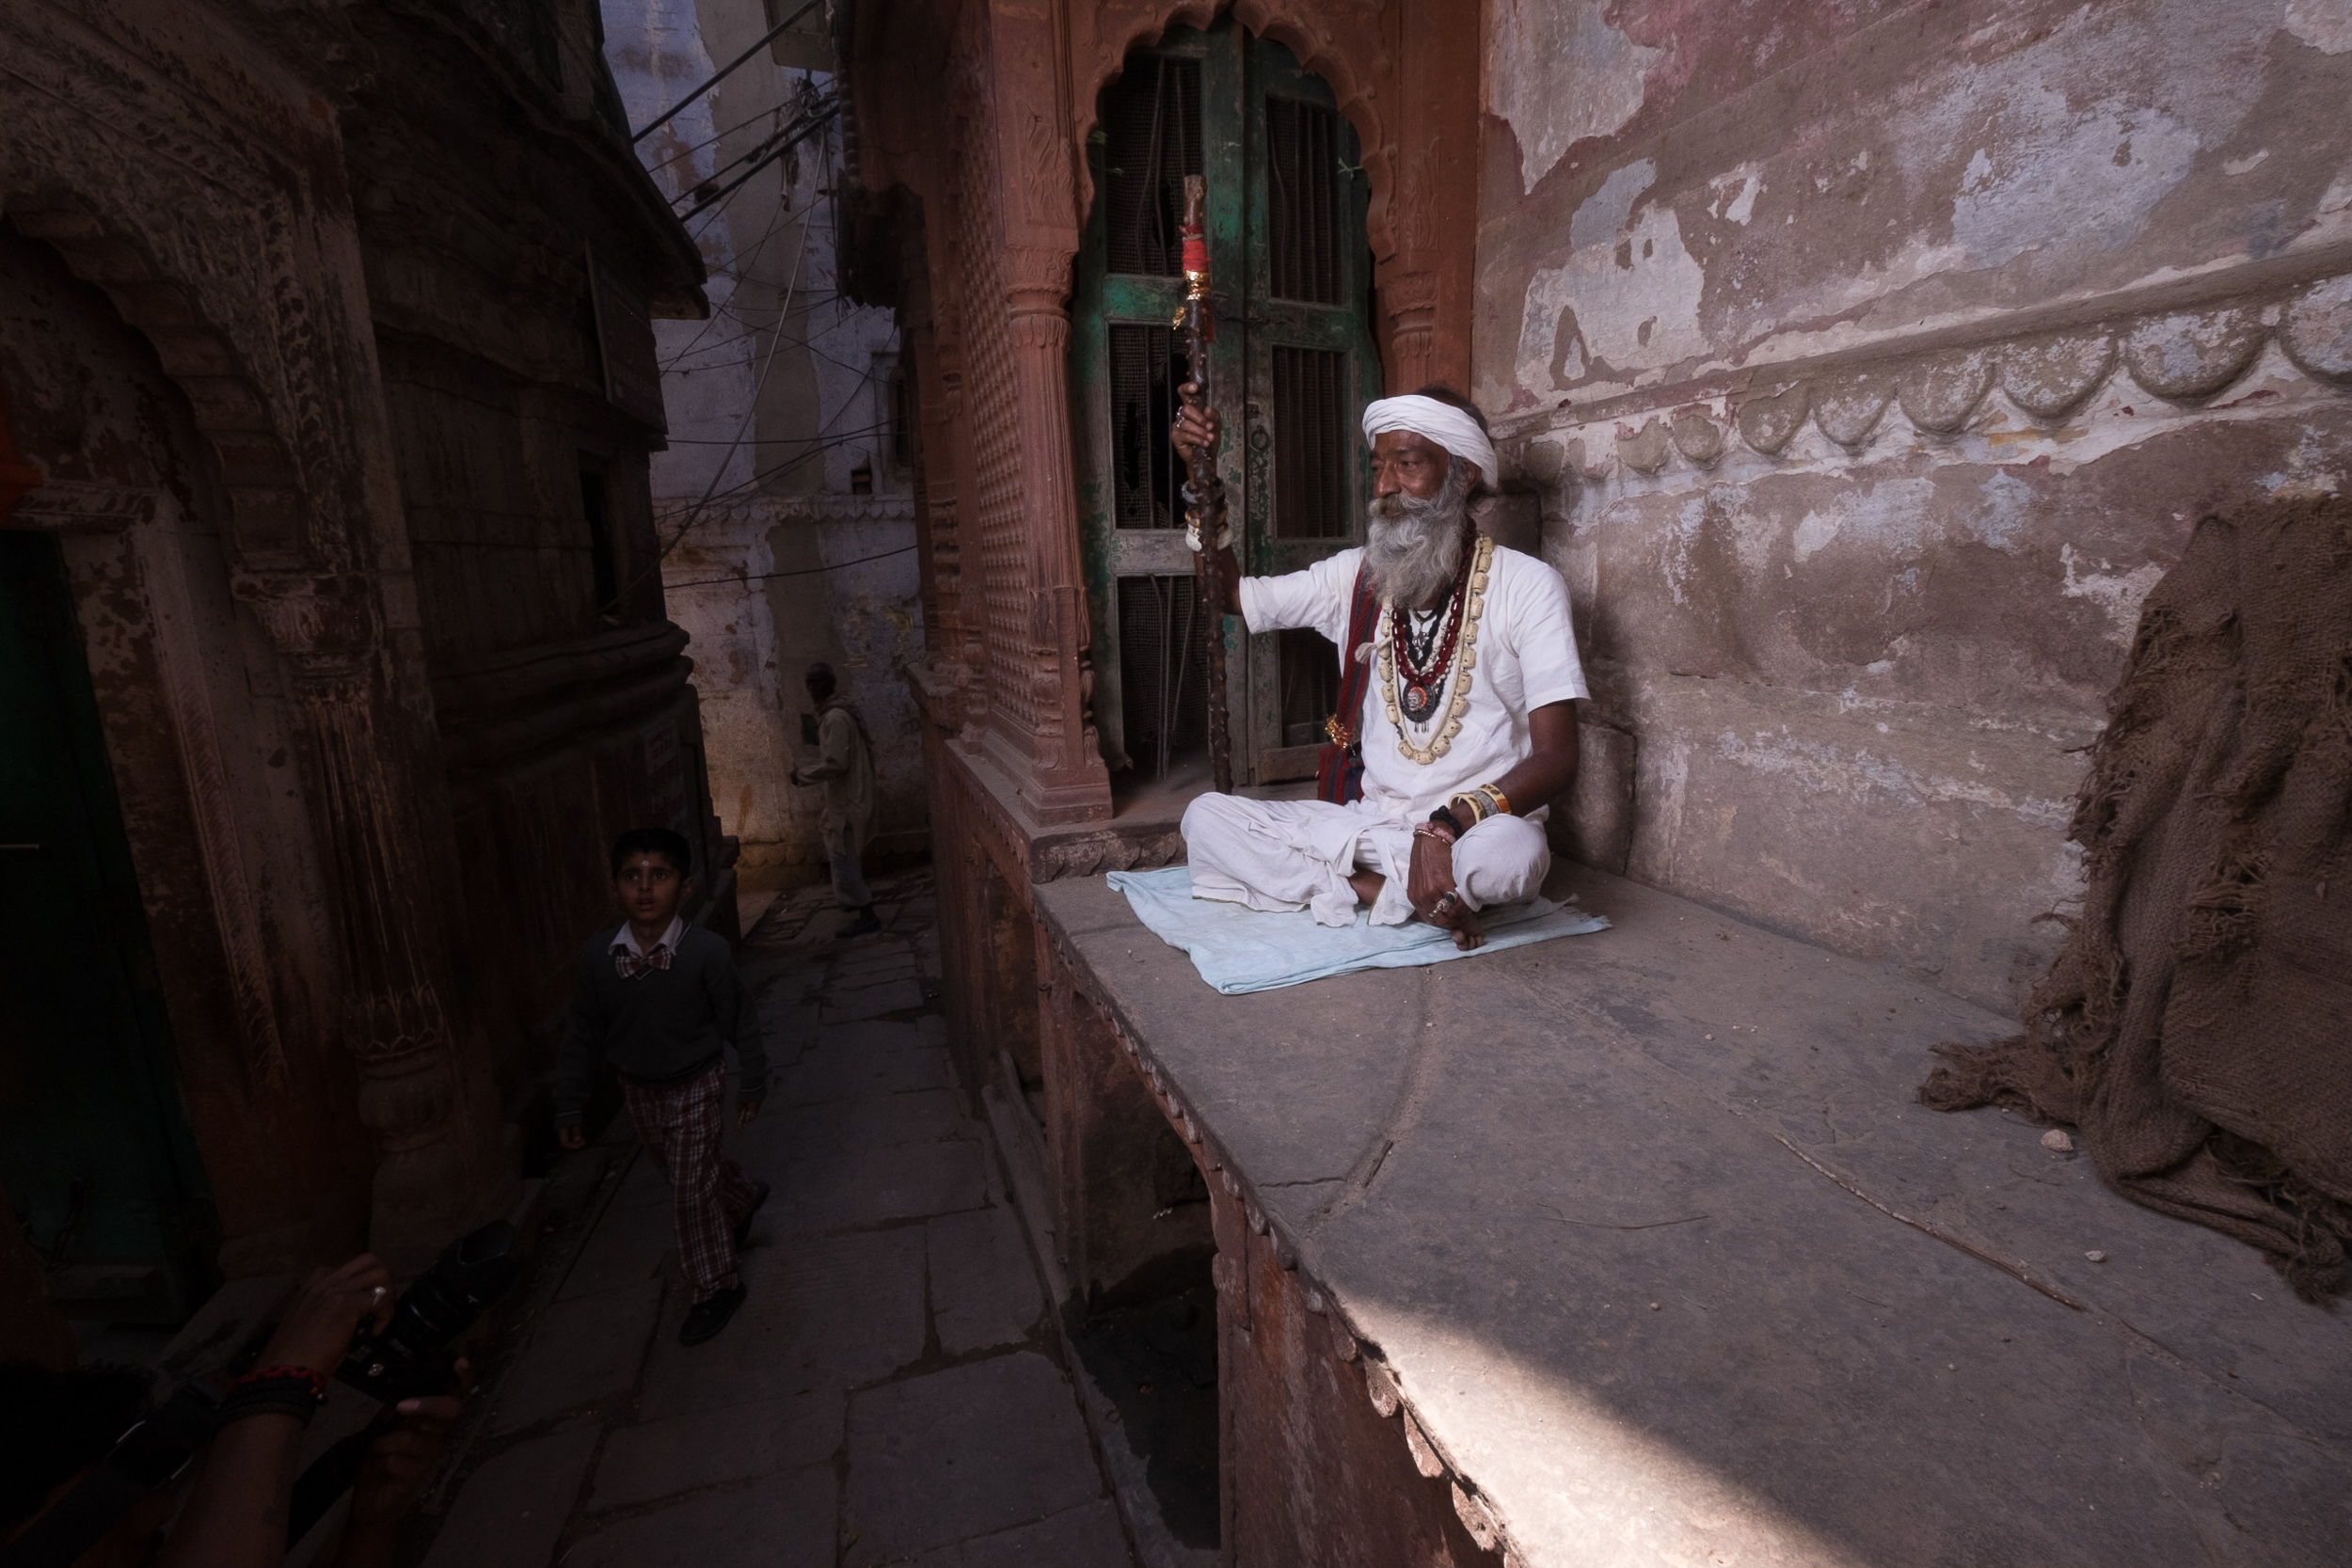
A composition that's way too wide, a balance between flash and available light that's completely off and a light blue towel that matches none of the other colours in the image. There's work to be done!
Step 1: Adjusting Exposure and Shadows

Time after time, I'm amazed at what you can do with the handful of sliders in Lightroom's Standard Panel in the Develop Module. I increased the Exposure and maxed out the Shadows slider all the way to +100. This made me see a new problem: Matt's also in the picture. That's what those ultrawide angle zooms will do for you!
Step 2: Cropping and Straightening the Image

I don't know if I should see a therapist, but I have a thing with straight lines. In an image, I want my verticals and horizontals either completely wonky or dead straight. Not something in the middle as in this shot. So I opened up the Transform Panel and activated the Guided Upright tool (1). I drew a line parallel over a wall in the left of the image (2) that I wished were vertical and did the same with a wall on the right (3). Doing so, I told Lightroom it had to straighten those lines and make them parallel. Sometimes, this correction will cause the image to become too compressed or too elongated, but the Aspect Ratio (4) slider can easily fix that for you.
I subsequently activated the Crop tool (R) (5) and made a square crop. This also almost solved the problem of Matt being in the picture. All that was left was a part of his camera, which I took out in one fell swoop of the Healing Brush. In retrospect, I actually shouldn't have done that at this stage, as my subsequent vignetting took care of the problem automatically.
Step 3: Adding a Graduated Filter

Because I still did not like the light-dark balance between the left and the right part of the image, I added a Graduated Filter to brighten the darkest part of the alleyway a bit more. By choosing a relatively soft transition zone (1), this adjustment blends in unnoticed.
Step 4: Color Grading via the new Creative Profiles

The previous steps were mainly meant to improve the image's exposure and balance, but they weren't necessarily creative, rather corrective. In this step I decided on my Colour Grading: choosing the subjective 'Look and Feel' for the image. I used to use Lightroom presets for that, but ever since they've been introduced in Lightroom Classic CC 7.3, I now prefer to use the Creative Profiles. Not in the least because of their handy Amount slider that lets you adjust their effect all the way between 0 and 200 percent! In this case, I chose the Dark Color Pop profile from my brand new Piet's Creative Profiles Starter Pack (available here for only $14.95) and I diminished its strength to 70 percent.

Step 5: Brightening (Dodging) the face of the man in the background

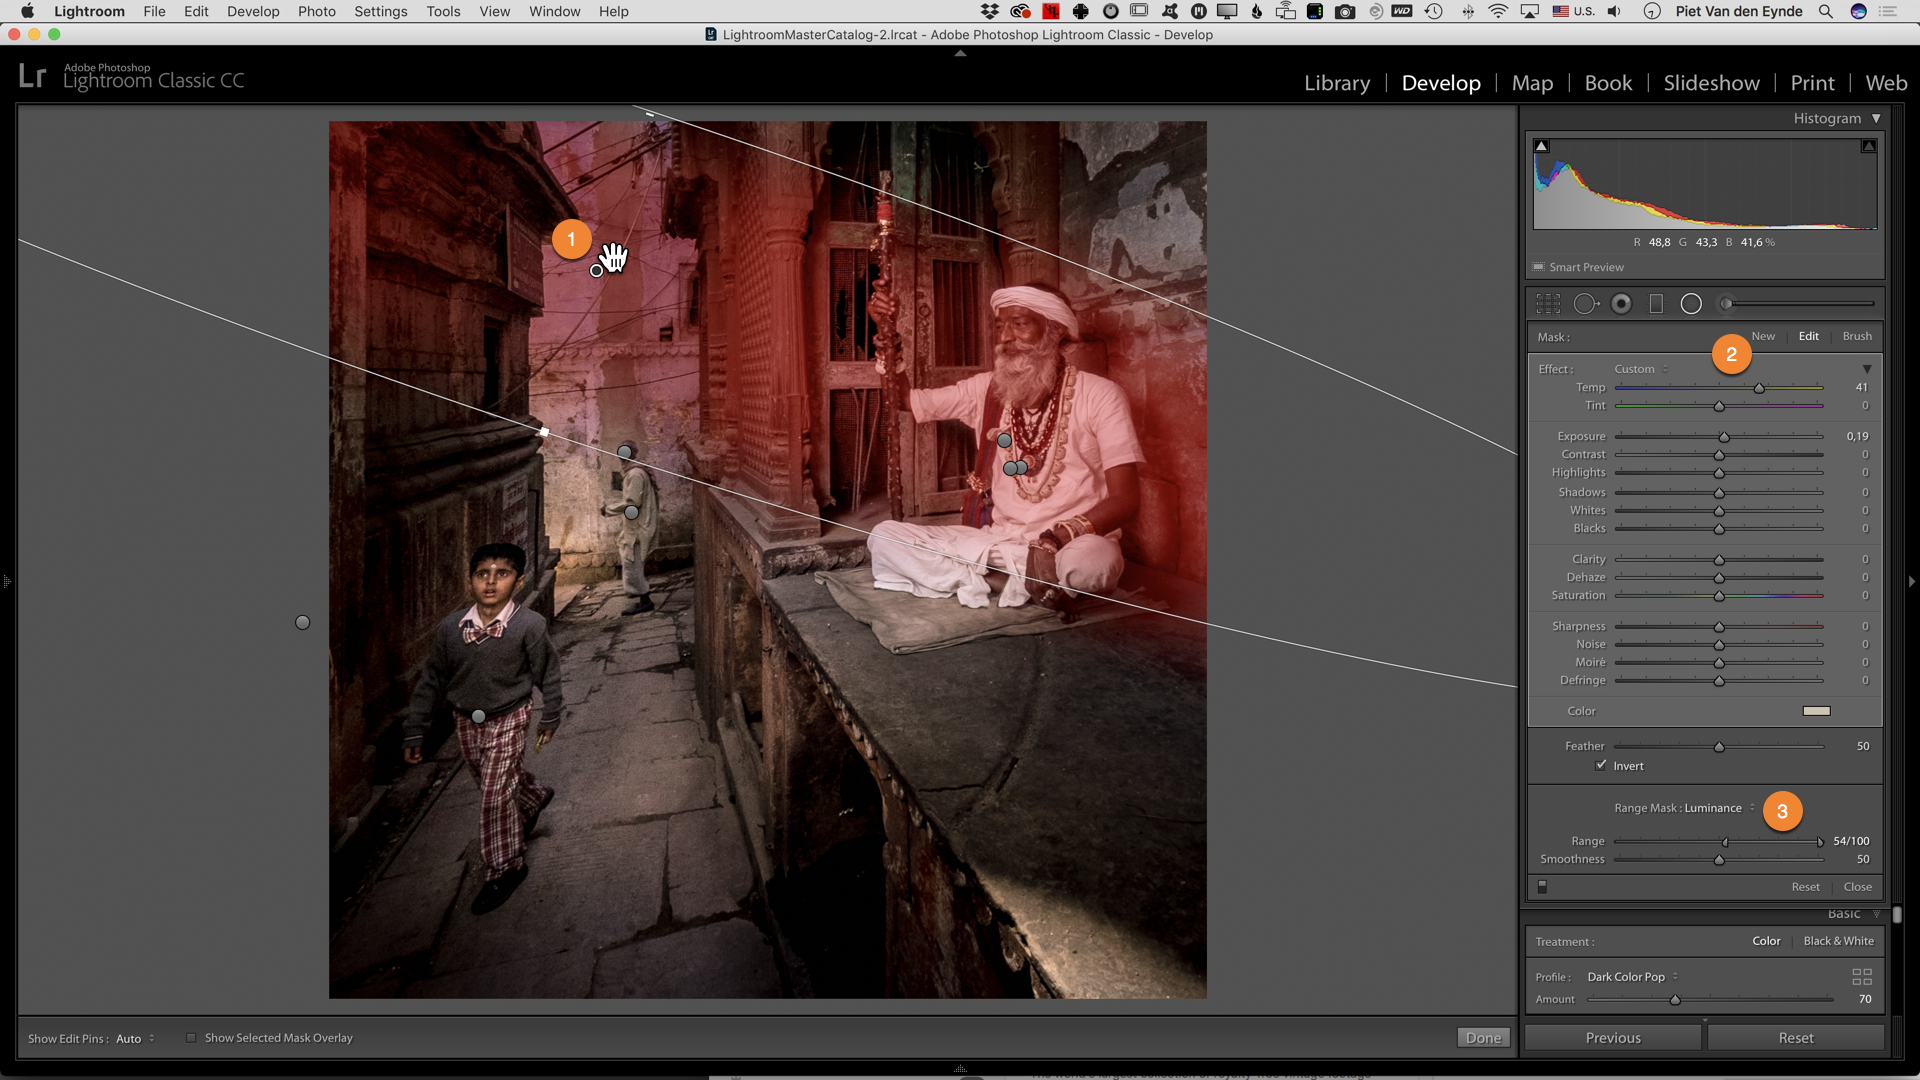
I sometimes jump around a bit while I'm editing my images. One of the things the profile caused was for the face of the man in the background to turn too dark. So I drew a Radial Filter over his face (1) and brought up the Shadows slider to +100 (2). That didn't do much, though. In those cases where the targeted Shadows or Highlights sliders don't seem to do anything, it's time to move to the broader range of the Exposure slider. However, its sledgehammer approach also caused the surrounding wall to brighten, creating a telltale halo around the man's head. So I turned to one of my favourite new tools in Lightroom Classic CC: the Range Mask. By activating the Luminosity Range Mask (3), I could direct the Exposure slider's effect to specific brightness zones within the overall limits of the Radial Filter's perimeter (in this case the levels between 0 and 26). This way, I could use a fairly blunt tool (the Radial Filter) and still create an utterly precise mask without having to paint it manually with the Adjustment Brush. Further in this Before & After, you'll see another example of the power of this tool, when I use it to simply change the towel's colour!
Step 6: Darkening the Foreground with a Graduated Filter

As I thought the lower right corner was still too bright, I added an extra Graduated Filter to darken it, thereby focusing even more on the subjects.
Step 7: Changing the Towel's Color

Ok. This step is the most spectacular one in this entire Before & After, I think! The towel that our sadhu used to protect his spotless white attire from the dirt of the Varanasi streets, is quite the attention-grabber. That's not only because of its size, but mainly because of its color. Baby-blue might look good on newborns, but it definitely is out of place in the otherwise warm color palette of this image. My first idea was to Photoshop the towel out but it's quite a lot of work to do in a believable way and... this is supposed to be a Lightroom tutorial! So I tried the following: I used the Adjustment Brush to paint a fairly rough mask over the towel. I increased the Temp slider (1) to make it warmer and subsequently lowered the Saturation slider (2) to reduce the saturation of the existing colour. Then I went on to choose a new color in the Color rectangle (3) that better integrated with the surroundings. In order to make the mask coincide completely with the actual towel, I activated the Color Range Mask tool (4) and used its Color Picker (5) to drag and select the blue hues in the towel. This told Lightroom to only adjust those blue pixels within the original, slightly broader and rougher Adjustment Brush mask. You can see the result in the next picture: I changed the towel's colour from blue to beige without resorting to Photoshop!
Step 8: Adjusting the Color of the Sadhu's Clothes
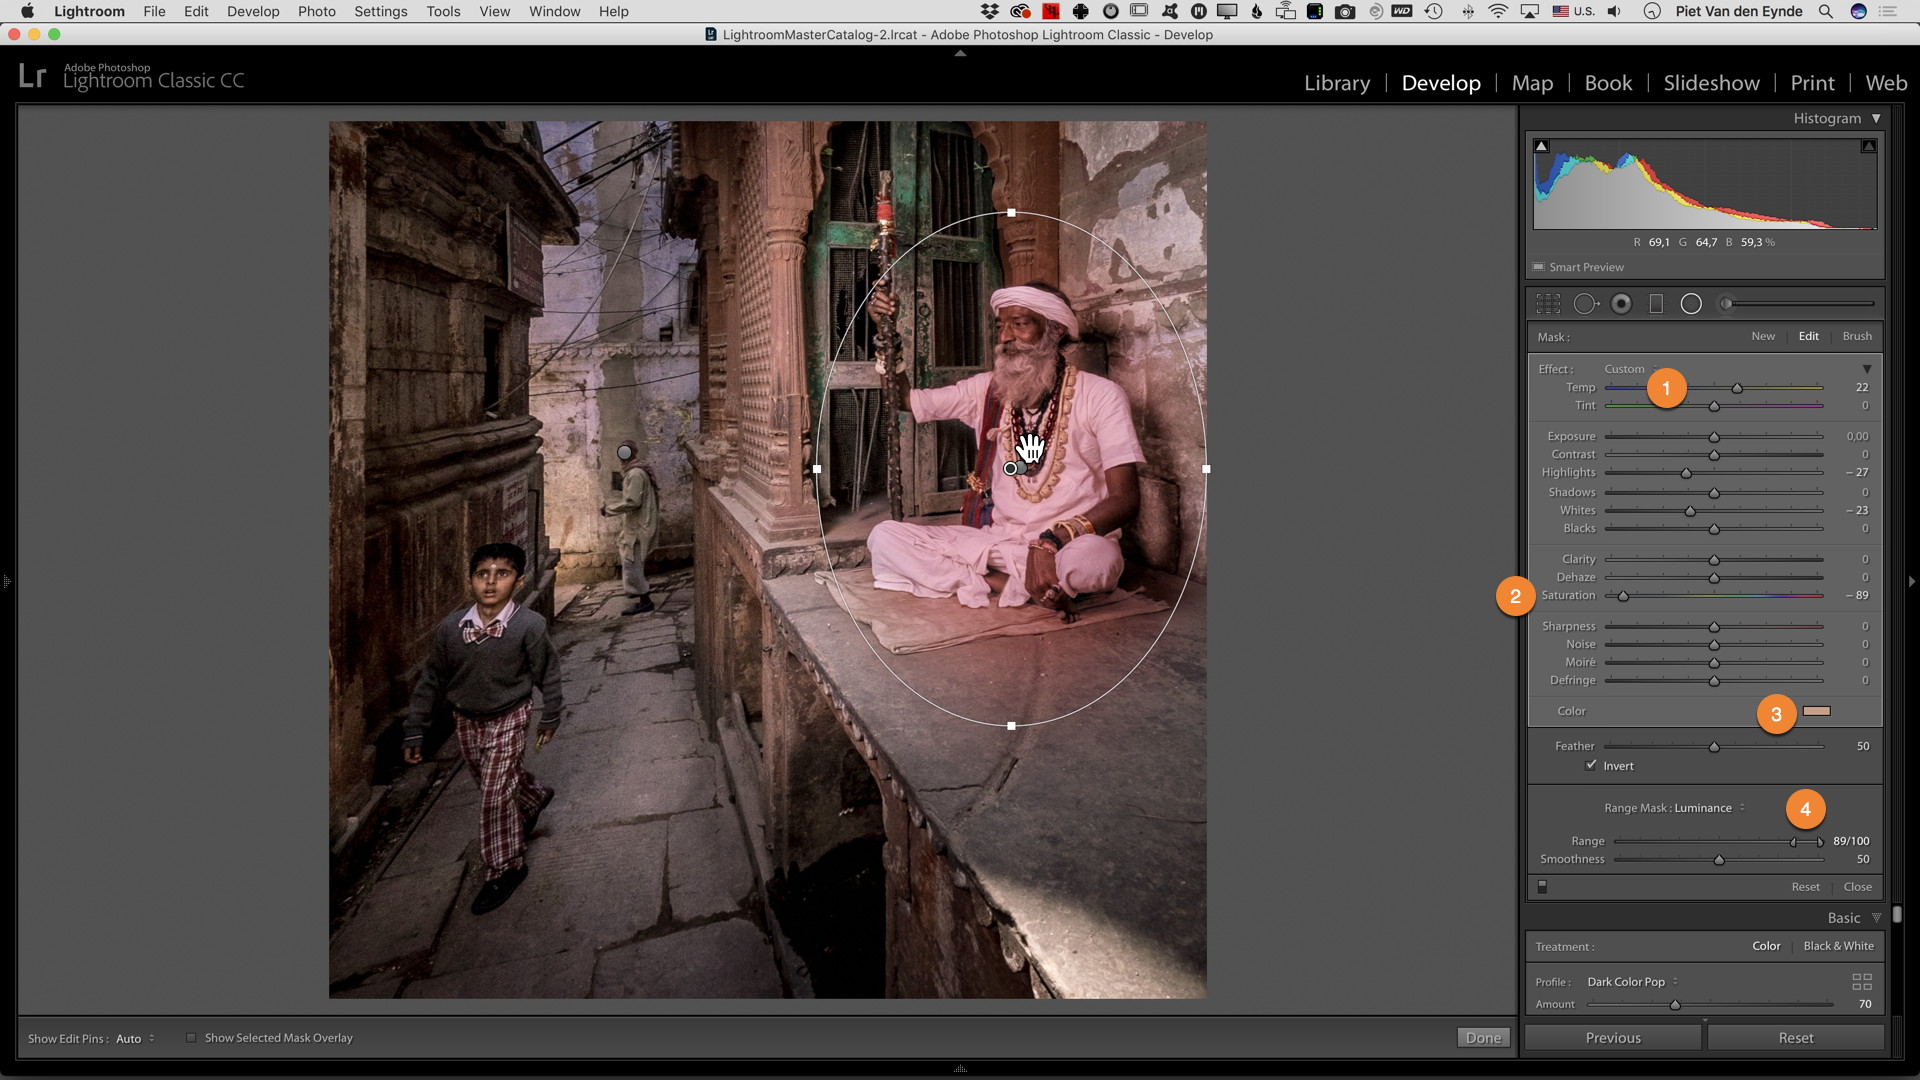
With the color of the towel blending in more into the environment, a new problem surfaced: the sadhu's clothing looks a bit too neutrally white in comparison to the rest of the scene. I solved this problem in a way that was comparable to the previous step but I used a Radial Filter instead. I drew one over the sadhu and adjusted the color with a combination of the Temperature (1), Saturation (2) and a custom color (3). In this case, I did not choose the Color Range Mask but the Luminance Range Mask to further narrow down the selection. By setting the slider to only affect tones in the 89 to 100 values, I could direct the color change only to the sadhu's white clothes. So, a combination of a Radial Filter and a Range Mask once again let me perform a difficult task with relative ease. For me personally, these new range masks alone are worth the price of the monthly Lightroom subscription. Definitely something to consider if you're still using Lightroom 6.
Step 9: Adding Radial Filters to the three People in the Image

Because I was after a dark, moody image, I wanted to darken the area around our three subjects a bit more. I could obviously do that with the Adjustment Brush, but that involves painting and I try to avoid that. So I used a little roundabout technique: I added three Radial Filters, each brightening one of the subjects (you can see all three of them together in this screenshot - normally you can only see one at a time). So they were now brighter than their surroundings and in fact a bit too bright. Then I turned to the Basic Panel and lowered the overall Exposure. The net result was that the people kept more or less their original brightness value and the background got darkened. Sometimes, the fastest way to do something in Lightroom is to take a detour!
Step 10: Burning with the Adjustment Brush

It's a more or less a constant technique in my postprocessing that I will achieve the general look and feel of an image through one click on a preset or a profile. The time I save in doing so, I will reinvest in local adjustments that can really take the image to the next level. In this case, I used the Adjustment Brush to further burn (darken) the area around the sadhu.
Step 11: More Graduated Filters

Ok, we're definitely in the area of diminishing returns here, but in order to guide the eye of the viewer even more through the image, I added two more Graduated Filters (shown together here). These darken the edges of the image so your eye is drawn more tho the center. A little like a vignette would do, but only to the left and right, as I wanted to keep the alleyway as it was. As you can see in the Graduated Filter to the right, I used another Luminance Range Mask to protect my subject from being darkened as well.
Step 12: Radial Filter to simulate the Sun
Another technique for which I like to use the Radial Filter, is to simulate the effect of sun rays. The back of this picture is lit by sunlight and I wanted to slighly warm up the neutral (and by comparison cold) flash light we used on the sadhu. So I added a Radial Filter (1) with an increased Temperature (2). Another Range Mask allowed me to focus mainly on the brightest parts of the image.
Step 13: Adding a Split Tone and Grain
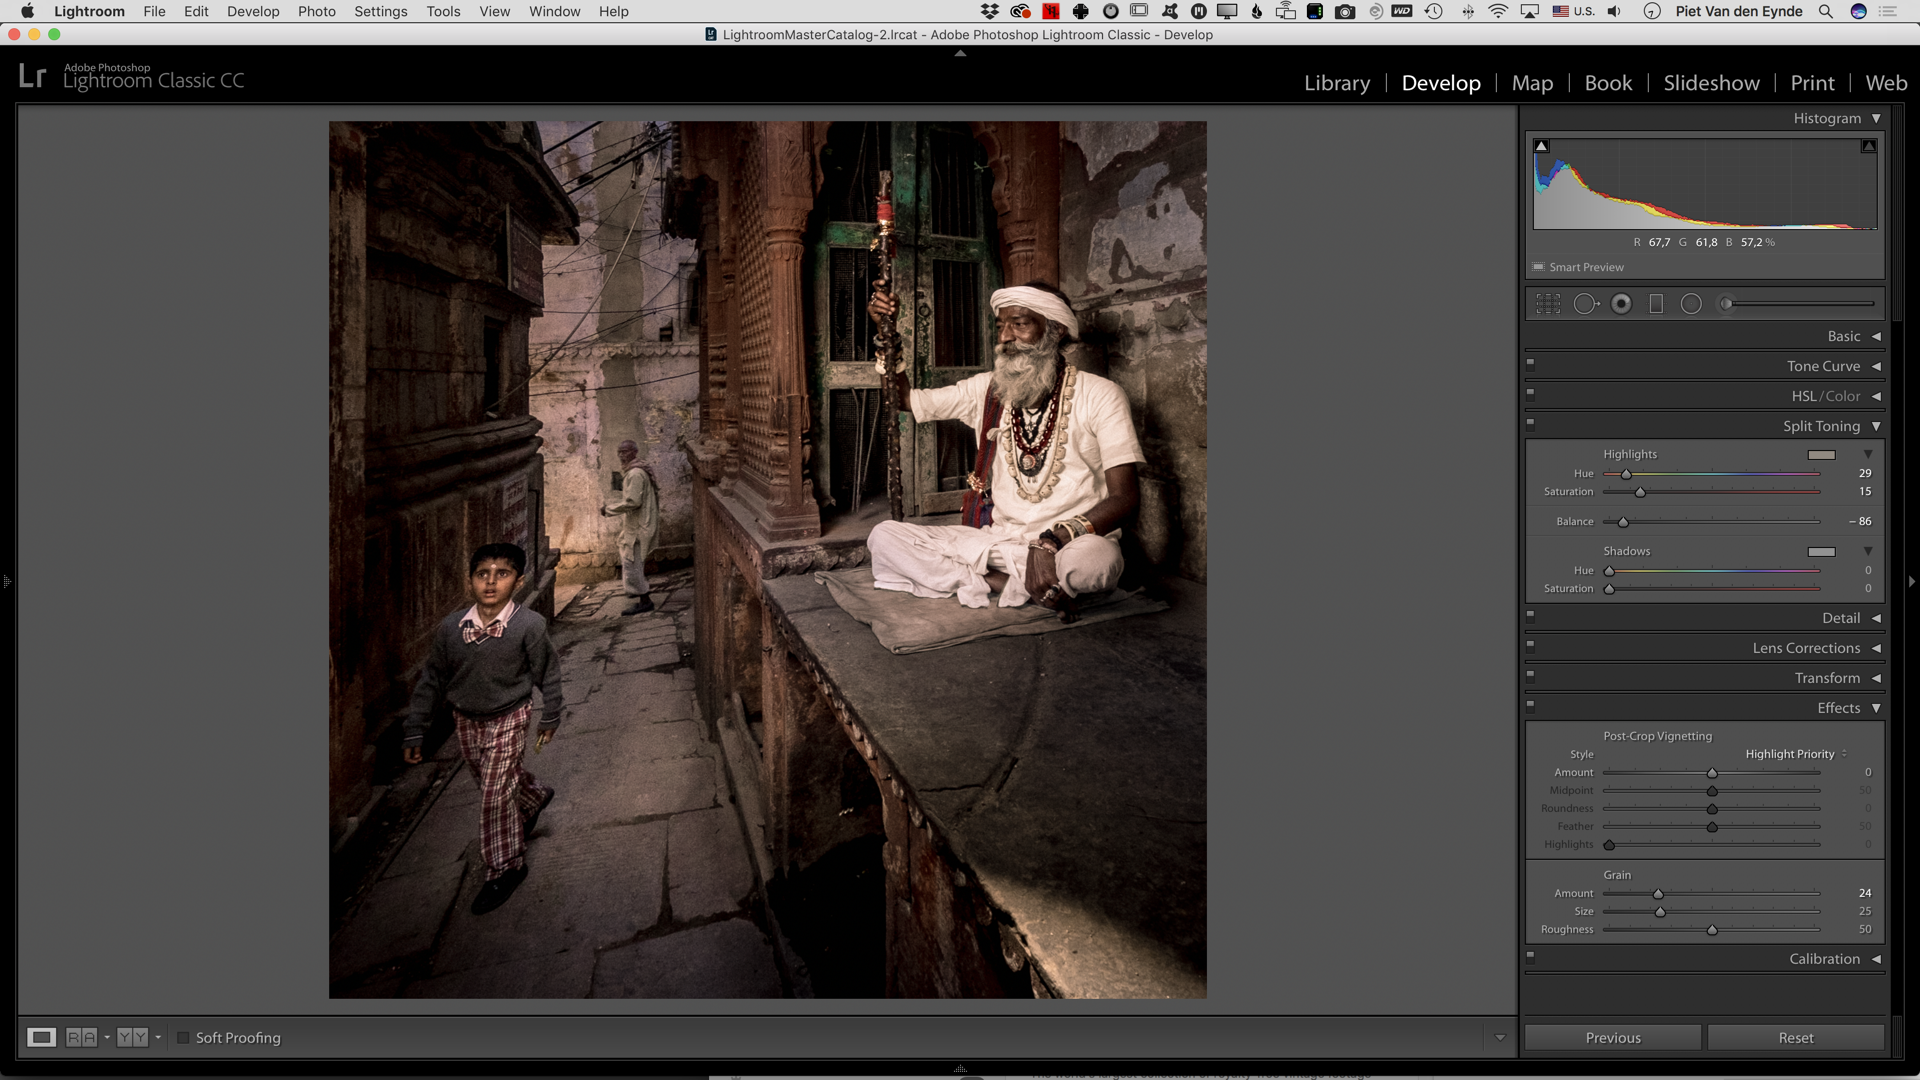
Brightening the left side caused some noise to appear in that part of the image. By itself, that doesn't bother me, on the contrary: some noise can add to a photo's atmosphere but... as the right part of the image was correctly exposed by flash, there was no noise over there. And that difference in noise level is a telltale sign that the photo has been worked on. So, in order to cover my tracks, I added some global Grain via the Effects Panel. Finally, I turned the Highlights in the image a little more yellow by adding a Split Tone. By dragging the Balance slider to the left, I told Lightroom to only tone the brightest highlights, like the ones in the sadhu's clothes.
Step 14: Burning the Lower Right Corner with the Adjustment Brush

As a finishing touch, I also darkened the lower right corner a little more, using an Adjustment Brush.
Finally...
In this Before-And-After tutorial, I wanted to introduce you to a number of techniques that I often use to improve my images. This was a rather extreme example, and I am already bracing myself for comments that will tell me that 'this is no longer photography' and that I 'should get it right in camera'. Believe me or not, but occasionally I do get it right (or at least better) in camera, but there wouldn't be a lot to teach with those images! But most of all, I wanted to show you that sometimes, there's more in an image than you might think at first sight and that it can be worthwhile to invest some time into improving a seemingly hopeless image. Then, you can learn from your mistakes and next time, hopefully, you will get it right in camera!
Wanna join us in Varanasi?
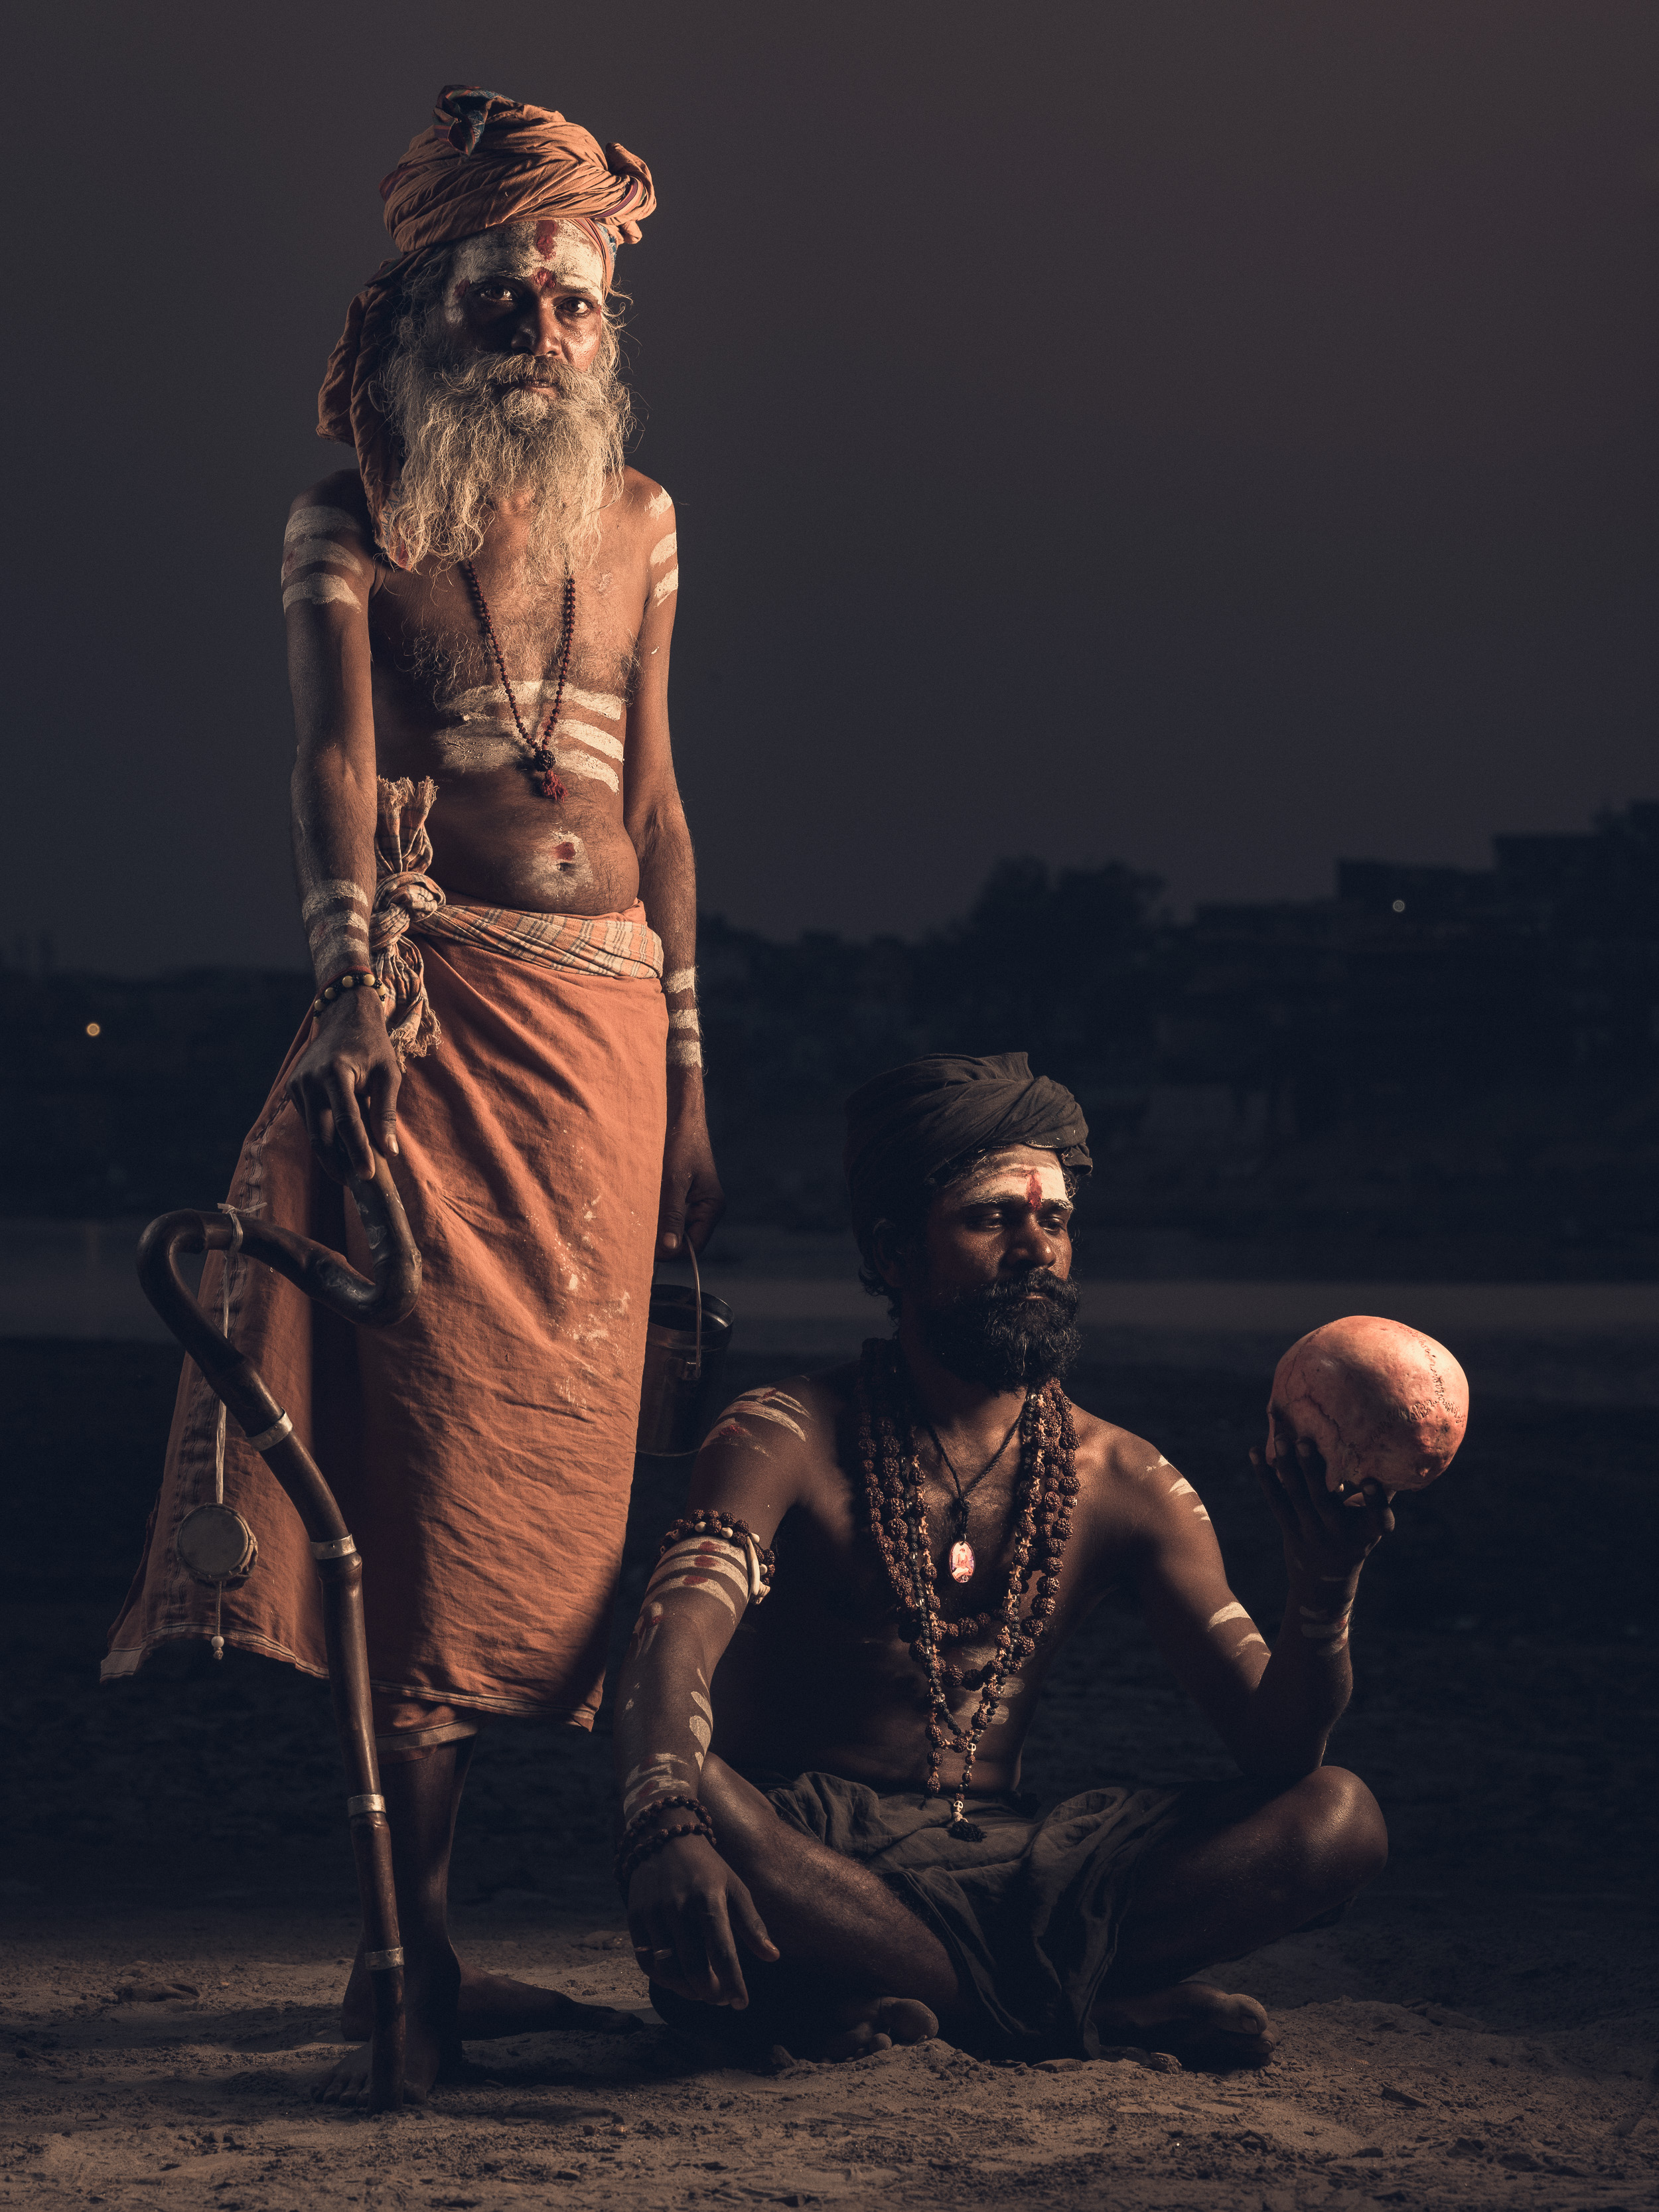
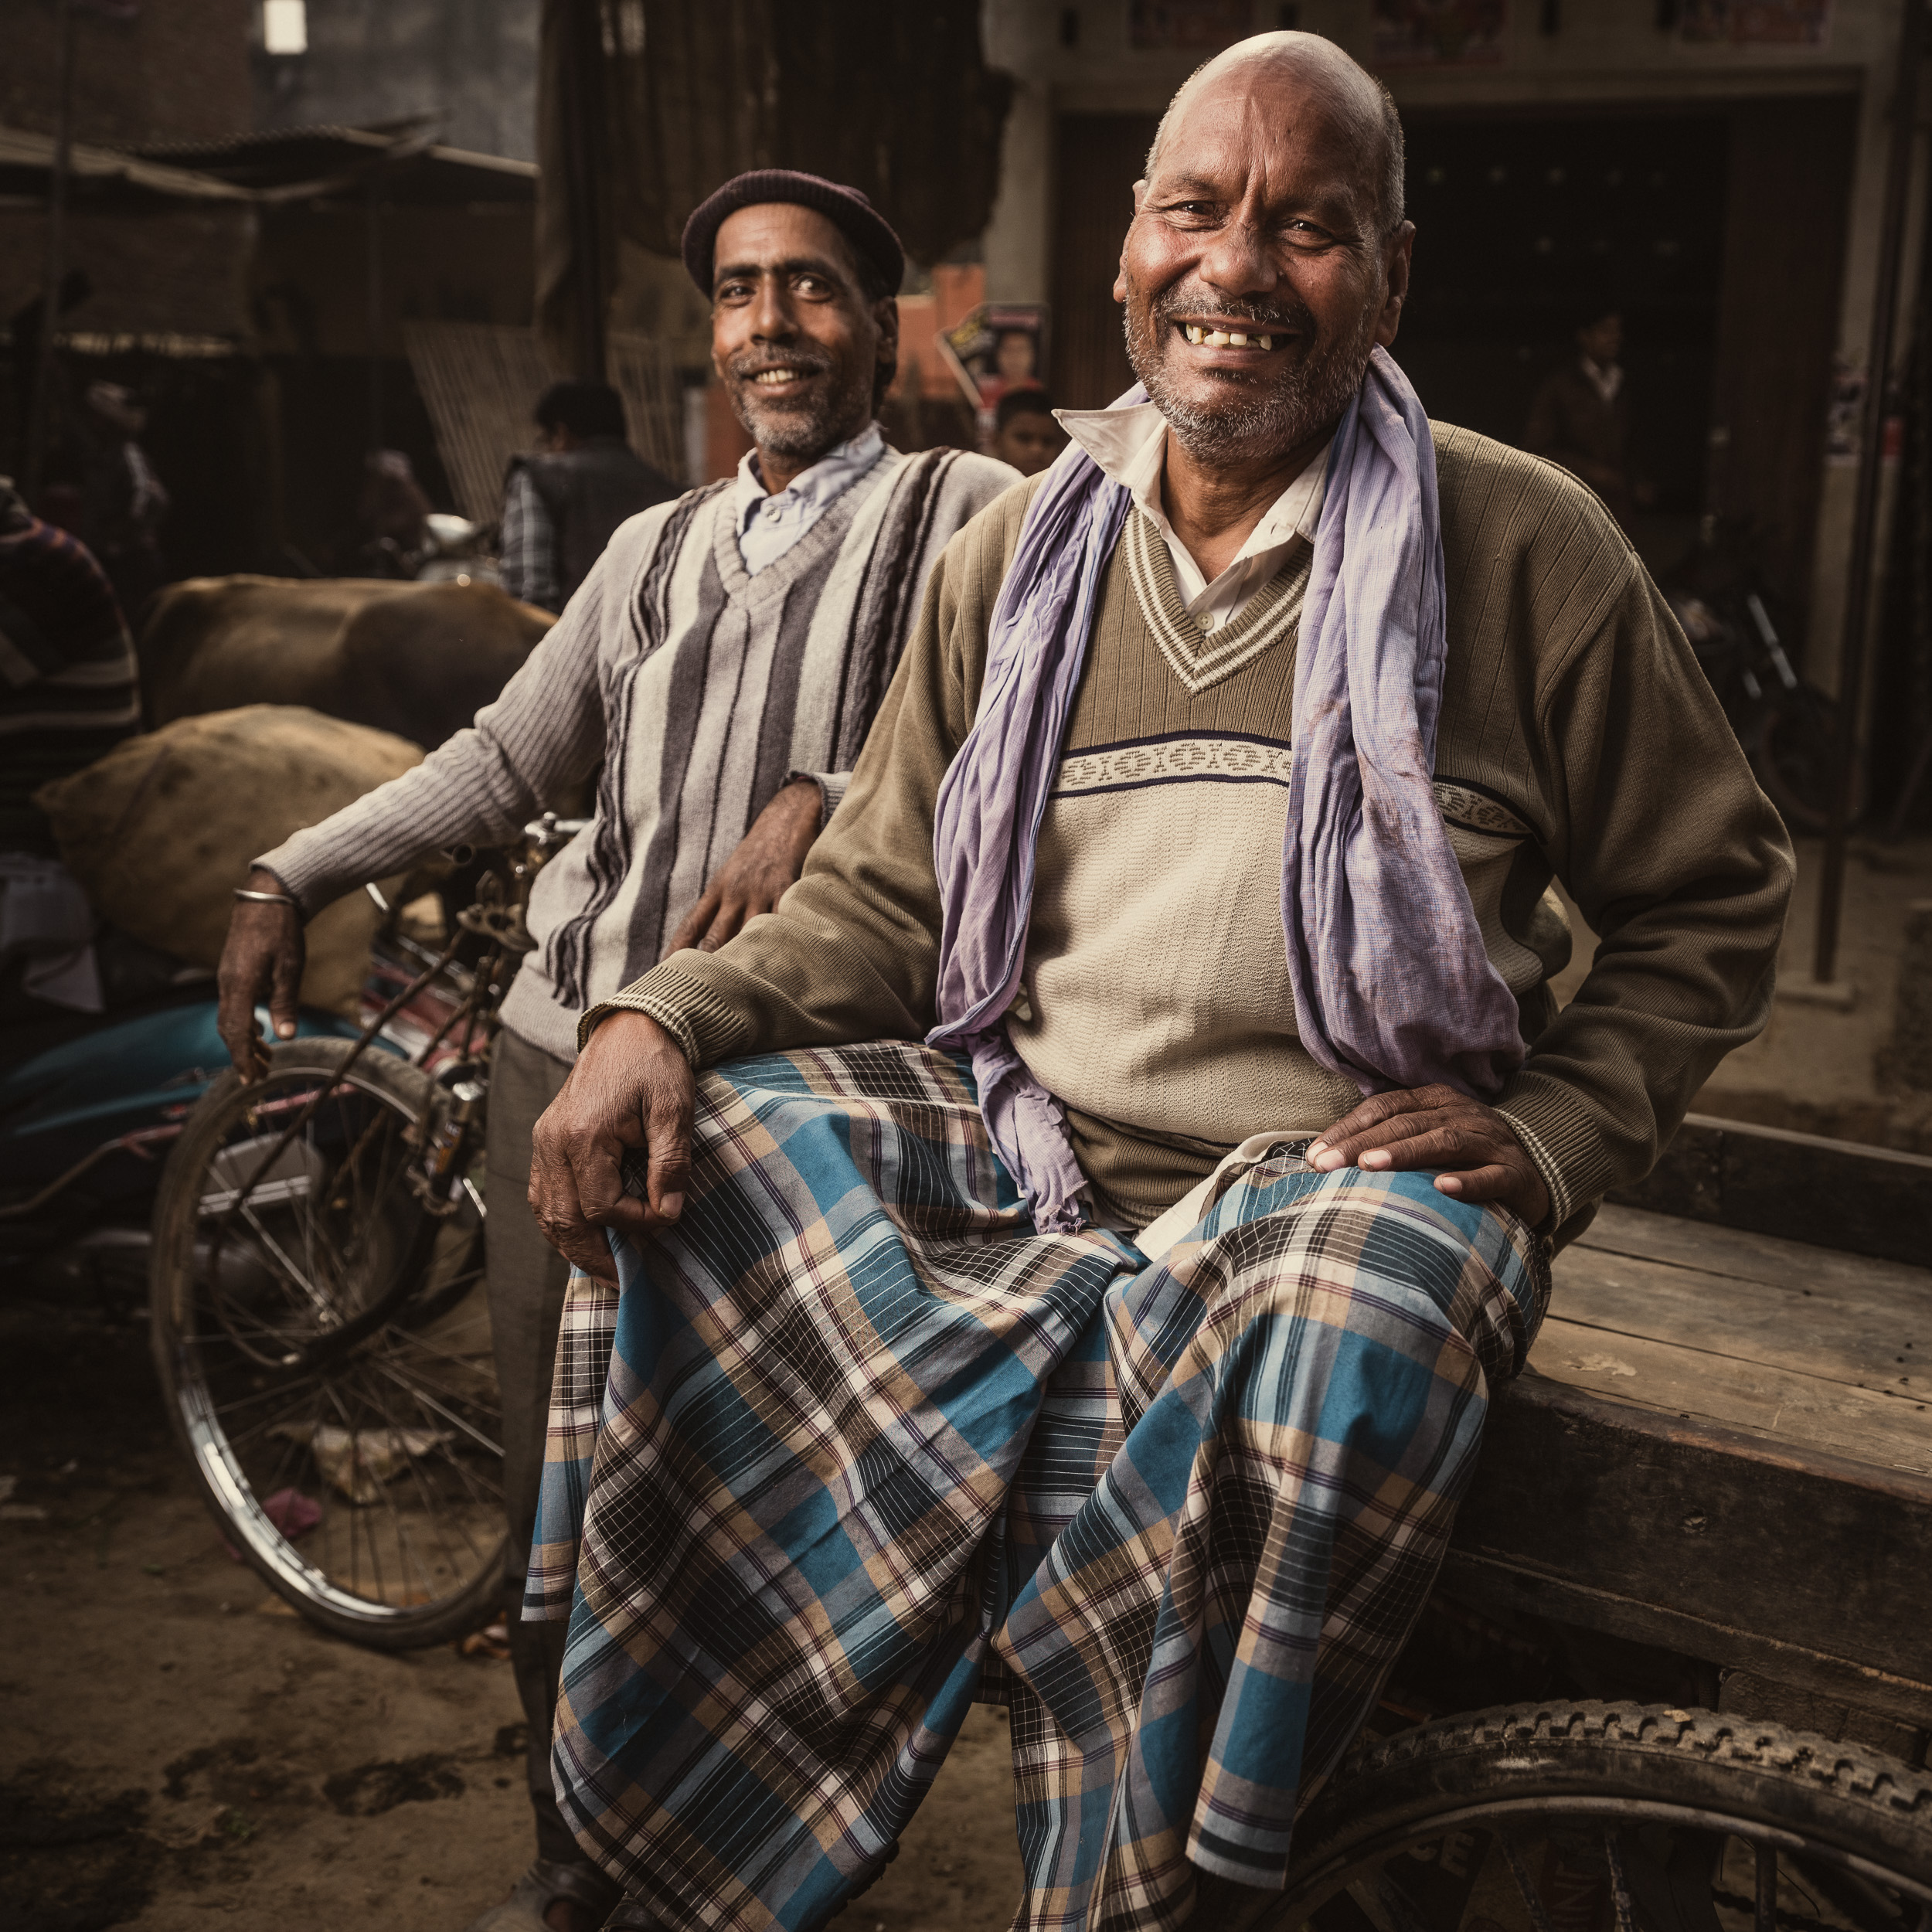
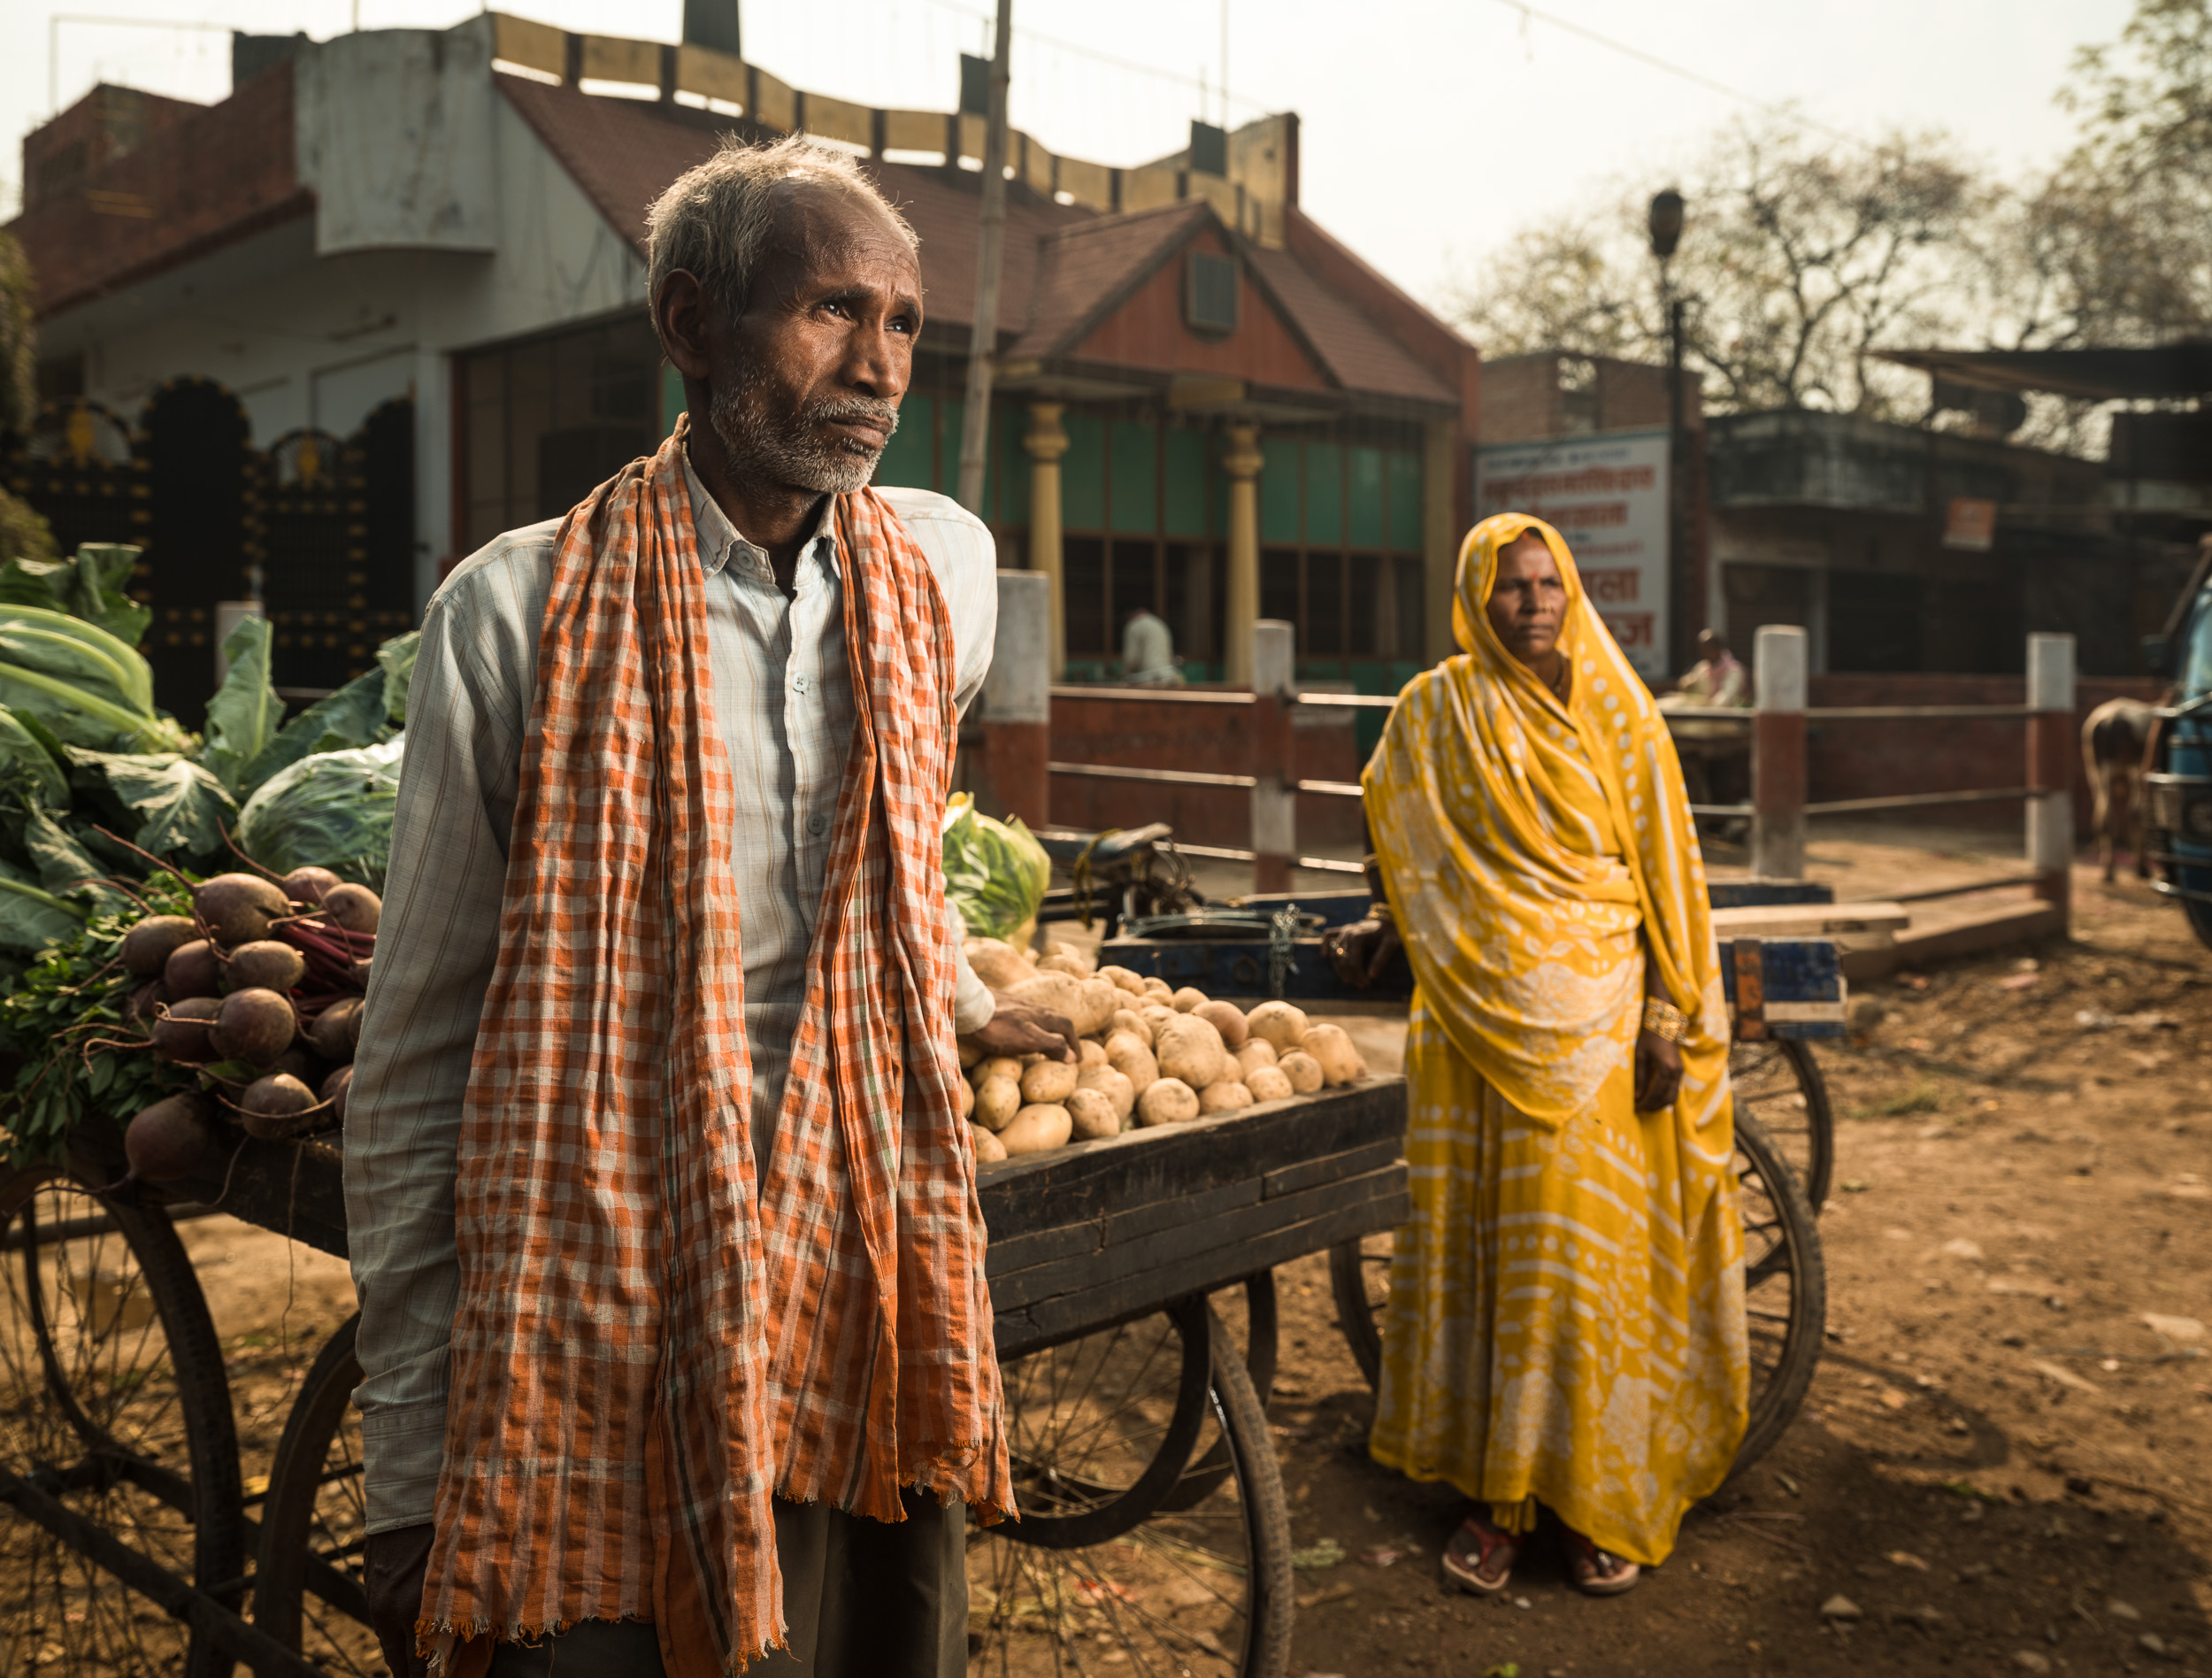
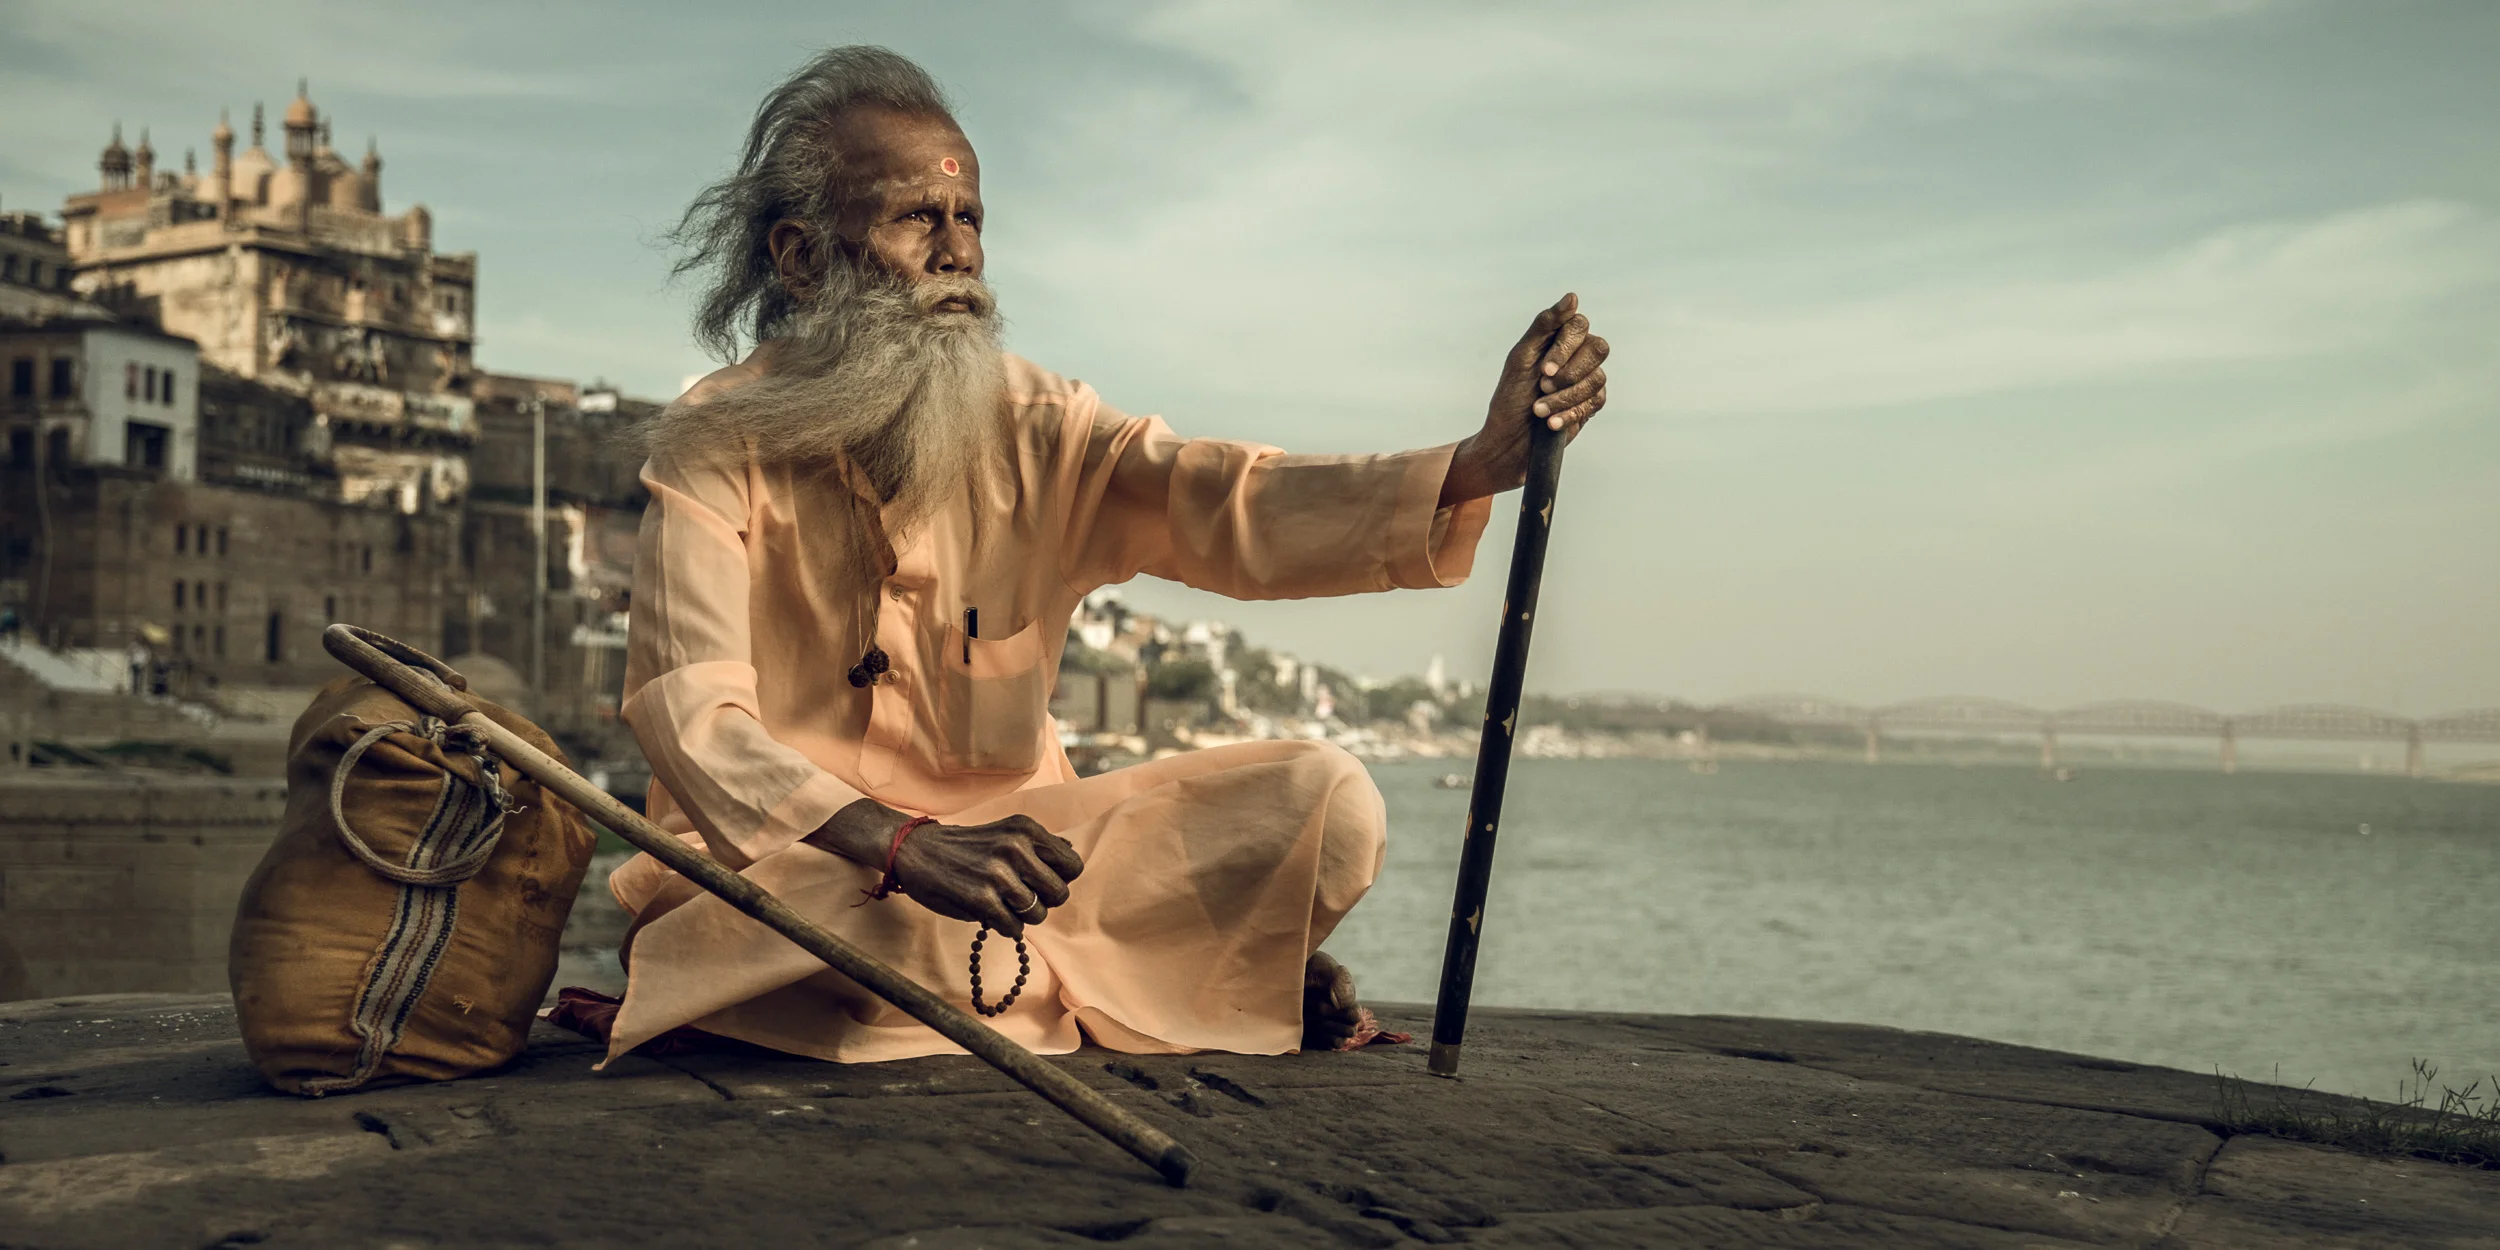
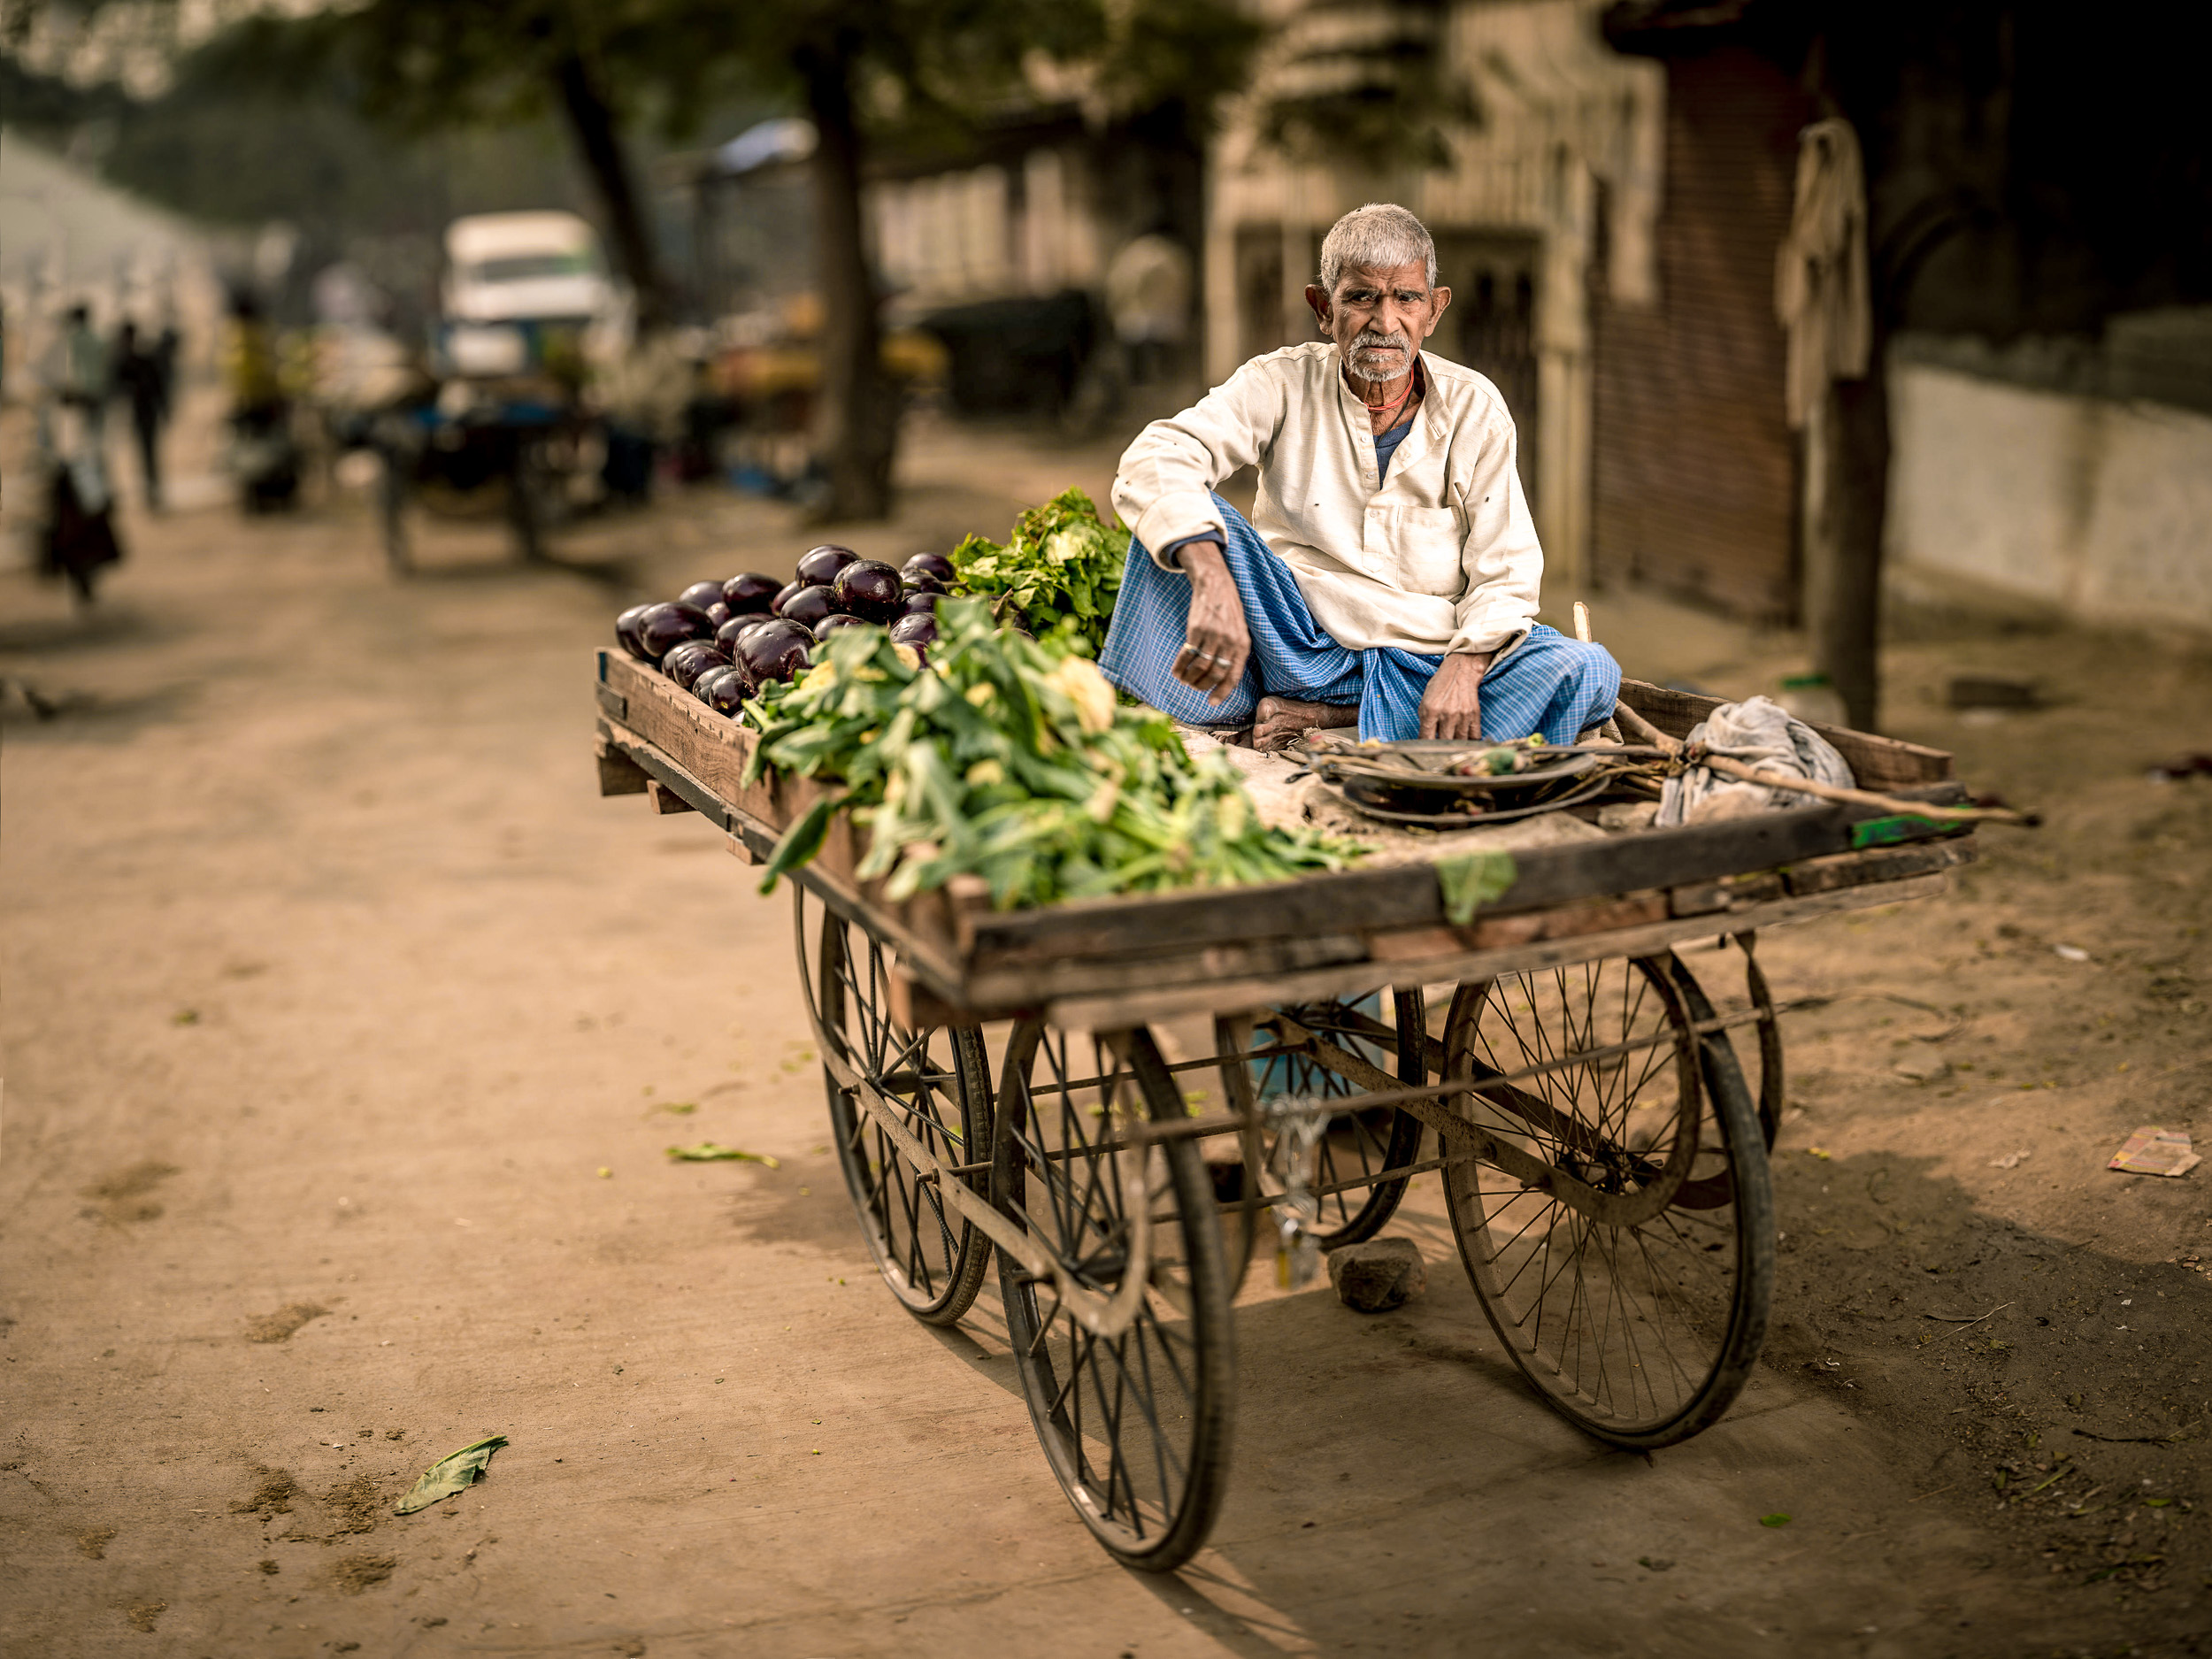
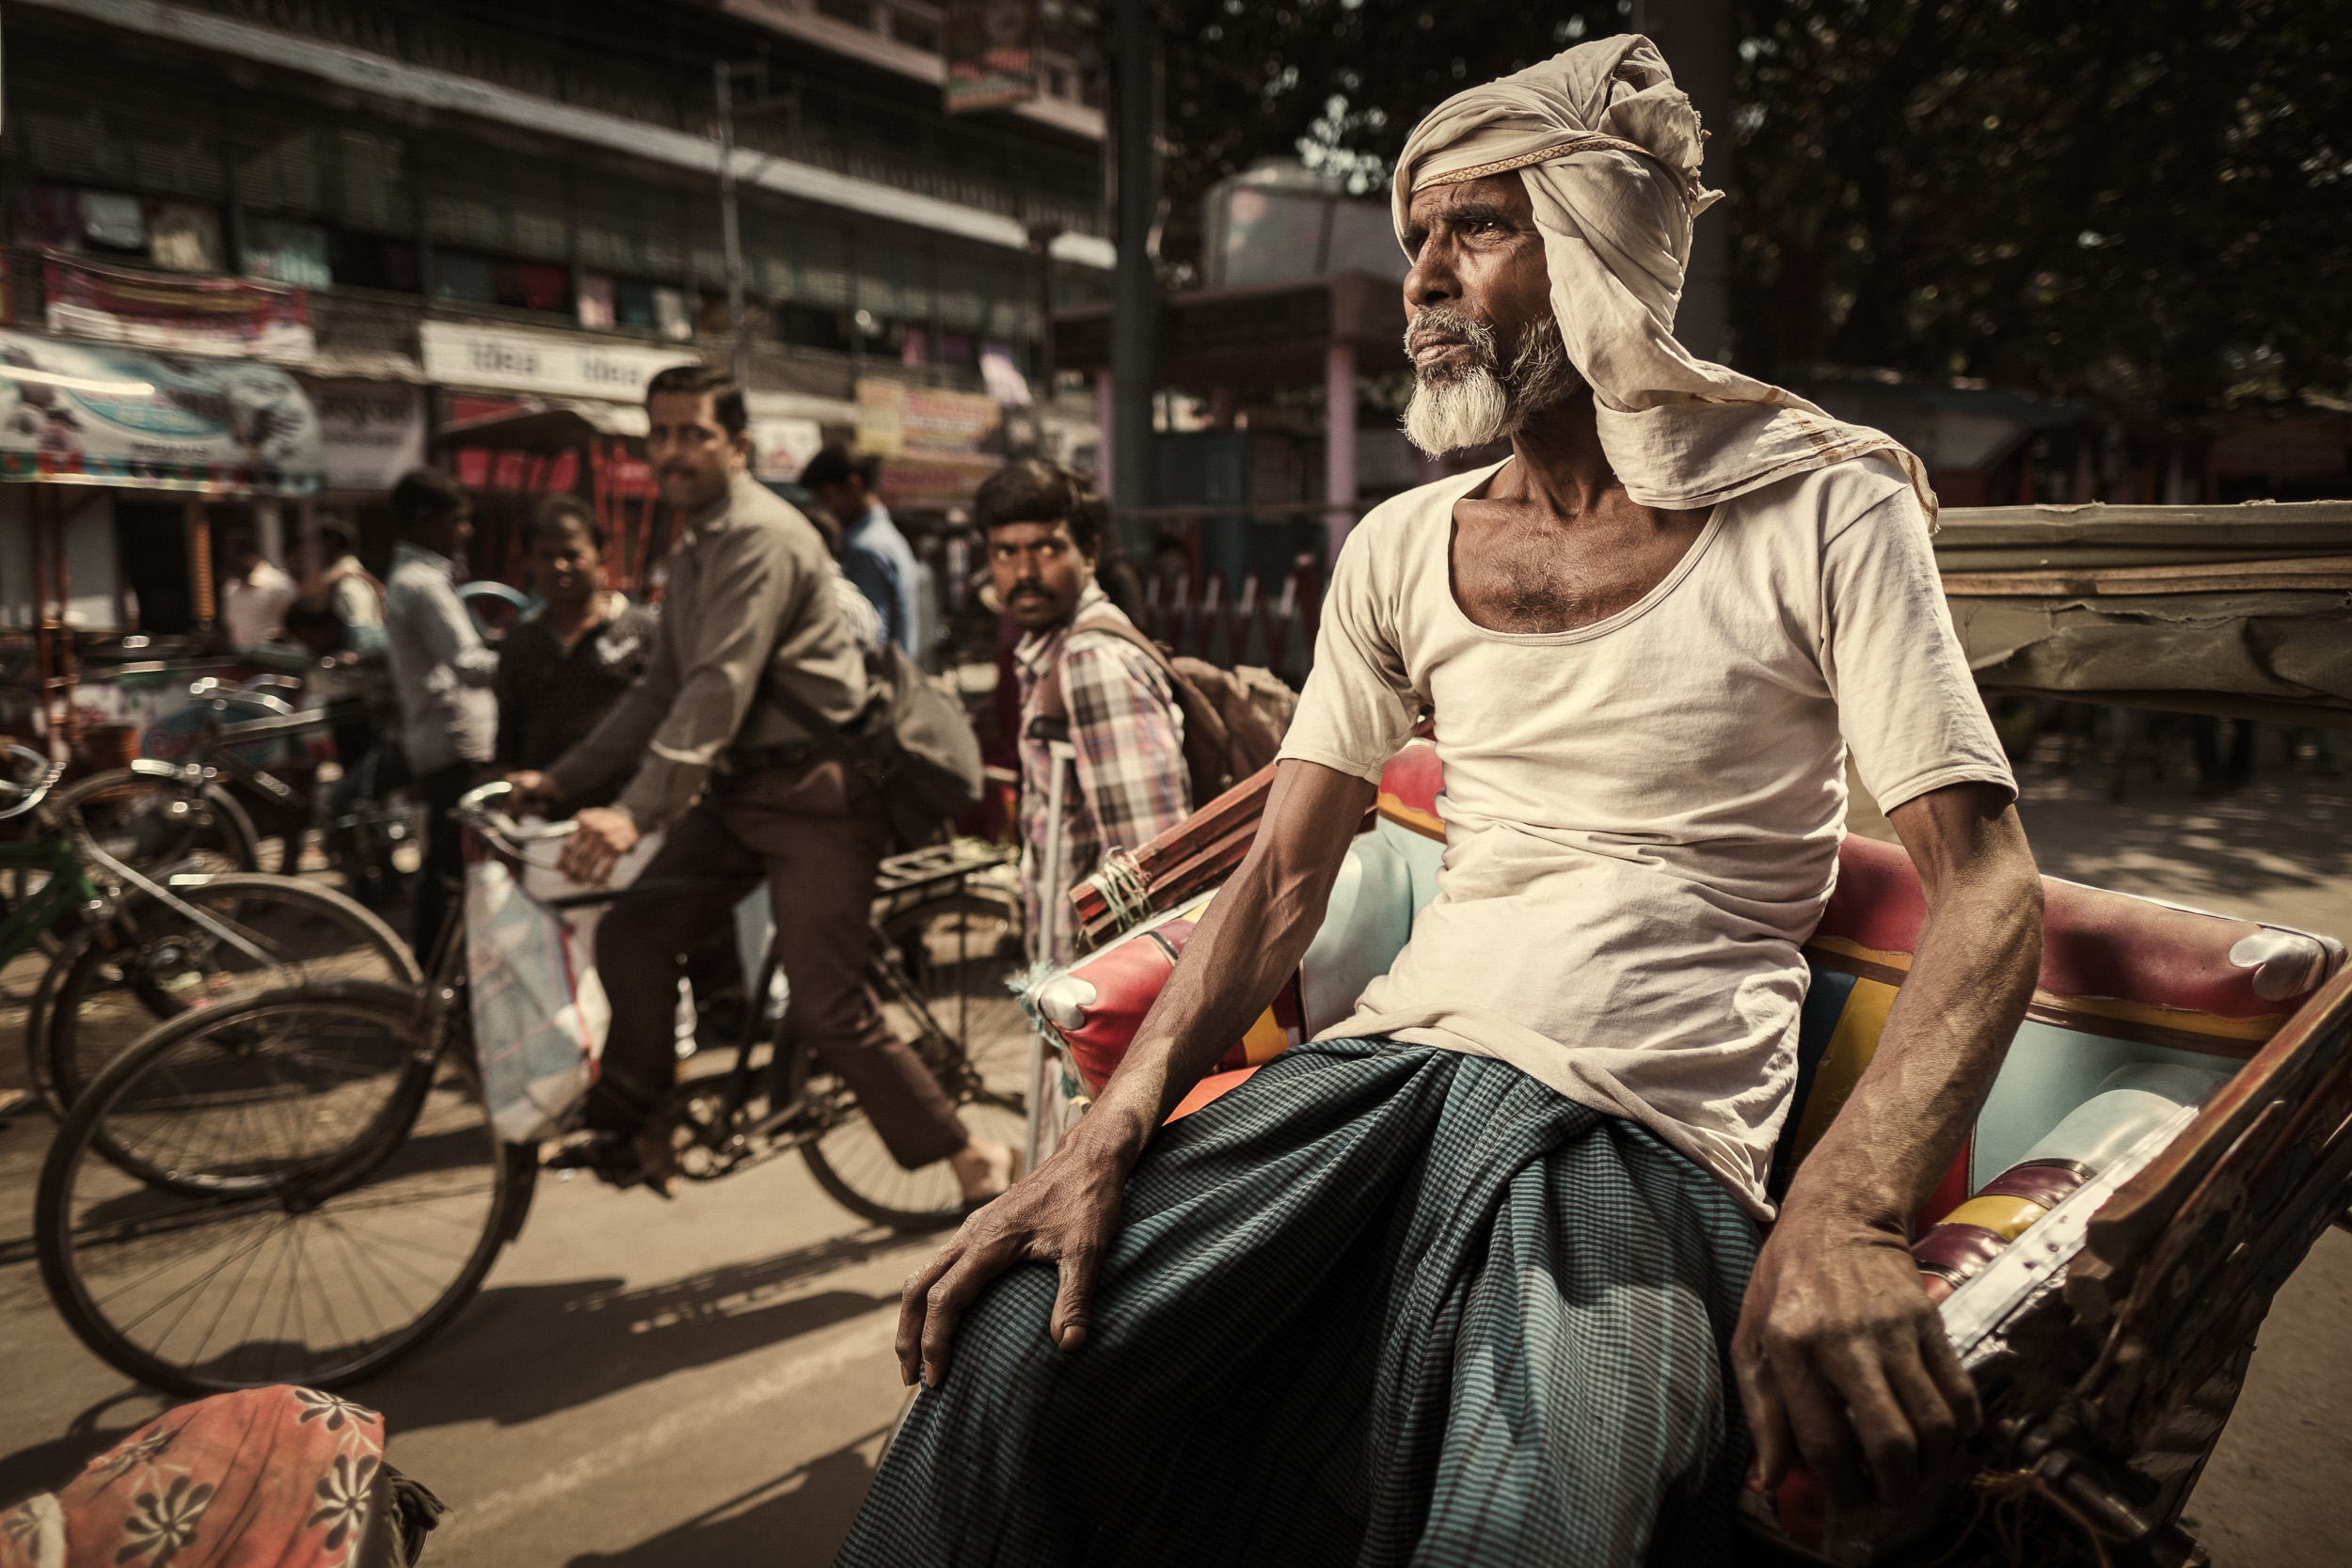
Maybe, after reading this blog post, you're thinking that it might be cool to visit Varanasi, too. It's a fantastic place to hone your portrait skills and there is no better way to do it than through a photo workshop where you'll get all the logistical help you need to create great images yourself. That's why Matt Brandon and yours truly are nose-deep in our agendas trying to set up a new edition of our popular seven day Varanasi Location Portraiture and Lighting Masterclass. If you want to be amongst the first to know about dates and pricing, fill out this form. Below you can see some more images that were made during previous editions of this workshop and some of those came straight out of camera looking pretty close to their final version :-)